

Knowing the right cooked chicken temp is essential for both food safety and great taste. Cooking chicken to 165°F ensures harmful bacteria are destroyed, while proper techniques keep it moist and flavorful. This guide covers everything you need to master perfectly cooked chicken.
Cooking chicken seems simple—until you’re staring at a rubbery, dry breast or, worse, wondering if that slightly pink piece is safe to eat. We’ve all been there. The truth? Getting the perfect cooked chicken temp isn’t just about following a number—it’s about understanding how heat transforms meat, kills bacteria, and locks in juiciness. Whether you’re roasting a whole bird, grilling thighs, or pan-searing cutlets, knowing the right internal temperature is your secret weapon for safe, delicious meals every single time.
Chicken is one of the most versatile proteins in the kitchen, but it’s also one of the riskiest if not handled properly. Undercooked chicken can harbor dangerous bacteria like Salmonella and Campylobacter, which cause foodborne illness. On the flip side, overcooked chicken turns dry, tough, and flavorless. The good news? There’s a sweet spot—a precise cooked chicken temp—that delivers both safety and satisfaction. In this guide, we’ll break down exactly what that temperature is, why it matters, and how to hit it consistently, no matter your cooking method. From thermometer tips to resting tricks, you’ll walk away confident in your chicken-cooking skills.
Key Takeaways
- Safe cooked chicken temp is 165°F: This temperature kills Salmonella, E. coli, and other pathogens instantly, as recommended by the USDA.
- Use a meat thermometer: Visual cues like clear juices or white meat aren’t reliable—only a thermometer gives accurate readings.
- Resting time matters: Let chicken rest 5–10 minutes after cooking; internal temp may rise 5°F, continuing to pasteurize.
- Different cuts vary slightly: Ground chicken must reach 165°F, while whole breasts can be safe at 160°F if held for 3+ minutes.
- Avoid overcooking: Chicken dries out above 170°F—aim for 165°F and use brining or marinating to retain moisture.
- Color isn’t a safety indicator: Chicken can turn white before reaching safe temps, especially in high-heat methods like grilling.
- Restaurant vs. home standards: Professional kitchens often cook to 160°F with time-based safety, but home cooks should stick to 165°F for simplicity.
Quick Answers to Common Questions
What is the safe cooked chicken temp?
The safe internal temperature for cooked chicken is 165°F, as recommended by the USDA. This kills harmful bacteria like Salmonella instantly.
Can I eat chicken at 160°F?
Technically, chicken can be safe at 160°F if held for 3+ minutes, but 165°F is simpler and safer for home cooking. Use a thermometer to confirm.
Is pink chicken always undercooked?
No. Chicken can stay pink due to smoke or nitric oxide, even when fully cooked. Always check the temperature, not the color.
How do I keep chicken from drying out?
Use a thermometer to avoid overcooking, brine before cooking, and let it rest 5–10 minutes after. Pull at 165°F, not higher.
Do I need a meat thermometer?
Yes. Visual cues aren’t reliable. An instant-read thermometer is the only way to know if chicken has reached a safe cooked chicken temp.
📑 Table of Contents
Why Temperature Matters More Than You Think
When it comes to cooking chicken, temperature isn’t just a suggestion—it’s science. Bacteria multiply rapidly in the “danger zone” between 40°F and 140°F. Once chicken hits 165°F, those harmful microbes are destroyed almost instantly. That’s why the USDA and food safety experts universally recommend 165°F as the minimum safe internal temperature for all poultry, including breasts, thighs, wings, and ground chicken.
But safety is only half the story. Temperature also controls texture and moisture. Chicken breast, for example, starts to dry out once it passes 165°F. At 170°F, it’s noticeably tough. At 175°F? You’re basically chewing on rubber. That’s why precision matters. Cooking to the exact right temp ensures you’re not just safe—you’re serving something delicious.
Many home cooks rely on visual cues: “If the juices run clear, it’s done.” But that’s misleading. Chicken can turn white and release clear juices well before reaching 165°F, especially when grilled or roasted at high heat. Conversely, some chicken—especially thighs or dark meat—may retain a slight pink hue even when fully cooked due to myoglobin, a protein that reacts with heat. Relying on sight or touch alone is risky. The only way to know for sure? Use a thermometer.
The Science Behind Safe Cooking
Food safety experts use something called “time and temperature” to determine when bacteria are eliminated. At 165°F, Salmonella is killed in less than a second. But at lower temperatures, you need longer hold times. For example, at 155°F, you need to hold the chicken for about 30 seconds. At 150°F, it takes nearly 5 minutes. That’s why professional kitchens sometimes cook chicken to 160°F—they monitor time carefully. But for home cooks, that’s impractical and risky. Sticking to 165°F simplifies everything: reach the temp, and you’re safe.
It’s also worth noting that freezing and thawing affect safety. Always thaw chicken in the fridge, not on the counter, to avoid bacterial growth. And never rinse raw chicken—it spreads bacteria around your sink and countertops. Pat it dry with paper towels instead.
Common Myths About Chicken Doneness
Let’s bust a few myths that keep circulating:
– **“If it’s white, it’s done.”** Nope. Chicken breast can turn white at around 140°F—still dangerously undercooked.
– **“Pink means raw.”** Not always. Smoked or grilled chicken can stay pink due to nitric oxide reacting with myoglobin, even when fully cooked.
– **“It feels firm, so it’s ready.”** Texture varies by cut and cooking method. A firm breast might still be undercooked in the center.
– **“I’ve eaten undercooked chicken before and been fine.”** Luck isn’t a food safety strategy. One bad batch can make you seriously ill.
The bottom line? Trust the thermometer, not your instincts.
The Magic Number: 165°F Explained
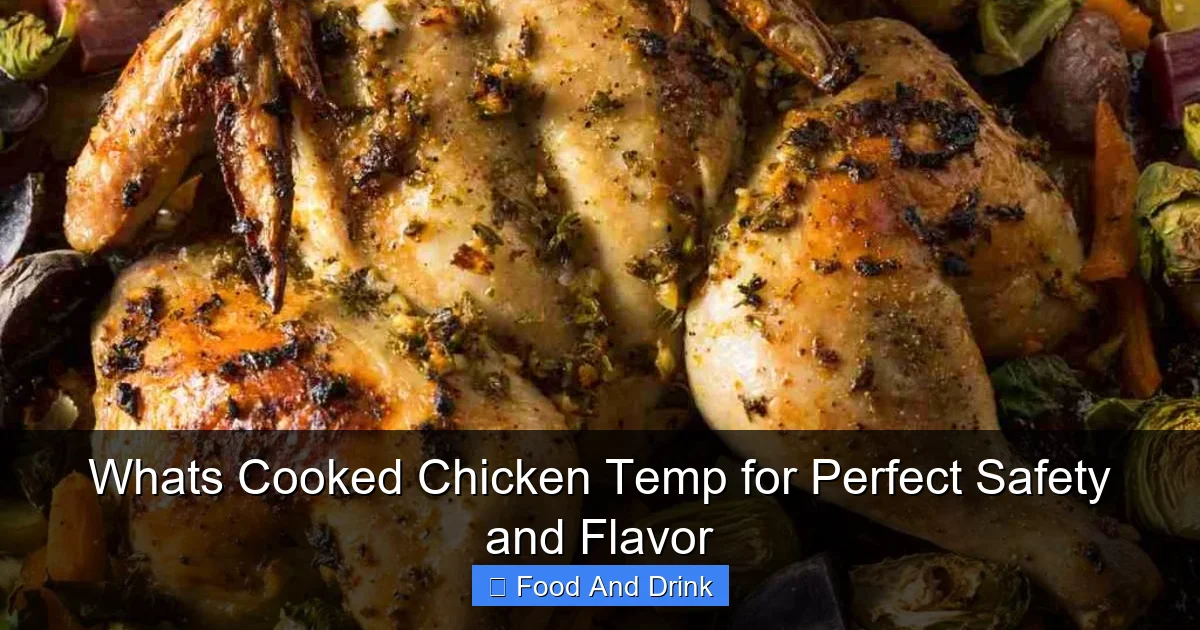
Visual guide about Whats Cooked Chicken Temp for Perfect Safety and Flavor
Image source: izzycooking.com
So, what’s the deal with 165°F? Why this specific number? It’s not arbitrary. The USDA established this standard based on extensive research into how quickly pathogens die at different temperatures. At 165°F, harmful bacteria like Salmonella, E. coli, and Listeria are destroyed in less than a second—making it the gold standard for safety.
But here’s a nuance: you don’t always have to hit 165°F and stop. If you pull chicken off the heat at 160°F and let it rest, the residual heat will carry the internal temperature up to 165°F during resting. This is called “carryover cooking,” and it’s a great way to avoid overcooking. For example, if you roast a chicken breast to 160°F, it may climb to 165°F in 5–10 minutes while resting—perfectly safe and still juicy.
That said, for most home cooks, aiming for 165°F from the start is the safest and simplest approach. It removes guesswork and ensures consistent results.
Exceptions and Special Cases
While 165°F is the rule, there are a few exceptions:
– **Ground chicken:** Must reach 165°F. There’s no margin for error here—bacteria can be mixed throughout the meat during grinding.
– **Whole poultry (roast chicken):** Also 165°F in the innermost part of the breast and thigh, where the meat meets the bone.
– **Boneless, skinless breasts:** Can be safely cooked to 160°F if held for 3+ minutes, but again, 165°F is easier and safer for most.
– **Dark meat (thighs, legs):** Some chefs prefer 170°F–175°F for thighs because the higher fat and collagen content benefit from longer cooking. But 165°F is still safe—just firmer.
Why 165°F Doesn’t Mean “Dry”
A common misconception is that cooking chicken to 165°F automatically makes it dry. That’s only true if you overcook it. The key is precision. Use a thermometer to pull the chicken the moment it hits 165°F—not 170°F, not 175°F. Then, let it rest. During resting, the juices redistribute, keeping the meat moist.
You can also use techniques like brining (soaking in saltwater) or marinating to boost moisture retention. A quick 30-minute brine can make a huge difference in juiciness, even at 165°F.
How to Measure Cooked Chicken Temp Accurately
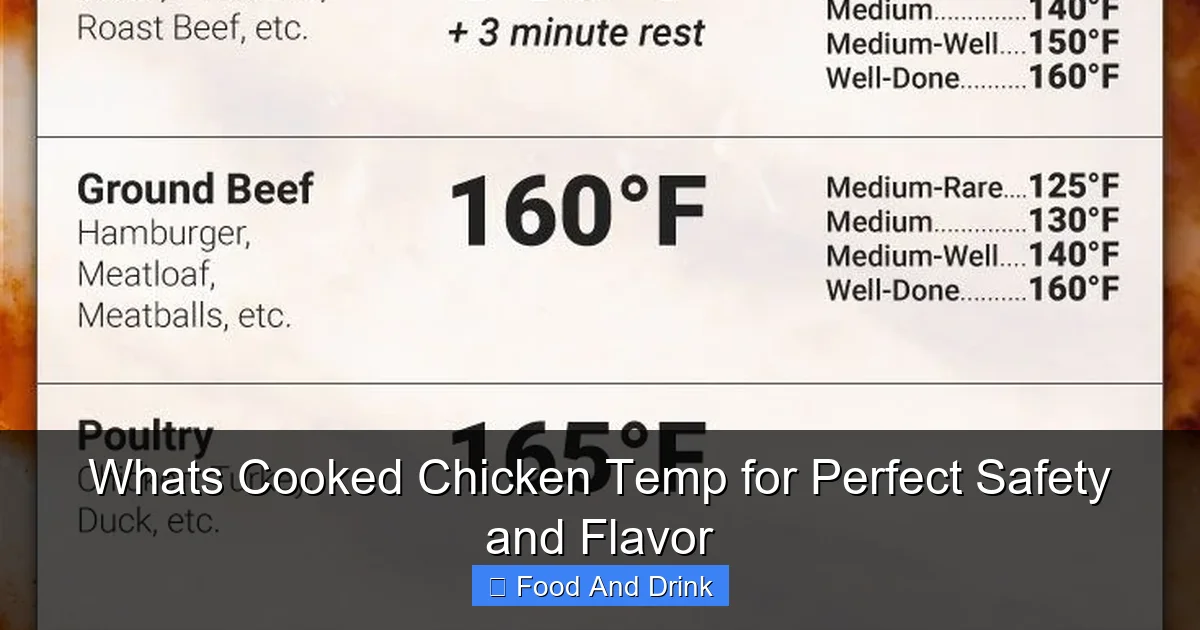
Visual guide about Whats Cooked Chicken Temp for Perfect Safety and Flavor
Image source: i.pinimg.com
Knowing the right temperature is one thing—measuring it correctly is another. A good instant-read thermometer is the most important tool in your chicken-cooking arsenal. Here’s how to use it like a pro.
Choosing the Right Thermometer
Not all thermometers are created equal. For chicken, you need an **instant-read digital thermometer**. These give readings in 2–5 seconds and are accurate to within 1–2°F. Avoid analog dial thermometers—they’re slow and often inaccurate.
Popular brands like Thermapen, ThermoPop, and Lavatools are excellent choices. They’re affordable (most under $50) and last for years. Some even come with backlit displays for grilling at night.
Where to Insert the Thermometer
Placement is critical. Insert the probe into the thickest part of the meat, avoiding bones, fat, and gristle. For chicken breasts, that’s usually the center, about halfway down. For thighs, aim for the middle of the meat, not near the bone.
If you’re cooking a whole chicken, check two spots: the breast (innermost part, near the wing) and the thigh (where it meets the body). Both should read 165°F.
When to Check the Temperature
Don’t wait until the last minute. Start checking chicken about 5–10 minutes before you think it’s done. For example, if a recipe says 25 minutes, check at 15–20 minutes. This prevents overcooking.
Also, check multiple spots if the piece is uneven. A thick breast might have a cold spot in the center, even if the edges look done.
Cleaning and Care
Always clean your thermometer after each use. Wipe the probe with hot, soapy water or a disinfectant wipe. Never submerge the entire unit—only the probe is waterproof on most models.
Calibrate your thermometer regularly by testing it in ice water (should read 32°F) or boiling water (212°F at sea level). This ensures accuracy over time.
Cooking Methods and Their Ideal Temperatures
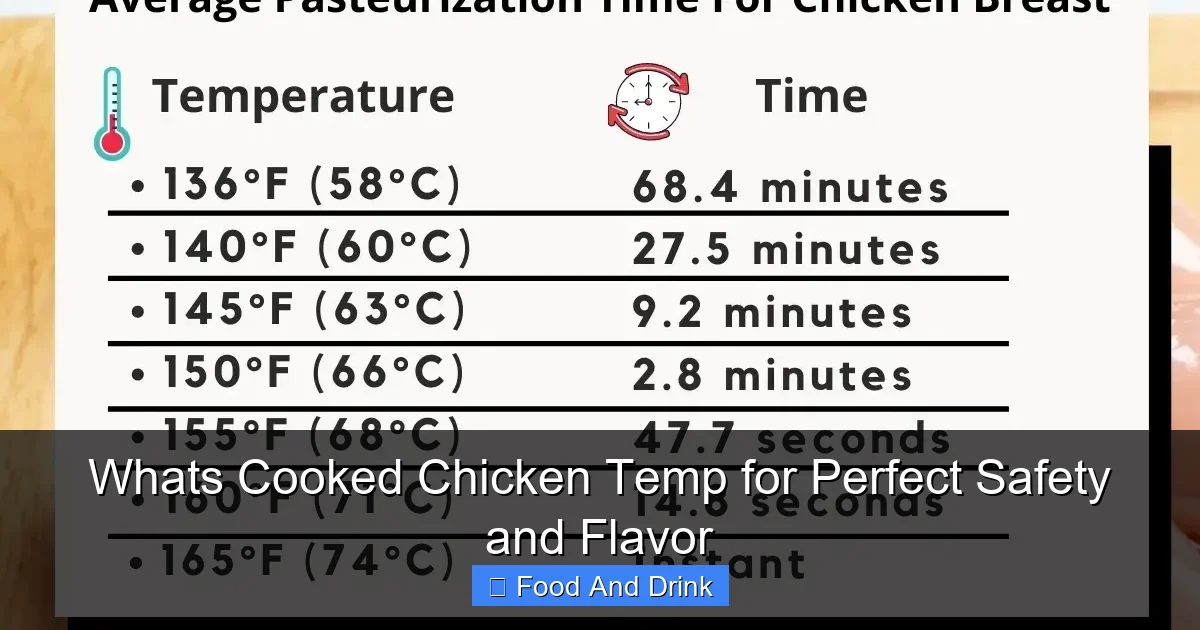
Visual guide about Whats Cooked Chicken Temp for Perfect Safety and Flavor
Image source: foodhow.com
Different cooking methods affect how quickly chicken heats up and how evenly it cooks. Here’s how to hit the perfect cooked chicken temp with popular techniques.
Grilling
Grilling adds great flavor but can dry out chicken if not monitored. Use a two-zone fire: sear over high heat, then move to indirect heat to finish. Check temp frequently—grills can flare up and cook unevenly.
Tip: Pound breasts to even thickness so they cook uniformly. Use a marinade with oil to prevent sticking and add moisture.
Roasting
Roasting a whole chicken or parts in the oven is forgiving and reliable. Set the oven to 375°F–400°F. For whole birds, roast breast-side up. Use a meat thermometer with a probe that stays in the chicken and alerts you when it hits 165°F.
Tip: Let the chicken come to room temperature for 20–30 minutes before roasting. This ensures even cooking.
Pan-Searing and Sautéing
Perfect for cutlets or boneless breasts. Heat oil in a skillet over medium-high heat. Cook 5–7 minutes per side, depending on thickness. Use a thermometer to check the center.
Tip: Don’t move the chicken too soon. Let it develop a golden crust before flipping.
Baking
Baking is great for casseroles, stuffed chicken, or sheet pan meals. Cover with foil for the first half to retain moisture, then uncover to brown.
Tip: Use a baking dish that fits the chicken snugly. Crowding prevents even cooking.
Slow Cooking
Slow cookers are convenient but require caution. Chicken can stay in the danger zone too long if not heated quickly enough. Always ensure the slow cooker reaches 165°F within 2 hours.
Tip: Brown chicken first for better flavor and texture.
Sous Vide
Sous vide gives the most precise control. Cook chicken at 145°F–150°F for 1–4 hours, then sear for color. This method keeps chicken incredibly moist but requires a vacuum sealer and immersion circulator.
Tip: Always finish with a hot sear to kill surface bacteria and add flavor.
Tips for Juicy, Flavorful Chicken Every Time
Hitting 165°F is just the start. To make your chicken truly delicious, try these expert tips.
Brining for Moisture
A simple brine—1/4 cup salt per quart of water—soaked for 30 minutes to 2 hours, dramatically improves juiciness. The salt helps the meat retain water during cooking.
For extra flavor, add sugar, herbs, garlic, or citrus to the brine.
Marinating for Flavor
Marinades with acid (like lemon juice or vinegar) and oil tenderize and flavor chicken. Marinate for at least 30 minutes, up to 24 hours in the fridge.
Avoid over-marinating acidic marinades—they can make chicken mushy.
Resting After Cooking
Let chicken rest 5–10 minutes before slicing. This allows juices to redistribute. Cutting too soon lets all the moisture spill out.
Cover loosely with foil to keep warm.
Seasoning Smart
Season chicken at least 15 minutes before cooking, or even overnight. Salt draws out moisture initially, but it’s reabsorbed, seasoning the meat deeply.
Use a mix of salt, pepper, garlic powder, and paprika for a simple, tasty rub.
Avoid Overcrowding
When pan-searing or roasting, give chicken space. Overcrowding lowers the pan temperature and causes steaming instead of browning.
Cook in batches if needed.
Use a Meat Thermometer Every Time
This can’t be stressed enough. Even experienced cooks get it wrong without a thermometer. Make it a habit.
What to Do If You Overcook or Undercook Chicken
Mistakes happen. Here’s how to fix them.
Undercooked Chicken
If chicken is below 165°F, return it to heat immediately. Finish in the oven, on the grill, or in a skillet. Check temp every minute.
Never eat undercooked chicken—even a small amount can cause illness.
Overcooked Chicken
Dry chicken isn’t unsafe, just unappetizing. Salvage it by slicing thin and serving with sauce—gravy, pesto, or a creamy dressing. Use in soups, salads, or casseroles where moisture is added.
For future batches, use a thermometer and pull at 165°F.
Reheating Safely
Reheat cooked chicken to 165°F. Use the oven, microwave, or stovetop. Add a splash of broth or water to prevent drying.
Never reheat more than once.
Conclusion
Mastering the cooked chicken temp isn’t just about following a rule—it’s about cooking with confidence. By aiming for 165°F, using a reliable thermometer, and applying a few smart techniques, you can serve chicken that’s safe, juicy, and full of flavor every time. Whether you’re a weeknight cook or a weekend grill master, this knowledge transforms your meals. So next time you’re in the kitchen, remember: precision beats guesswork, and great chicken starts with the right temperature.
Frequently Asked Questions
Can I cook chicken to a lower temperature if I monitor time?
Yes, but it’s not recommended for home cooks. At 155°F, you need to hold chicken for 30 seconds; at 150°F, nearly 5 minutes. This requires precise timing and is risky without professional equipment.
Is it safe to eat chicken that’s slightly pink?
Only if it has reached 165°F internally. Pink color can result from smoking or chemical reactions, not undercooking, but temperature is the only reliable indicator.
How long should I let chicken rest after cooking?
Let chicken rest 5–10 minutes. This allows juices to redistribute, keeping the meat moist. Cover loosely with foil to retain heat.
Can I use a regular kitchen thermometer for chicken?
Only if it’s an instant-read digital model. Oven-safe probes are great for roasting, but for quick checks, a fast-reading thermometer is best.
Does brining really make a difference?
Yes. Brining adds moisture and flavor. A 30-minute soak in saltwater can significantly improve juiciness, especially for lean cuts like breasts.
What’s the best way to reheat cooked chicken?
Reheat to 165°F using the oven, microwave, or stovetop. Add a little broth or water to prevent drying, and avoid reheating more than once.


