Using an OXO fat separator is the easiest way to make smooth, rich gravy without excess fat. This handy kitchen gadget lets you pour in pan drippings, let the fat rise, and dispense the flavorful broth from the bottom—leaving the grease behind.
If you’ve ever made gravy from scratch, you know the secret to rich, velvety flavor lies in the pan drippings. But those same drippings are often swimming in melted fat—especially after roasting a turkey or chicken. Skimming the fat with a spoon is messy, time-consuming, and rarely gets it all. That’s where the OXO fat separator comes in. It’s a simple, clever kitchen tool that takes the hassle out of making perfect gravy. Whether you’re a holiday cooking pro or a weeknight dinner warrior, this gadget can transform your cooking game.
The OXO fat separator works on a basic science principle: fat is less dense than water, so it rises to the top when liquids sit still. Instead of trying to spoon off grease or using paper towels (which never work well), you pour your hot drippings into the separator, wait a few minutes, and then dispense the flavorful broth from the bottom—leaving the fat behind. The result? A rich, full-bodied gravy base with none of the greasy aftertaste. And the best part? It’s incredibly easy to use, even if you’ve never tried it before.
Key Takeaways
- Simple Pour-and-Separate Design: The OXO fat separator uses gravity to separate fat from liquid, making it effortless to use.
- Heat-Resistant and Safe: Made from BPA-free, heat-resistant materials, it’s safe for hot liquids straight from the stove.
- Built-In Strainer Included: A removable strainer catches food particles, ensuring a clean, smooth gravy base.
- Easy to Clean and Store: Dishwasher-safe parts and a compact design make cleanup and storage a breeze.
- Perfect for Gravy, Soups, and Stocks: Ideal for Thanksgiving turkey drippings, roast beef juices, or homemade bone broth.
- No More Spooning Fat: Say goodbye to messy skimming—this tool does the work for you in seconds.
- Consistent Results Every Time: Get restaurant-quality gravy at home with minimal effort.
Quick Answers to Common Questions
Can I use the OXO fat separator with boiling liquids?
No, avoid pouring boiling liquids into the separator. Let drippings cool slightly to prevent warping the plastic or causing burns.
Is the OXO fat separator dishwasher safe?
Yes, all parts—including the body, lid, strainer, and spout—are dishwasher safe for easy cleaning.
How long should I let the drippings sit in the separator?
Let them sit for 5 to 10 minutes. This gives the fat enough time to rise to the top for clean separation.
Can I use the separated fat for cooking?
Absolutely! The fat is flavorful and great for roasting vegetables, frying potatoes, or adding richness to soups.
What’s the best way to thicken gravy made with separated drippings?
Use a slurry of flour and water, or cornstarch for a gluten-free option. Whisk into the hot broth until thickened.
📑 Table of Contents
What Is an OXO Fat Separator and Why You Need One
The OXO Good Grips Fat Separator is a kitchen essential designed to remove fat from pan drippings, soups, stews, and stocks. It looks a bit like a small pitcher with a spout near the bottom and a lid on top. But don’t let its simple appearance fool you—this tool is a game-changer for anyone who loves homemade gravy.
Unlike traditional methods like using a spoon or a fat-skimming ladle, the OXO separator uses gravity and time to do the work for you. You pour in your hot liquid, let it sit for a few minutes, and the fat naturally rises to the top. Then, you simply press the spout to release the lean, flavorful liquid from the bottom. The fat stays trapped at the top, ready to be discarded or saved for other uses (like roasting potatoes!).
One of the biggest advantages of the OXO model is its thoughtful design. It features a heat-resistant, BPA-free plastic body that can handle liquids straight from the stovetop. The wide mouth makes pouring easy, and the built-in strainer catches small bits of herbs, spices, or meat particles. Plus, the spout is positioned low on the body, so you get every last drop of flavorful broth without disturbing the fat layer.
Whether you’re making Thanksgiving gravy, a weeknight beef stew, or a rich chicken stock, the OXO fat separator ensures you get the most flavor with the least fat. It’s especially helpful for people watching their fat intake or those who just prefer a cleaner, more refined taste in their sauces.
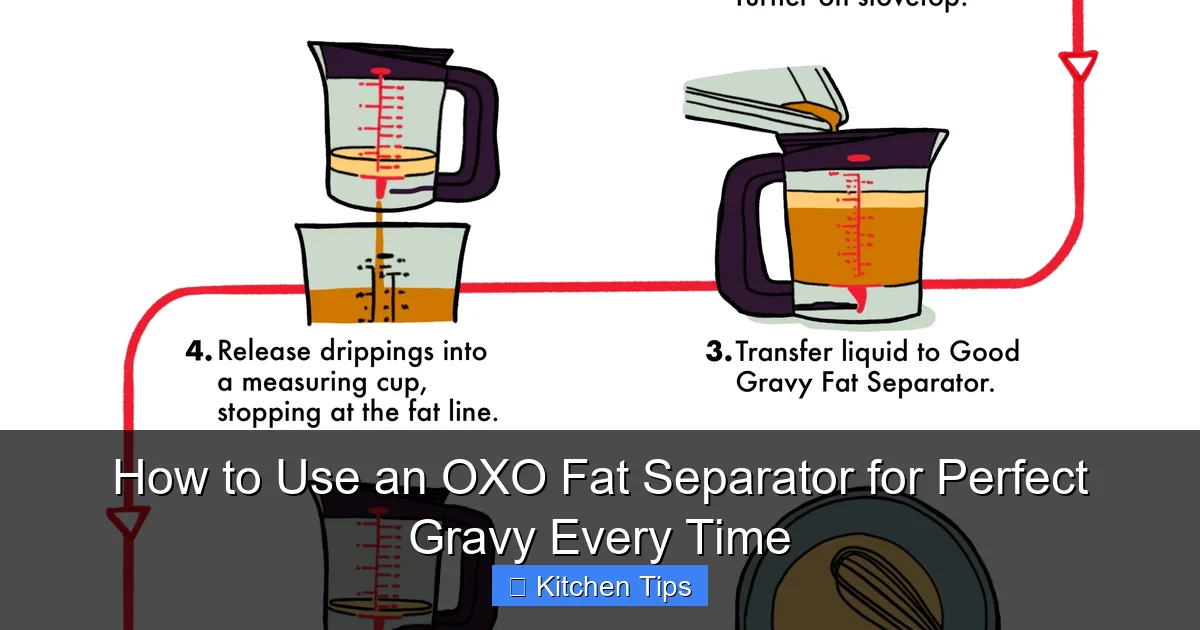
Step-by-Step Guide: How to Use an OXO Fat Separator

Visual guide about How to Use an OXO Fat Separator for Perfect Gravy Every Time
Image source: i.pinimg.com
Using an OXO fat separator is surprisingly simple, even if you’ve never used one before. With just a few easy steps, you’ll have perfectly separated drippings ready for gravy, soup, or sauce.
Step 1: Prepare Your Drippings
After roasting meat—like a turkey, chicken, or roast beef—remove the meat from the pan and place it on a cutting board to rest. Leave the pan drippings in the roasting pan. If there’s a lot of fat pooled on top, you can tilt the pan slightly and use a spoon to remove the excess, but don’t worry about getting it all. That’s what the separator is for.
Let the drippings cool slightly—just enough so they’re not boiling, but still warm. This helps the fat rise more effectively. If the drippings are too hot, they can warp the plastic, so aim for around 160–180°F (70–80°C).
Step 2: Pour into the Separator
Remove the lid from the OXO fat separator and check that the built-in strainer is in place. The strainer sits just inside the top opening and catches any small food particles. This is especially helpful if your drippings have bits of onion, garlic, or herbs.
Slowly pour the warm drippings into the separator. Don’t overfill—leave about an inch of space at the top to prevent spills when the fat rises. The wide mouth makes pouring easy, even from a heavy roasting pan.
Step 3: Let It Sit
Place the separator on a flat, heat-safe surface and let it sit undisturbed for 5 to 10 minutes. During this time, the fat will naturally rise to the top, while the flavorful broth settles at the bottom. The longer you wait, the more complete the separation will be, but even a few minutes makes a big difference.
You’ll start to see a clear layer of yellow fat forming on top, with the darker, richer liquid below. This is exactly what you want.
Step 4: Dispense the Broth
Once the fat has risen, it’s time to dispense the lean liquid. Place a heat-safe container—like a measuring cup or gravy boat—under the spout. The spout is located near the bottom of the separator, so only the fat-free broth will come out.
Press the spout gently to release the liquid. You’ll notice the flow starts strong and then slows as you get closer to the fat layer. Stop dispensing when you see the fat beginning to come through. This ensures you don’t mix fat back into your gravy.
Step 5: Finish Your Gravy
Now that you have rich, fat-free drippings, you’re ready to make gravy. Pour the separated broth into a saucepan and bring it to a simmer. Add a slurry of flour and water (or cornstarch for a gluten-free option) to thicken. Whisk constantly until the gravy reaches your desired consistency.
Season with salt, pepper, and herbs like thyme or rosemary. Taste and adjust as needed. The result is a smooth, flavorful gravy that’s rich without being greasy.
Tips for Best Results with Your OXO Fat Separator
Visual guide about How to Use an OXO Fat Separator for Perfect Gravy Every Time
Image source: oxo.com
To get the most out of your OXO fat separator, keep these practical tips in mind. They’ll help you achieve consistent, professional-quality results every time.
Use It Right After Cooking
For the best separation, use the fat separator while the drippings are still warm. Fat separates more easily when it’s liquid, so don’t let the drippings cool completely. If they do cool and the fat solidifies, gently reheat them in a saucepan before pouring into the separator.
Don’t Shake or Stir
Once you’ve poured the drippings in, avoid moving or shaking the separator. Any disturbance can mix the fat back into the broth, undoing the separation. Let gravity do its job.
Clean Immediately After Use
Fat can harden and become difficult to remove if left to cool inside the separator. Rinse it out with warm water right after use, then wash it in the dishwasher or by hand with warm, soapy water. The removable strainer should be cleaned separately to prevent clogging.
Use the Fat for Cooking
Don’t throw away the separated fat! It’s full of flavor and perfect for roasting vegetables, frying potatoes, or adding richness to soups. Store it in a sealed container in the fridge for up to a week or freeze for longer storage.
Try It with Soups and Stocks
While the OXO separator is a gravy hero, it’s also great for soups and stocks. After making a rich chicken or beef broth, pour it through the separator to remove excess fat. This results in a cleaner, clearer soup that’s easier to digest and tastes more refined.
Cleaning and Maintaining Your OXO Fat Separator

Visual guide about How to Use an OXO Fat Separator for Perfect Gravy Every Time
Image source: i.ytimg.com
One of the best things about the OXO fat separator is how easy it is to clean. Unlike some kitchen gadgets with hard-to-reach parts, this one is designed for quick, hassle-free maintenance.
Dishwasher Safe
The entire separator—body, lid, strainer, and spout—is dishwasher safe. Simply disassemble the parts and place them on the top rack of your dishwasher. The heat and detergent will remove any remaining fat or residue.
Hand Washing Tips
If you prefer to wash by hand, use warm, soapy water and a bottle brush to clean the inside of the spout and the strainer. Pay special attention to the small holes in the strainer, as food particles can get stuck there.
Store Properly
Once clean and dry, reassemble the separator and store it in a cabinet or drawer. Its compact size makes it easy to tuck away, and the clear body lets you see if it’s clean at a glance.
Regular cleaning not only keeps your separator in great condition but also prevents odors and buildup that can affect the taste of your food.
Common Mistakes to Avoid
Even with a simple tool like the OXO fat separator, there are a few common mistakes that can lead to less-than-perfect results. Avoid these pitfalls to get the best performance every time.
Pouring in Boiling Liquid
Pouring extremely hot drippings into the separator can warp the plastic or cause burns. Always let the liquid cool slightly before using. A good rule of thumb is to wait until it’s warm to the touch but not steaming.
Overfilling the Separator
Filling it to the brim can cause spills when the fat rises. Leave at least an inch of space at the top to allow for expansion and movement.
Dispensing Too Quickly
If you press the spout too hard or too fast, you might pull up fat along with the broth. Go slow and stop as soon as you see the fat layer approaching.
Skipping the Strainer
The built-in strainer is there for a reason. Skipping it can lead to clogged spouts and gritty gravy. Always use it, especially with drippings that contain herbs or spices.
Why the OXO Fat Separator Stands Out
There are other fat separators on the market, but the OXO Good Grips model stands out for its thoughtful design and user-friendly features. The wide mouth makes pouring easy, even from a heavy roasting pan. The heat-resistant material ensures safety and durability. And the built-in strainer adds an extra layer of convenience that many competitors lack.
OXO is known for creating kitchen tools that prioritize comfort and function, and this separator is no exception. The ergonomic handle provides a secure grip, and the clear body lets you monitor the separation process. It’s a tool that feels good to use and delivers consistent results.
Whether you’re a seasoned cook or a beginner, the OXO fat separator takes the guesswork out of making great gravy. It’s affordable, reliable, and built to last—making it a worthwhile addition to any kitchen.
Conclusion
Making perfect gravy doesn’t have to be a messy, frustrating process. With the OXO fat separator, you can turn pan drippings into rich, flavorful sauce with minimal effort. It’s simple to use, easy to clean, and delivers consistent results every time.
From Thanksgiving feasts to weeknight dinners, this tool helps you get the most flavor out of your cooking without the excess fat. So the next time you roast a chicken or turkey, don’t reach for a spoon—grab your OXO fat separator and enjoy gravy that’s smooth, rich, and absolutely delicious.
Frequently Asked Questions
How does an OXO fat separator work?
The separator uses gravity to let fat rise to the top of the liquid. You pour in warm drippings, wait a few minutes, then dispense the lean broth from the bottom spout.
Can I use it for soups and stews?
Yes, it’s great for removing fat from soups, stews, and homemade stocks, resulting in a cleaner, more refined flavor.
Is the strainer removable?
Yes, the built-in strainer is removable for easy cleaning and helps catch food particles during pouring.
What size is the OXO fat separator?
The standard model holds about 4 cups (1 liter), which is perfect for most home cooking needs.
Can I use it with bone broth?
Absolutely. It’s ideal for clarifying bone broth by removing excess fat, giving you a clearer, more digestible soup.
Does it work with all types of meat drippings?
Yes, it works with turkey, chicken, beef, pork, and lamb drippings. Any fat-based liquid can be separated using this tool.