Roasting a chicken in the oven is one of the simplest yet most rewarding cooking techniques you can master. With the right preparation, seasoning, and timing, you can achieve golden, crispy skin and tender, juicy meat every single time—no fancy equipment required.
Key Takeaways
- Choose the right chicken: A 3.5 to 4.5-pound whole chicken works best for even roasting and consistent results.
- Pat the chicken dry: Removing moisture from the skin ensures crispy, golden results instead of soggy skin.
- Season generously and evenly: Use salt, pepper, herbs, and aromatics both inside and outside the cavity for maximum flavor.
- Truss the chicken (optional but helpful): Tying the legs together helps the chicken cook evenly and retain its shape.
- Roast at 425°F (220°C) for best results: High heat crisps the skin while keeping the meat moist.
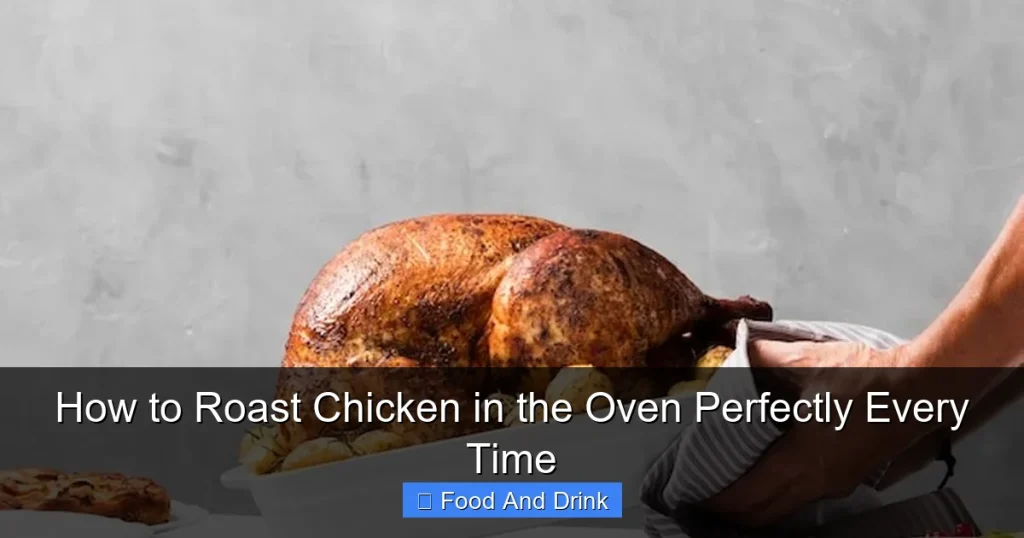
- Use a meat thermometer: Insert it into the thickest part of the thigh (without touching bone)—165°F (74°C) is safe and juicy.
- Let it rest before carving: Resting for 10–15 minutes allows juices to redistribute, ensuring every bite is succulent.
How to Roast Chicken in the Oven Perfectly Every Time
There’s something deeply satisfying about pulling a golden, aromatic roasted chicken out of the oven. The skin is crisp and glistening, the meat is tender and juicy, and the kitchen smells like comfort itself. Roasting a whole chicken might seem intimidating if you’ve never done it before, but the truth is, it’s one of the most straightforward and rewarding cooking methods out there. With a few simple steps and a little know-how, you can roast a chicken in the oven perfectly every time—no chef’s knife skills or sous-vide machines required.
Whether you’re cooking for a weeknight dinner, a holiday feast, or just meal prepping for the week, a well-roasted chicken is a culinary powerhouse. It’s versatile, economical, and packed with flavor. Plus, leftovers can be transformed into soups, salads, sandwiches, or tacos. The key to success lies in understanding the fundamentals: choosing the right bird, proper seasoning, correct oven temperature, and timing. Once you master these basics, you’ll wonder why you ever relied on store-bought rotisserie chickens.
In this guide, we’ll walk you through every step of the process—from selecting your chicken to carving it at the table. We’ll share pro tips, common mistakes to avoid, and even creative ways to flavor your bird. Whether you’re a beginner or a seasoned home cook looking to refine your technique, this comprehensive guide will help you roast a chicken that’s juicy, flavorful, and picture-perfect every single time.
Choosing the Right Chicken
The foundation of a great roasted chicken starts with the bird itself. Not all chickens are created equal, and choosing the right one can make a big difference in texture, flavor, and cooking time.
Size Matters
For most home ovens and standard roasting pans, a whole chicken weighing between 3.5 and 4.5 pounds (1.6 to 2 kg) is ideal. This size roasts evenly, cooks in about 1 to 1.5 hours, and feeds 3–4 people comfortably. Smaller chickens (under 3 pounds) can dry out quickly due to their high surface-area-to-volume ratio, while larger birds (over 5 pounds) may require longer cooking times and risk uneven doneness—cooked on the outside but undercooked near the bone.
If you’re feeding a crowd or love leftovers, consider roasting two smaller chickens instead of one large one. This ensures even cooking and gives you more flexibility with carving and serving.
Fresh vs. Frozen
Fresh chickens are convenient, but frozen chickens can be just as good—if handled properly. If using a frozen chicken, make sure to thaw it completely in the refrigerator (allow 24 hours for every 5 pounds). Never thaw a chicken at room temperature, as this can promote bacterial growth. Once thawed, pat it dry and proceed as usual.
Look for chickens labeled “air-chilled” if possible. Air-chilled chickens are processed without being submerged in water, which helps retain natural flavor and results in better browning and crispier skin.
Organic, Free-Range, or Conventional?
This comes down to personal preference and budget. Organic and free-range chickens are often praised for better flavor and ethical farming practices, but they come at a higher price. Conventional chickens are perfectly fine for roasting and can still yield delicious results with proper seasoning and technique. The most important thing is to choose a chicken that’s fresh, well-handled, and from a reputable source.
Preparing the Chicken for Roasting
Once you’ve selected your chicken, it’s time to get it ready for the oven. Proper preparation is crucial for achieving that golden, crispy skin and juicy interior.
Remove the Packaging and Giblets
Unwrap the chicken and remove any packaging, including the neck and giblets (heart, liver, gizzard) that are often tucked inside the cavity. These can be saved for making stock or discarded. Rinse the chicken under cold water if desired, but many chefs now recommend skipping this step to reduce the risk of cross-contamination in the kitchen.
Pat It Dry—Thoroughly
This step cannot be overstated: dry skin = crispy skin. Use paper towels to pat the chicken dry, inside and out. Moisture is the enemy of browning, so the drier the skin, the better it will crisp up in the oven. Take your time with this step—don’t rush it.
Season Generously
Seasoning is where the magic happens. Start with salt and pepper, but don’t stop there. A well-seasoned chicken is a flavorful chicken.
– Dry brine (optional but recommended): For extra juiciness and flavor, season the chicken with salt (about 1 teaspoon per pound) 12–24 hours before roasting. Place it uncovered on a wire rack in the fridge. This allows the salt to penetrate the meat, enhancing moisture retention and flavor.
– Season under the skin: Gently loosen the skin over the breast and thighs with your fingers (be careful not to tear it). Slide pats of butter, herb butter, or minced garlic underneath. This bastes the meat from within as it roasts.
– Season the cavity: Stuff the cavity with aromatics like halved lemons, garlic cloves, onion wedges, fresh herbs (rosemary, thyme, sage), or even a few sprigs of parsley. These infuse the meat with subtle fragrance as the chicken cooks.
– Season the outside: Rub the entire surface with olive oil, melted butter, or a mix of both. Then season liberally with salt, pepper, and your favorite spices—paprika, garlic powder, onion powder, or a poultry seasoning blend work well.
Truss the Chicken (Optional but Helpful)
Trussing means tying the legs together with kitchen twine and tucking the wings under the body. This isn’t strictly necessary, but it helps the chicken cook more evenly by keeping the limbs close to the body. It also gives the bird a neat, professional appearance.
To truss:
1. Place the chicken breast-side up.
2. Tuck the wing tips behind the shoulders.
3. Cross the legs and tie them together with kitchen twine.
4. If desired, loop the string around the body to secure the legs further.
If you don’t have twine, you can simply tuck the wings and cross the legs without tying—just make sure they’re snug against the body.
Roasting Techniques and Oven Setup
Now that your chicken is prepped and seasoned, it’s time to roast. The way you set up your oven and roasting pan can significantly impact the final result.
Preheat the Oven
Always preheat your oven to 425°F (220°C). A hot oven is essential for achieving crispy skin and even cooking. If you start with a cold oven, the chicken will steam instead of roast, resulting in soggy skin.
Choose the Right Pan
Use a heavy-duty roasting pan or a sturdy baking dish. A pan with low sides allows heat to circulate evenly around the chicken. Avoid using nonstick pans, as they can prevent proper browning.
For even better results, place the chicken on a wire rack set inside the pan. This elevates the bird, allowing hot air to flow underneath and preventing the bottom from steaming. If you don’t have a rack, you can improvise by placing chopped vegetables (carrots, celery, onion) in the bottom of the pan to act as a makeshift platform.
Add Aromatics to the Pan
Scatter chopped vegetables—like carrots, potatoes, onions, and celery—in the bottom of the pan around the chicken. These will absorb the drippings, caramelize slightly, and make a delicious side dish. Plus, they add moisture to the oven environment, helping keep the chicken juicy.
Avoid overcrowding the pan. The vegetables should be in a single layer, not piled high. This ensures even roasting and prevents steaming.
Roasting Time and Temperature
Roast the chicken at 425°F (220°C) for the first 30 minutes, then reduce the heat to 375°F (190°C) for the remainder of the cooking time. This initial high heat jump-starts browning and crisping, while the lower temperature gently finishes cooking the meat without drying it out.
As a general rule:
– A 3.5- to 4.5-pound chicken will take 60 to 90 minutes total.
– Start checking for doneness at the 60-minute mark.
Use a Meat Thermometer
The only reliable way to know if your chicken is done is by using a meat thermometer. Insert the probe into the thickest part of the thigh, avoiding the bone. The internal temperature should reach 165°F (74°C). At this temperature, the meat is safe to eat and still juicy.
If the breast is browning too quickly, you can loosely tent it with aluminum foil halfway through cooking. This prevents over-browning while allowing the thighs to catch up.
Flavor Variations and Creative Twists
Once you’ve mastered the basic roast chicken, the fun begins. There are countless ways to customize your bird to suit your taste or the occasion.
Herb Butter Roast
Mix softened butter with minced garlic, fresh rosemary, thyme, lemon zest, salt, and pepper. Rub this herb butter under the skin and over the outside of the chicken. The butter melts as it roasts, basting the meat and infusing it with rich, aromatic flavor.
Citrus and Spice
Stuff the cavity with lemon and orange halves, then rub the skin with a blend of smoked paprika, cumin, coriander, and olive oil. This creates a bold, slightly smoky flavor profile perfect for a southwestern twist.
Garlic and Herb Crust
Make a paste with minced garlic, Dijon mustard, olive oil, and chopped parsley. Spread it over the chicken before roasting. The mustard helps the garlic adhere and adds a subtle tang, while the herbs create a fragrant crust.
Asian-Inspired Roast
Marinate the chicken (or dry brine) with soy sauce, ginger, garlic, honey, and a splash of rice vinegar. Roast as usual. The result is a savory-sweet bird with a glossy, caramelized exterior.
Mediterranean Style
Rub the chicken with olive oil, then season with oregano, thyme, garlic powder, and a pinch of red pepper flakes. Stuff with lemon, garlic, and fresh oregano. Serve with roasted tomatoes and olives for a complete Mediterranean meal.
Stuffing the Cavity (Not the Bird)
While some people stuff the cavity with bread-based stuffing, this is not recommended for food safety reasons—stuffing inside the bird takes longer to cook and can harbor bacteria. Instead, cook stuffing separately or use the cavity for aromatics only.
Resting and Carving the Chicken
Pulling the chicken out of the oven is exciting, but the job isn’t done yet. Resting and carving are just as important as roasting.
Let It Rest
Once the chicken reaches 165°F (74°C), remove it from the oven and transfer it to a cutting board. Tent it loosely with aluminum foil and let it rest for 10 to 15 minutes. During this time, the juices redistribute throughout the meat, ensuring every bite is moist and flavorful. Skipping this step can result in dry, juice-less chicken.
Carving Like a Pro
Carving a whole chicken doesn’t have to be intimidating. Here’s a simple method:
1. Remove the legs: Hold one leg and pull it away from the body. Cut through the joint where the thigh meets the body. Repeat on the other side.
2. Separate the thigh and drumstick: Cut through the joint between the thigh and drumstick.
3. Remove the wings: Pull each wing away from the body and cut through the joint.
4. Slice the breast: Make a horizontal cut just above the wing joint to remove the entire breast. Slice it into even portions.
5. Optional: Remove the backbone with kitchen shears for stock or discard.
Serve the carved chicken with the roasted vegetables from the pan and a drizzle of the pan juices for extra flavor.
Storing and Reheating Leftovers
Leftover roasted chicken is a gift that keeps on giving. Store it properly to maintain quality and safety.
Refrigeration
Let the chicken cool to room temperature (no more than 2 hours), then store it in an airtight container in the refrigerator. It will keep for 3 to 4 days.
Freezing
For longer storage, freeze the chicken in portions. Remove the meat from the bones, place it in freezer-safe bags or containers, and label with the date. It will keep for up to 3 months. Thaw in the refrigerator before reheating.
Reheating
To reheat, place the chicken in a baking dish, cover with foil, and warm in a 350°F (175°C) oven for 15–20 minutes. Alternatively, use a microwave for quick reheating, but be careful not to overcook and dry it out.
Common Mistakes to Avoid
Even experienced cooks can make mistakes when roasting chicken. Here are a few to watch out for:
– Not drying the skin: Wet skin = soggy skin. Always pat the chicken dry.
– Overcrowding the pan: This traps steam and prevents browning.
– Opening the oven too often: This drops the temperature and slows cooking.
– Cooking at too low a temperature: Low and slow can dry out the meat. Use high heat for crispy skin.
– Not using a thermometer: Guessing leads to undercooked or overcooked chicken.
– Skipping the rest: Resting is non-negotiable for juicy meat.
Conclusion
Roasting a chicken in the oven is a timeless, foolproof technique that delivers impressive results with minimal effort. By choosing the right bird, preparing it properly, and roasting at the correct temperature, you can achieve golden, crispy skin and tender, juicy meat every time. Whether you stick to classic herbs and butter or experiment with global flavors, a perfectly roasted chicken is a centerpiece worth mastering.
With the tips and techniques in this guide, you’re well on your way to becoming a roast chicken pro. So preheat that oven, season with confidence, and get ready to enjoy one of the most satisfying meals in the culinary world. Your family, friends, and taste buds will thank you.
Quick Q&A
How long does it take to roast a 4-pound chicken?
A 4-pound chicken typically takes 70 to 90 minutes to roast at 425°F (220°C) initially, then 375°F (190°C). Always use a meat thermometer to check for doneness.
Can I roast a chicken without a roasting pan?
Yes! Use a baking dish, cast-iron skillet, or even a sheet pan with a wire rack. Just ensure the chicken is elevated and not sitting in juices.
Should I cover the chicken while roasting?
No, covering the chicken traps steam and prevents the skin from crisping. Only tent with foil if the breast is browning too quickly.
Can I stuff the chicken with bread stuffing?
It’s safer to cook stuffing separately. Stuffing inside the bird takes longer to reach a safe temperature and can pose a food safety risk.
How do I know if my chicken is undercooked?
The juices should run clear when you pierce the thigh, and the internal temperature should read 165°F (74°C) on a meat thermometer.
FAQS
What temperature should I roast a chicken at?
Start at 425°F (220°C) for 30 minutes to crisp the skin, then reduce to 375°F (190°C) to finish cooking. This ensures even browning and juicy meat.
Do I need to brine my chicken before roasting?
Brining (wet or dry) enhances moisture and flavor, but it’s not required. A dry brine with salt 12–24 hours ahead is a simple way to improve results.
Can I roast a chicken from frozen?
It’s not recommended. Always thaw the chicken completely in the refrigerator before roasting to ensure even cooking and food safety.
Why is my chicken skin not crispy?
Common causes include not patting the skin dry, roasting at too low a temperature, or covering the chicken. Use high heat and keep the skin dry.
How much chicken per person should I plan for?
Plan for about 1 pound of whole chicken per person. This accounts for bones and ensures everyone gets a good portion of meat.
Can I use a slow cooker instead of the oven?
While possible, slow cookers won’t give you crispy skin. For the best texture and flavor, roasting in the oven is the preferred method.
This is a comprehensive guide about how do you roast chicken in the oven.
Key Takeaways
- Understanding how do you roast chicken in the oven: Provides essential knowledge
Quick Answers to Common Questions
What is how do you roast chicken in the oven?
how do you roast chicken in the oven refers to essential knowledge and techniques.
🎥 Related Video: How to roast a chicken!
📺 Jose.elcook
Roasting a chicken can make or break your reputation at the homies gathering, so show let me show you how to Bust it down!
Frequently Asked Questions
What is how do you roast chicken in the oven?
how do you roast chicken in the oven is an important topic with many practical applications.