Perfectly cooked chicken isn’t just safe—it’s tender, juicy, and full of flavor. Knowing what cooked chicken looks like ensures you avoid undercooked risks and overcooked dryness. From color changes to texture cues, this guide shows you exactly how to spot done chicken every time.
Key Takeaways
- Color shift from pink to white or golden: Raw chicken is pink or grayish; cooked chicken turns white, beige, or lightly golden, with no pink remaining.
- Clear juices, not pink or red: When pierced, juices should run clear—never pink or bloody—indicating safe internal temperature.
- Firm but springy texture: Properly cooked chicken feels firm when pressed but bounces back slightly, unlike mushy raw or dry overcooked meat.
- Internal temperature of 165°F (74°C): Use a meat thermometer to confirm doneness—this is the USDA-recommended safe temperature.
- Shrinking and pulling away from bones: As chicken cooks, it contracts and may pull slightly from the bone, especially in drumsticks or thighs.
- No translucent or rubbery appearance: Undercooked chicken often looks glossy, wet, or rubbery; fully cooked meat appears matte and opaque.
- Even browning on the surface: A golden-brown crust (from searing or roasting) signals Maillard reaction, enhancing flavor and indicating thorough cooking.
Quick Answers to Common Questions
What color should cooked chicken be?
Cooked chicken should be white, beige, or light golden throughout, with no pink or gray areas—even near the bone.
Can chicken be pink and still be safe?
Yes, in rare cases, dark meat may retain a slight pink hue due to myoglobin, but only if the internal temperature has reached 165°F (74°C).
How do I know if chicken is undercooked?
Undercooked chicken looks pink, translucent, or rubbery, and may release pink or bloody juices when pierced.
Is it safe to eat chicken that’s white but feels soft?
Not necessarily. Soft texture can indicate undercooking, especially if the chicken was brined or not fully thawed. Always check the temperature.
Should I cut into chicken to check if it’s done?
No—cutting releases juices and dries out the meat. Use a thermometer or the press test instead.
📑 Table of Contents
- What Does Perfectly Cooked Chicken Look Like? A Visual Guide
- Color Changes: From Pink to Perfectly White
- Juices: Clear Is Key
- Texture and Feel: Firm Yet Tender
- Internal Temperature: The Gold Standard
- Bones and Shrinkage: Subtle Signs of Doneness
- Browning and the Maillard Reaction
- Common Mistakes and How to Avoid Them
- Conclusion: Mastering the Art of Perfectly Cooked Chicken
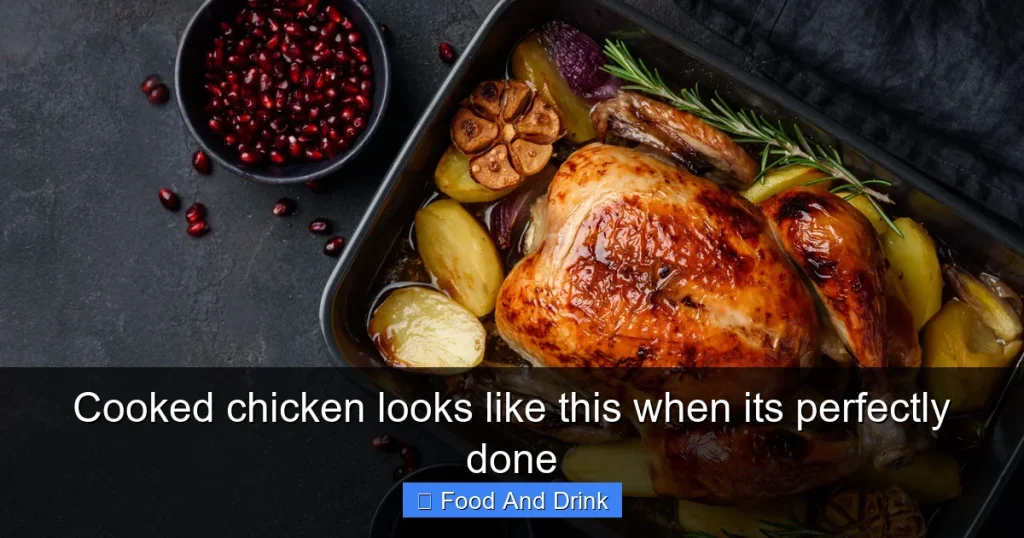
What Does Perfectly Cooked Chicken Look Like? A Visual Guide
You’ve seasoned your chicken, heated the pan, and waited patiently—but how do you really know it’s done? Many home cooks rely on guesswork, timers, or cutting into the meat too early, only to risk foodborne illness or dry, overcooked results. The truth is, cooked chicken looks like a completely different food from its raw state. It transforms in color, texture, and even how it behaves in the pan. Recognizing these changes is the key to serving safe, delicious meals every time.
Whether you’re grilling breasts, roasting a whole bird, or frying thighs, the signs of doneness remain consistent. It’s not just about time—it’s about observation. A perfectly cooked chicken breast should be white throughout, with clear juices and a firm yet tender bite. Dark meat, like thighs and drumsticks, may retain a slightly deeper hue but should never show any pink near the bone. And while color is a helpful clue, it’s not the only one. Texture, temperature, and even the way the meat pulls away from the bone all tell a story of proper cooking.
This guide will walk you through every visual and tactile cue so you can confidently identify when your chicken is perfectly done. No more cutting into the center to check—just reliable, science-backed signs that ensure juicy, safe, and flavorful results. Whether you’re a beginner or a seasoned cook, mastering these details will elevate your poultry game and reduce kitchen stress.
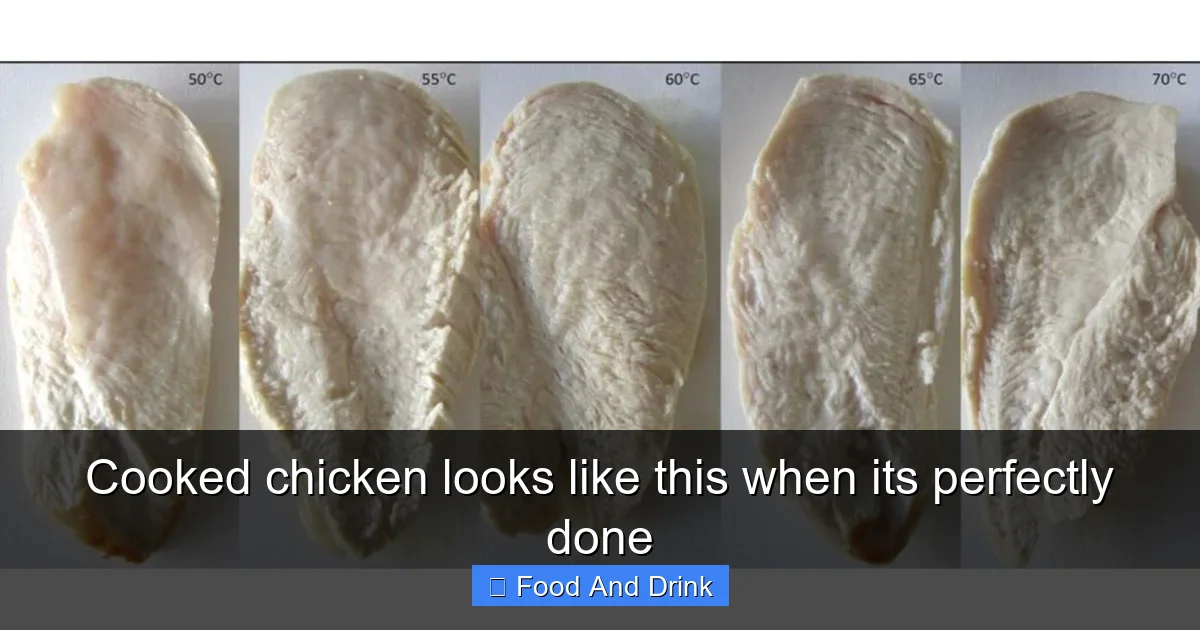
Color Changes: From Pink to Perfectly White
One of the most obvious signs that chicken is cooked is a dramatic shift in color. Raw chicken typically appears pink, grayish-pink, or even slightly translucent, especially in thinner cuts like breasts. As it cooks, the proteins denature and the meat turns opaque, shifting to a white, beige, or light golden hue. This change happens because heat causes the myoglobin in the meat to break down, eliminating the pink pigments associated with rawness.
Visual guide about Cooked chicken looks like this when its perfectly done
Image source: media.cnn.com
Breast Meat: The Whitening Process
Chicken breast is especially prone to overcooking, so watching for color change is crucial. When raw, it’s often pale pink with a slightly glossy surface. As it cooks, the exterior turns white first, followed by the interior. A perfectly cooked breast will be uniformly white or off-white throughout, with no traces of pink—even at the thickest part. If you see any pink streaks or grayish zones, it’s not done yet.
Dark Meat: Thighs and Drumsticks
Dark meat, such as thighs and drumsticks, contains more myoglobin and fat, which means it can retain a slightly deeper color even when fully cooked. However, cooked chicken looks like it has no pink near the bone or in the thickest sections. The meat should be uniformly beige or light brown, with a matte finish. If the area around the bone looks translucent or pink, return it to the heat. Dark meat is more forgiving than breast, so it’s less likely to dry out, but undercooking is still a safety risk.
Wings and Tenders
Chicken wings and tenders cook quickly and can go from undercooked to overcooked in minutes. Raw wings often have a pinkish hue under the skin. When done, the skin should be golden and crisp (if fried or roasted), and the meat beneath should be white with no pink. Tenders, being thin, can brown fast—watch closely to avoid drying them out while ensuring they’re fully white inside.
Juices: Clear Is Key
Another reliable indicator of doneness is the color of the juices that run from the chicken when pierced or pressed. Raw or undercooked chicken often releases pink or reddish juices due to residual blood and myoglobin. As the meat reaches a safe internal temperature, these juices turn clear.
Visual guide about Cooked chicken looks like this when its perfectly done
Image source: lb.stuffyouputinyourmouth.com
How to Test Juices Safely
To check juices without over-handling the meat, use a fork or knife to gently pierce the thickest part of the chicken—usually the center of a breast or the joint of a drumstick. If the liquid that comes out is clear and watery, the chicken is likely done. If it’s pink, red, or cloudy, it needs more time. Avoid cutting large slits, as this can cause moisture loss and dry out the meat.
Why Clear Juices Matter
Clear juices indicate that the proteins have fully coagulated and any harmful bacteria have been destroyed. While this method isn’t as precise as using a thermometer, it’s a useful visual cue, especially when cooking multiple pieces at once. Just remember: clear juices don’t always guarantee 165°F, so combine this test with temperature checks for best results.
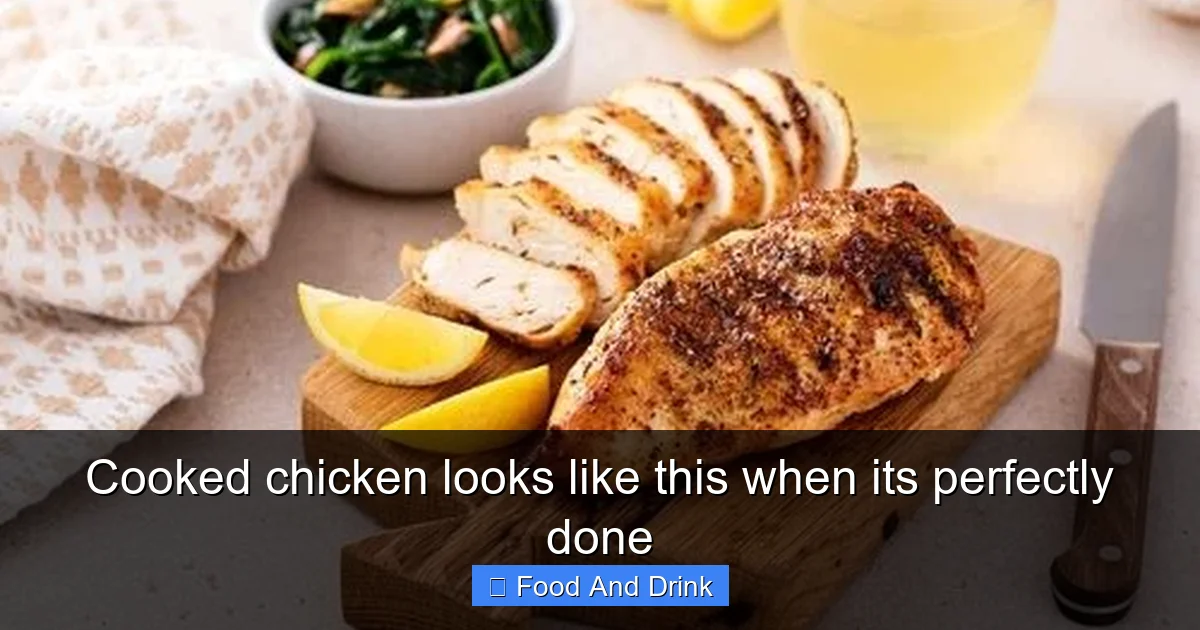
Texture and Feel: Firm Yet Tender
Texture is one of the most telling signs of properly cooked chicken. Raw chicken feels soft, slippery, and slightly rubbery. As it cooks, the proteins tighten and the meat becomes firmer. When done, it should feel springy to the touch—not hard or mushy.
Visual guide about Cooked chicken looks like this when its perfectly done
Image source: media2.popsugar-assets.com
Press Test for Doneness
A simple way to assess texture is the press test. Use tongs or a fork to gently press down on the thickest part of the chicken. If it feels soft and gives easily, it’s undercooked. If it’s very hard and doesn’t yield at all, it’s likely overcooked. Perfectly cooked chicken offers slight resistance and springs back when released—similar to the feel of your cheek when you press it lightly.
Differences by Cut
Different cuts have different ideal textures. Breast meat should be firm but still moist—overcooked breast becomes dry and chalky. Thighs and drumsticks, with more fat and connective tissue, should be tender enough to pull away from the bone with ease. When properly cooked, dark meat will feel juicy and almost fall-off-the-bone, especially if braised or slow-cooked.
Avoiding the Mushy Trap
Sometimes, chicken can look done but still feel slightly mushy—this often happens with pre-marinated or brined chicken, where added moisture can mask doneness. In these cases, rely more on temperature and less on texture alone. Also, be cautious with frozen chicken that hasn’t fully thawed; uneven cooking can leave cold spots that feel soft even when the rest is done.
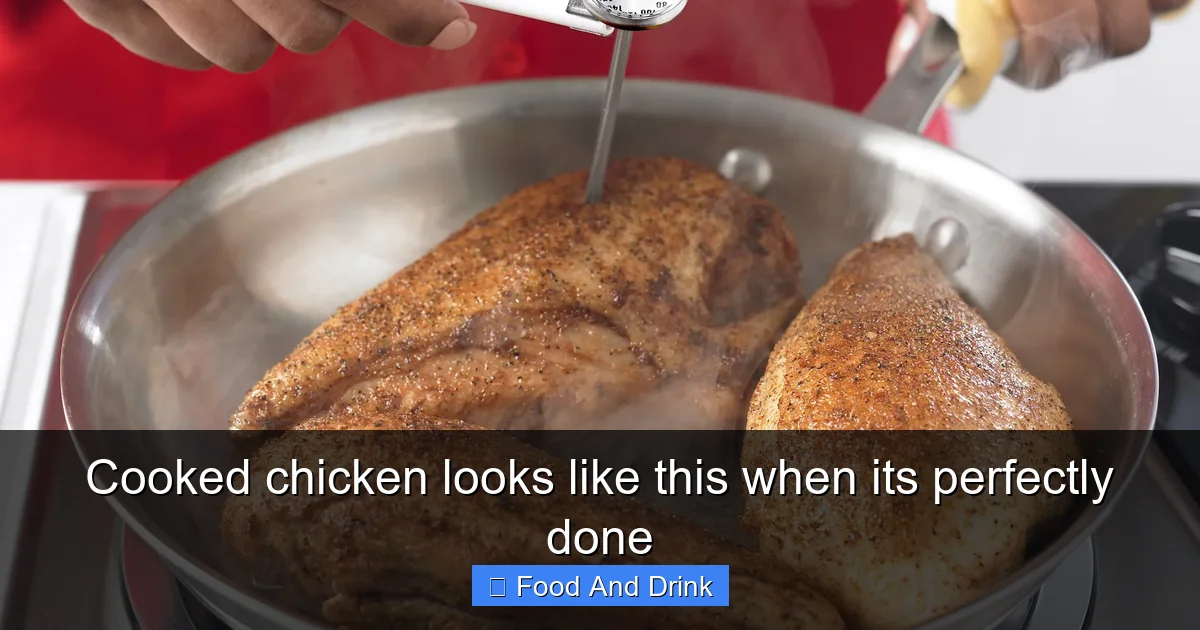
Internal Temperature: The Gold Standard
While visual and tactile cues are helpful, the only way to be 100% certain your chicken is safe is by using a meat thermometer. The USDA recommends cooking all poultry to an internal temperature of 165°F (74°C) to destroy harmful bacteria like Salmonella and Campylobacter.
Where to Insert the Thermometer
For accuracy, insert the thermometer into the thickest part of the meat, avoiding bones, fat, and gristle. In a whole chicken, check the breast and the innermost part of the thigh. For boneless cuts, aim for the center. Digital instant-read thermometers are best—they give a reading in seconds and are widely available.
Temperature vs. Visual Cues
It’s possible for chicken to reach 165°F before it looks fully white, especially if it’s brined or cooked at high heat. Conversely, overcooked chicken may look done but exceed 170°F, leading to dryness. That’s why temperature is the most reliable method. Once you hit 165°F, the chicken is safe—regardless of slight color variations.
Resting Time Matters
After removing chicken from heat, let it rest for 5–10 minutes. During this time, the internal temperature can rise by 5–10°F due to carryover cooking. This means pulling the chicken at 160°F and letting it rest can safely bring it to 165°F. Resting also allows juices to redistribute, keeping the meat moist.
Bones and Shrinkage: Subtle Signs of Doneness
As chicken cooks, it naturally shrinks and pulls away from the bone. This is due to the contraction of muscle fibers and the rendering of fat. While not as obvious as color or temperature, these physical changes are useful indicators—especially for bone-in cuts.
Pulling Away from the Bone
In drumsticks and thighs, watch for the meat to retract slightly from the bone ends. The skin may also tighten and become taut. If the meat still clings tightly to the bone and looks wet or glossy, it likely needs more time. This sign is particularly helpful when roasting a whole chicken—legs should move freely in the joint when done.
Shrinkage and Fat Rendering
You’ll notice chicken pieces shrink as they cook, especially if skin-on. The fat beneath the skin melts and renders out, causing the meat to compact. This is normal and actually desirable—it concentrates flavor and improves texture. However, excessive shrinkage in breast meat can signal overcooking, so monitor closely.
Whole Chicken Cues
When roasting a whole bird, check that the legs wiggle easily and the skin is golden and crisp. The internal temperature should read 165°F in both the breast and thigh. The juices should run clear when the thigh is pierced. These combined signs ensure even cooking throughout.
Browning and the Maillard Reaction
A golden-brown crust on the surface of chicken isn’t just for looks—it’s a sign of the Maillard reaction, a chemical process that occurs when amino acids and sugars react under high heat. This creates complex flavors and aromas, making the chicken taste richer and more satisfying.
Why Browning Matters
While browning doesn’t guarantee the inside is cooked, it often correlates with proper heat exposure. A well-seared chicken breast or crispy-skinned roast indicates that the exterior has reached a high enough temperature to kickstart the Maillard reaction—usually above 285°F (140°C). This doesn’t replace internal temperature checks, but it’s a good visual cue that the cooking process is on track.
Achieving Even Browning
To get a uniform golden color, pat the chicken dry before cooking—moisture prevents browning. Use medium-high heat and avoid overcrowding the pan, which can cause steaming instead of searing. For oven roasting, start at a high temperature (425°F/220°C) to crisp the skin, then reduce to finish cooking.
Darker Doesn’t Mean Overcooked
Some browning is healthy and flavorful, but charred or blackened spots can indicate burnt fat or sugar. These areas may taste bitter and should be trimmed off. Aim for a deep golden to light brown color—crisp but not burnt.
Common Mistakes and How to Avoid Them
Even experienced cooks make mistakes when judging chicken doneness. Here are the most common pitfalls and how to steer clear of them.
Relying Solely on Time
Recipe timers are guidelines, not guarantees. Chicken thickness, starting temperature (frozen vs. thawed), and heat source all affect cooking time. A thin cutlet may be done in 6 minutes, while a thick breast needs 12. Always check with a thermometer or visual cues.
Cutting Into the Meat Too Early
Cutting into chicken to check doneness releases precious juices, leading to dryness. Instead, use a thermometer or the press test. If you must cut, do it at the end and make a small incision.
Ignoring Carryover Cooking
Chicken continues to cook after removal from heat. Pull it at 160°F and let it rest—this prevents overcooking and ensures safety. This is especially important for large roasts or whole birds.
Not Letting Chicken Rest
Resting allows juices to settle. Skipping this step means sliced chicken will leak moisture onto the plate. Let it rest tented with foil for 5–10 minutes before serving.
Using the Wrong Thermometer
Oven-safe dial thermometers can lag in response time. Instant-read digital thermometers are faster and more accurate. Keep one in your kitchen drawer for quick checks.
Conclusion: Mastering the Art of Perfectly Cooked Chicken
Knowing what cooked chicken looks like when it’s perfectly done is a skill that combines observation, touch, and science. From the shift in color to the clarity of juices, the firmness of texture, and the precision of temperature, each cue plays a role in ensuring your chicken is both safe and delicious. While no single method is foolproof, using a combination of these signs gives you the confidence to cook poultry perfectly every time.
Remember, the goal isn’t just to avoid undercooking—it’s to preserve moisture, flavor, and tenderness. Overcooked chicken may be safe, but it’s often dry and unappealing. By paying attention to how the meat changes during cooking, you can strike the ideal balance between safety and taste. Whether you’re grilling, baking, frying, or roasting, these visual and tactile guides will help you achieve juicy, golden, and perfectly cooked chicken that your family will love.
So next time you’re in the kitchen, don’t guess—observe. Look for the white flesh, feel for the springy texture, check for clear juices, and confirm with a thermometer. With practice, you’ll develop an instinct for doneness that goes beyond recipes and timers. And that’s the secret to great cooking: not just following steps, but understanding what’s happening on a deeper level. Happy cooking!
Frequently Asked Questions
How long does it take to cook chicken?
Cooking time varies by cut and method. Boneless breasts take 6–8 minutes per side when pan-seared, while a whole chicken may need 1.5–2 hours in the oven. Always use a thermometer to confirm doneness.
Can I eat chicken if it’s slightly pink near the bone?
If the internal temperature has reached 165°F (74°C), it’s safe—even if slightly pink. However, if the meat is translucent or the juices are pink, continue cooking.
Why does my chicken look done but still taste raw?
This can happen with brined or marinated chicken, where added moisture affects texture. Always verify with a thermometer to ensure safety.
What’s the best way to check chicken temperature?
Use a digital instant-read thermometer inserted into the thickest part, avoiding bone. Aim for 165°F (74°C) for all poultry.
Can overcooked chicken make you sick?
Overcooked chicken is safe to eat but may be dry and tough. It won’t cause illness, but it’s less enjoyable. Prevent overcooking by monitoring temperature and resting time.
Should I wash raw chicken before cooking?
No. Washing raw chicken can spread bacteria around your kitchen. Cooking to 165°F (74°C) kills all harmful pathogens safely.