
Knowing when roast chicken is done by temperature ensures it’s safe to eat and perfectly juicy. Use a meat thermometer to check internal temps—165°F (74°C) in the thickest part—for reliable results every time.
Key Takeaways
- Use a meat thermometer: The most accurate way to check if roast chicken is done is by measuring internal temperature, not time or color.
- Target 165°F (74°C): This is the USDA-recommended safe internal temperature for poultry, reached in the thickest part of the thigh, avoiding bone.
- Check multiple spots: Test the breast, thigh, and wing joint to ensure even cooking, especially in whole birds.
- Rest before carving: Let the chicken rest for 15–20 minutes after roasting; carryover cooking can raise the temperature by 5–10°F.
- Bone-in vs. boneless matters: Bone-in chicken takes longer and may need lower oven temps to cook evenly without drying out.
- Oven accuracy counts: Calibrate your oven and use an oven-safe thermometer to avoid under- or overcooking.
- Visual cues aren’t enough: Juices running clear or golden skin can be misleading—always verify with a thermometer.
Quick Answers to Common Questions
What temperature should roast chicken be when done?
The USDA recommends an internal temperature of 165°F (74°C) in the thickest part of the thigh, avoiding bone, to ensure roast chicken is safe to eat.
Can I eat roast chicken at 160°F?
Yes, if it rests properly. Chicken pulled at 160°F (71°C) will reach 165°F during resting due to carryover cooking, making it safe and juicy.
How long does it take to roast a 4-pound chicken?
At 375°F (190°C), a 4-pound chicken typically takes 1 hour 15 minutes to 1 hour 30 minutes, but always check with a thermometer, not time.
Is it safe to eat pink chicken if it’s 165°F?
Yes. Some chicken, especially thighs, may retain a pink hue even when fully cooked. As long as the internal temperature is 165°F, it’s safe.
Should I cover roast chicken while cooking?
No. Covering traps steam and prevents crispy skin. Roast uncovered for best results, and only tent with foil if the skin is browning too fast.
📑 Table of Contents
- Why Temperature Matters More Than Time When Roasting Chicken
- The Magic Number: 165°F (74°C) Explained
- How to Use a Meat Thermometer Like a Pro
- Roasting Methods and How They Affect Doneness
- The Importance of Resting Your Roast Chicken
- Troubleshooting Common Roast Chicken Problems
- Final Tips for Perfect Roast Chicken Every Time
Why Temperature Matters More Than Time When Roasting Chicken
Roasting a chicken seems simple—toss it in the oven, wait, and enjoy. But if you’ve ever cut into a bird only to find dry breast meat and undercooked thighs, you know it’s not always that easy. The secret to perfect roast chicken? It’s not about how long it cooks, but how hot it gets inside.
Chickens come in all sizes. A small 3-pound bird cooks faster than a hefty 6-pounder. Even two chickens of the same weight can vary due to breed, age, or how they were raised. That’s why relying on cooking time alone is risky. You might end up with a dry, overcooked bird or, worse, one that’s unsafe to eat.
The real key is internal temperature. Using a meat thermometer takes the guesswork out of roasting. It tells you exactly when the chicken has reached the safe minimum temperature to kill harmful bacteria like salmonella, while still keeping the meat tender and juicy. Think of it like a GPS for your roast—guiding you to the perfect destination every time.
And here’s a bonus: when you cook by temperature, you can experiment with different methods—high-heat roasting, slow roasting, spatchcocking—and still get consistent results. Whether you’re cooking for a holiday dinner or a weeknight meal, knowing the right temperature means you’ll never have to wonder, “Is it done yet?”
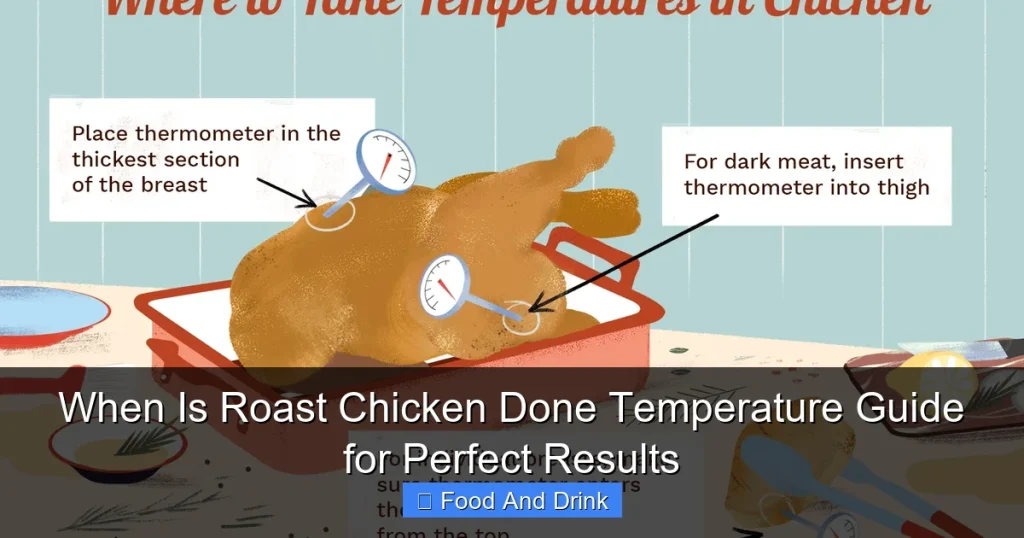
The Magic Number: 165°F (74°C) Explained
Visual guide about When Is Roast Chicken Done Temperature Guide for Perfect Results
Image source: realsimple.com
So what’s the magic number? For roast chicken, it’s 165°F (74°C). This is the temperature recommended by the USDA and food safety experts as the minimum safe internal temperature for poultry. At this point, harmful bacteria are destroyed, and the chicken is safe to eat.
But don’t panic if your chicken hits 165°F and seems dry. That’s a common misconception. The key is where you measure the temperature. You want to check the thickest part of the meat—usually the thigh—without touching the bone. Bone conducts heat differently and can give a false reading.
For example, if you stick the thermometer into the breast and it reads 165°F, that part might already be overcooked. Breast meat is lean and dries out quickly. But the thigh, which has more fat and connective tissue, stays juicy even at higher temps. That’s why many chefs actually prefer to cook chicken to 170–175°F (77–80°C) in the thigh for optimal texture.
Still, 165°F is the safety baseline. Once your chicken reaches that temperature in the thickest part, it’s safe. But for the best eating experience, consider pulling it out a few degrees early and letting it rest. More on that in a moment.
Why 165°F Is the Safety Standard
The 165°F rule isn’t arbitrary. It’s based on scientific research showing that salmonella and other pathogens in poultry are destroyed almost instantly at this temperature. Even if the chicken was contaminated, cooking it to 165°F makes it safe to eat.
Some people worry about undercooking, especially with whole birds. But modern poultry farming and proper handling have made chicken safer than ever. As long as you cook it to the right temperature and avoid cross-contamination in the kitchen, you’re in the clear.
That said, if you’re cooking for someone with a weakened immune system—like an elderly person, young child, or pregnant woman—you might want to go a few degrees higher for extra peace of mind. But for most people, 165°F is more than sufficient.
Breast vs. Thigh: Different Zones, Different Needs
Here’s a truth most recipes don’t tell you: the breast and thigh of a chicken cook at different rates. The breast is lean and cooks fast. The thigh is darker, fattier, and takes longer. If you cook the whole bird until the breast hits 165°F, the thigh might still be undercooked. But if you wait for the thigh to reach 165°F, the breast could be dry.
So what’s the solution? Many experienced cooks aim for a slightly higher temperature in the thigh—around 170–175°F (77–80°C)—while keeping the breast around 160–165°F (71–74°C). This balance ensures both parts are safe and tender.
One trick is to use a dual-probe thermometer. Insert one probe into the breast and one into the thigh. That way, you can monitor both zones at once and pull the chicken when both are in the ideal range.
Another option is to roast the chicken at a lower temperature (like 325°F/160°C) for a longer time. This gentle heat helps the meat cook more evenly, reducing the gap between breast and thigh doneness.
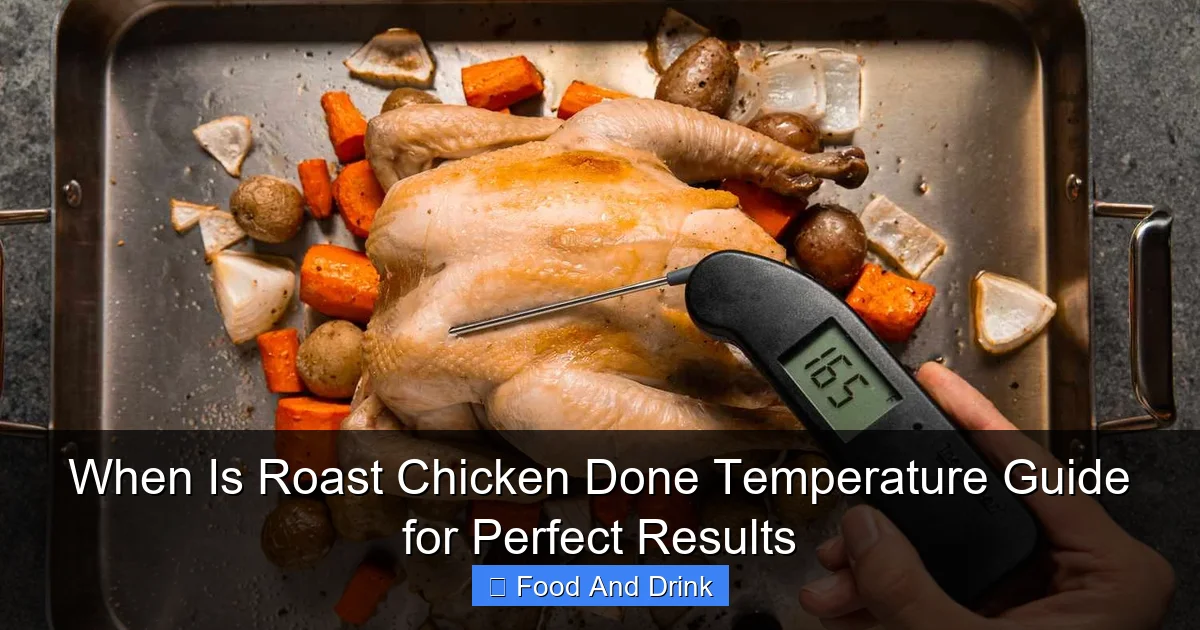
How to Use a Meat Thermometer Like a Pro
Visual guide about When Is Roast Chicken Done Temperature Guide for Perfect Results
Image source: i.pinimg.com
If you don’t already own a meat thermometer, now’s the time to get one. It’s the single most important tool for perfect roast chicken. But not all thermometers are created equal, and using them correctly makes all the difference.
There are two main types: instant-read and leave-in. Instant-read thermometers are great for quick checks—you insert them, wait a few seconds, and get a reading. They’re perfect for checking doneness at the end of cooking. Leave-in thermometers, also called probe thermometers, stay in the meat while it cooks. They’re ideal for monitoring temperature over time, especially with large roasts.
For roast chicken, a leave-in thermometer is your best friend. Insert the probe into the thickest part of the thigh, making sure it doesn’t touch the bone. Set the alarm for 165°F (74°C), and you’ll know exactly when the chicken is done—no guesswork, no cutting into the meat and losing juices.
Where to Insert the Thermometer
Placement is everything. If you stick the thermometer in the wrong spot, you’ll get a misleading reading. Here’s where to aim:
– **Thigh:** Insert the probe into the center of the thigh, near where it meets the body. Avoid the bone—it can give a false high reading.
– **Breast:** If you’re checking the breast, go for the thickest part, about halfway down from the top. Again, stay away from the bone.
– **Wing joint:** Some cooks check the wing joint, where the wing meets the body. If the thermometer slides in easily and reads 165°F, the chicken is likely done.
For whole chickens, the thigh is the most reliable spot. It’s the last part to cook, so when it hits 165°F, the rest of the bird is safe too.
Common Thermometer Mistakes to Avoid
Even with the best tool, mistakes happen. Here are a few to watch out for:
– **Touching the bone:** Bone heats up faster than meat. If your probe touches it, you’ll get a higher reading than the actual meat temperature.
– **Checking too early:** Don’t test the chicken right after it goes in the oven. Wait until it’s close to done—usually in the last 15–20 minutes.
– **Using a dirty probe:** Always clean your thermometer between uses. Bacteria can transfer from raw meat to cooked food.
– **Relying on old thermometers:** Over time, thermometers can lose accuracy. Test yours in ice water (should read 32°F/0°C) or boiling water (212°F/100°F at sea level) to make sure it’s working right.
Recommended Thermometers for Roast Chicken
Not sure which thermometer to buy? Here are a few top picks:
– **ThermoWorks Thermapen ONE:** Fast, accurate, and easy to use. Great for instant readings.
– **Maverick ET-733:** Dual-probe leave-in thermometer with wireless remote. Perfect for monitoring breast and thigh at once.
– **Lavatools Javelin PRO:** Affordable instant-read with a large display and quick response time.
Investing in a good thermometer pays off in juicier, safer chicken—and fewer kitchen disasters.
Roasting Methods and How They Affect Doneness
Visual guide about When Is Roast Chicken Done Temperature Guide for Perfect Results
Image source: simplyrecipes.com
Not all roast chickens are created equal. The way you cook your bird—oven temperature, roasting position, even the pan you use—can affect how evenly it cooks and when it’s done. Let’s break down the most popular methods and how they impact temperature.
High-Heat Roasting (425–450°F / 220–230°C)
This method is all about crispy skin and fast cooking. High heat browns the skin quickly, sealing in juices and giving you that golden, crackly exterior everyone loves. But it can be tricky. The outside cooks fast, while the inside—especially the thickest parts—lags behind.
To avoid overcooking the breast while waiting for the thigh to reach 165°F, many chefs use a technique called “reverse searing.” Start the chicken at a lower temperature (like 250°F/120°C) to cook it gently, then finish it at high heat for the last 15–20 minutes to crisp the skin.
Another tip: truss the chicken. Tying the legs together helps it cook more evenly and prevents the breast from drying out.
Low and Slow Roasting (300–325°F / 150–160°C)
If you have time, low and slow is a fantastic way to roast chicken. The gentle heat cooks the meat evenly, reducing the risk of dry breast or undercooked thighs. It’s especially good for larger birds or bone-in, skin-on cuts.
At this temperature, a 4-pound chicken might take 1.5 to 2 hours. But because the heat is steady, the internal temperature rises gradually. You’re less likely to overshoot 165°F, and the meat stays incredibly tender.
One bonus: low and slow roasting makes the chicken easier to carve. The meat falls off the bone, and the skin stays crispy if you finish it with a quick broil.
Spatchcocking (Butterflying)
Spatchcocking means removing the backbone and flattening the chicken. It’s a game-changer for even cooking. With the bird flattened, heat reaches all parts at the same rate. The breast and thigh cook together, reducing the gap in doneness.
This method is perfect for high-heat roasting. Place the spatchcocked chicken skin-side up on a baking sheet and roast at 450°F (230°C) for 40–50 minutes. The skin gets extra crispy, and the meat stays juicy.
Because the chicken is flat, it’s easier to insert the thermometer accurately. Just make sure to check the thickest part of the thigh, away from the bone.
Roasting on a Rack vs. Directly in the Pan
Using a roasting rack elevates the chicken, allowing hot air to circulate underneath. This helps the skin crisp evenly and prevents the bottom from steaming in its own juices.
If you don’t have a rack, you can improvise with vegetables like carrots, onions, or potatoes. They act as a natural platform and add flavor to the drippings.
Just remember: whether you use a rack or not, the internal temperature is what matters most. The setup affects texture and browning, but not safety.
The Importance of Resting Your Roast Chicken
You’ve pulled your chicken out of the oven. The thermometer reads 165°F. It’s golden, fragrant, and ready to eat—right? Not so fast. One of the most overlooked steps in roasting chicken is resting.
Resting means letting the chicken sit, uncovered, for 15–20 minutes before carving. During this time, the juices redistribute throughout the meat. If you cut into the chicken too soon, those juices will spill out, leaving the meat dry.
But there’s another benefit: carryover cooking. Even after the chicken is out of the oven, the internal temperature continues to rise by 5–10°F. So if you pull it at 160°F (71°C), it might reach 165°F (74°C) while resting. This is especially helpful if you’re aiming for a slightly lower final temperature for extra juiciness.
How Long to Rest (and Why)
For a whole chicken, 15–20 minutes is ideal. That’s enough time for the meat to relax and the juices to settle. Covering the chicken with foil can trap steam and soften the skin, so it’s best to leave it uncovered—unless you’re in a very cold kitchen.
If you’re short on time, even 10 minutes makes a difference. But don’t skip it entirely. The few extra minutes of waiting will pay off in every bite.
Carryover Cooking: The Hidden Helper
Carryover cooking is your secret weapon for perfect roast chicken. Because heat continues to move from the outside to the inside after cooking, the internal temperature keeps climbing.
This means you can pull the chicken out a few degrees early and let it finish while resting. For example, if your target is 165°F, remove the chicken at 160°F. By the time you carve it, it’ll be right where it needs to be.
This technique is especially useful for large birds or when using high-heat methods. It prevents overcooking and keeps the meat moist.
Troubleshooting Common Roast Chicken Problems
Even with the best techniques, things can go wrong. Here’s how to fix the most common roast chicken issues—using temperature as your guide.
Dry Breast Meat
Dry breast is the #1 complaint with roast chicken. It happens when the lean breast meat overcooks before the thigh is done. To fix it:
– Use a dual-probe thermometer to monitor both breast and thigh.
– Roast at a lower temperature (325°F/160°C) for more even cooking.
– Baste the breast with butter or pan juices during roasting.
– Consider brining the chicken beforehand to boost moisture.
Undercooked Thighs
If the thighs are still pink or rubbery, they haven’t reached 165°F. This is common with high-heat roasting. Solutions include:
– Trussing the legs to keep them close to the body.
– Using a leave-in thermometer to monitor the thigh temperature.
– Extending the cooking time at a lower heat.
Pale or Soggy Skin
Crispy skin starts with dry skin. Pat the chicken thoroughly with paper towels before roasting. For extra crispness:
– Salt the skin and refrigerate uncovered overnight.
– Roast at high heat (425°F/220°C) or finish under the broiler.
– Use a rack to allow air circulation.
Uneven Cooking
If one side of the chicken is more done than the other, your oven might have hot spots. Rotate the pan halfway through cooking. Or use a convection setting, which circulates hot air for more even results.
Final Tips for Perfect Roast Chicken Every Time
Roasting the perfect chicken isn’t about luck—it’s about science, patience, and the right tools. Here are a few final tips to seal the deal:
– **Start with a room-temperature chicken.** Take it out of the fridge 30–60 minutes before roasting. Cold meat cooks unevenly.
– **Season well.** Salt the chicken inside and out. Add herbs, garlic, or lemon for flavor.
– **Use a reliable thermometer.** Don’t guess—measure.
– **Rest before carving.** Let the juices settle for juicier meat.
– **Save the drippings.** Make gravy or sauce with the pan juices for extra flavor.
With these tips and a focus on temperature, you’ll roast chicken that’s safe, juicy, and delicious—every single time.
Frequently Asked Questions
How do I know if my roast chicken is done without a thermometer?
While possible, it’s not recommended. You can check if juices run clear and the leg moves easily, but these signs aren’t reliable. A thermometer is the only sure way to confirm doneness.
Can I roast a frozen chicken?
It’s not safe to roast a fully frozen chicken. Thaw it completely in the fridge first. Cooking from frozen increases the risk of uneven cooking and foodborne illness.
Why is my roast chicken dry even at 165°F?
It may be overcooked in the breast. Try roasting at a lower temperature or using a dual-probe thermometer to monitor both breast and thigh separately.
Should I brine my chicken before roasting?
Brining adds moisture and flavor, especially for lean breast meat. A simple saltwater brine for 4–12 hours can make a big difference in juiciness.
Can I use a digital thermometer for roast chicken?
Yes, and it’s highly recommended. Digital thermometers are fast, accurate, and easy to read—perfect for checking internal temperature quickly.
What’s the best way to store leftover roast chicken?
Store in an airtight container in the fridge for up to 4 days. Reheat gently to avoid drying out. You can also freeze it for up to 3 months.


