
Master the art of a perfect roast chicken dinner with this easy step by step guide. From brining to carving, we’ll walk you through every detail to ensure crispy skin, tender meat, and a flavorful meal the whole family will love.
Key Takeaways
- Choose the right chicken: Opt for a high-quality, fresh or thawed whole chicken (3–4 lbs) for best results.
- Brining boosts flavor and moisture: Soak the chicken in saltwater (wet brine) or use a dry brine for juicier meat.
- Season generously and evenly: Use a mix of salt, pepper, herbs, and aromatics inside and under the skin.
- Roast at high heat for crispy skin: Start at 425°F (220°C) for 20 minutes, then reduce to 375°F (190°C) to finish.
- Let it rest before carving: Rest the chicken for 15–20 minutes to lock in juices and make carving easier.
- Pair with simple sides: Roasted vegetables, mashed potatoes, or a fresh salad complete the perfect roast chicken dinner.
- Use a meat thermometer: Cook until the internal temperature reaches 165°F (74°C) in the thickest part of the thigh.
Quick Answers to Common Questions
How long should I brine a chicken?
For wet brining, soak the chicken for 4 to 12 hours in the refrigerator. For dry brining, salt the chicken and refrigerate uncovered for 8 to 24 hours. Don’t exceed these times to avoid overly salty meat.
Can I roast a chicken without a roasting rack?
Yes! You can place the chicken directly in the pan or use chopped vegetables like onions, carrots, and celery as a bed. Just avoid letting the chicken sit in its own juices, which can make the skin soggy.
What temperature should the oven be for roasting chicken?
Start at 425°F (220°C) for 20 minutes to crisp the skin, then reduce to 375°F (190°C) to finish cooking. This two-stage method ensures even cooking and golden-brown results.
How do I know when the chicken is done?
Use a meat thermometer. Insert it into the thickest part of the thigh, avoiding the bone. The chicken is safe to eat when it reaches 165°F (74°C).
Can I use leftover roast chicken?
Absolutely! Leftover chicken is great for sandwiches, salads, soups, or casseroles. Store it in an airtight container in the fridge for up to 4 days or freeze for up to 3 months.
📑 Table of Contents
- Why a Perfect Roast Chicken Dinner Belongs on Your Table
- Choosing the Right Chicken for Roasting
- Preparing the Chicken: Brining and Seasoning
- Roasting the Chicken: Step by Step
- Resting and Carving the Chicken
- Building the Perfect Roast Chicken Dinner
- Tips for Success and Common Mistakes to Avoid
- Conclusion: Your Perfect Roast Chicken Dinner Awaits
Why a Perfect Roast Chicken Dinner Belongs on Your Table
There’s something deeply comforting about the aroma of a roast chicken dinner filling your kitchen. The golden-brown skin, the sizzle in the pan, the rich scent of herbs and garlic—it’s a meal that feels both special and familiar. Whether you’re cooking for a holiday feast or a quiet weeknight family dinner, a perfectly roasted chicken is a timeless classic that never goes out of style.
But let’s be honest—roasting a chicken can feel intimidating if you’ve never done it before. You might worry about dry meat, undercooked thighs, or soggy skin. That’s why we’ve created this complete, step by step guide to help you nail the perfect roast chicken dinner every single time. No guesswork, no stress—just juicy, flavorful chicken with crispy skin and a side of confidence in the kitchen.
This guide covers everything from selecting the right bird to carving it like a pro. We’ll walk you through brining, seasoning, roasting techniques, and even how to build a full meal around your chicken. By the end, you’ll not only know how to roast a chicken—you’ll *love* doing it.
Choosing the Right Chicken for Roasting

Visual guide about Perfect roast chicken dinner step by step guide
Image source: mykitchendom.com
The foundation of a great roast chicken dinner starts with the chicken itself. Not all chickens are created equal, and your choice can make a big difference in flavor, texture, and ease of cooking.
Fresh vs. Frozen: What to Know
You can use either fresh or frozen chicken, but there are some important considerations. Fresh chickens are convenient and ready to cook, but frozen ones are often more affordable and widely available. If you go with frozen, make sure to thaw it completely in the refrigerator—never at room temperature. Allow about 24 hours of thawing time for every 5 pounds of chicken. Rushing this step can lead to uneven cooking and food safety risks.
Size Matters: Picking the Perfect Bird
For most home roasting, a 3- to 4-pound (1.4–1.8 kg) chicken is ideal. It’s large enough to feed a family of four with leftovers, but small enough to cook evenly in a standard oven. Larger birds (5+ pounds) can dry out in the breast if not monitored closely, while smaller ones may cook too quickly. If you’re feeding a crowd, consider roasting two smaller chickens instead of one giant one.
Quality Counts: Organic, Free-Range, or Conventional?
While any chicken can be roasted, higher-quality birds often yield better results. Free-range or pasture-raised chickens tend to have more flavor and firmer texture due to their natural diets and active lifestyles. Organic chickens are raised without antibiotics or synthetic pesticides, which some home cooks prefer for health and ethical reasons. That said, even a conventional chicken can shine with proper seasoning and technique—so don’t stress if premium options aren’t in your budget.
What to Look for When Buying
When selecting your chicken, check for plumpness and firmness. The skin should be smooth and free of tears or discoloration. Avoid chickens with a strong odor—fresh chicken should smell mild and slightly sweet, not sour or fishy. If buying pre-packaged, check the “sell-by” or “use-by” date to ensure freshness.
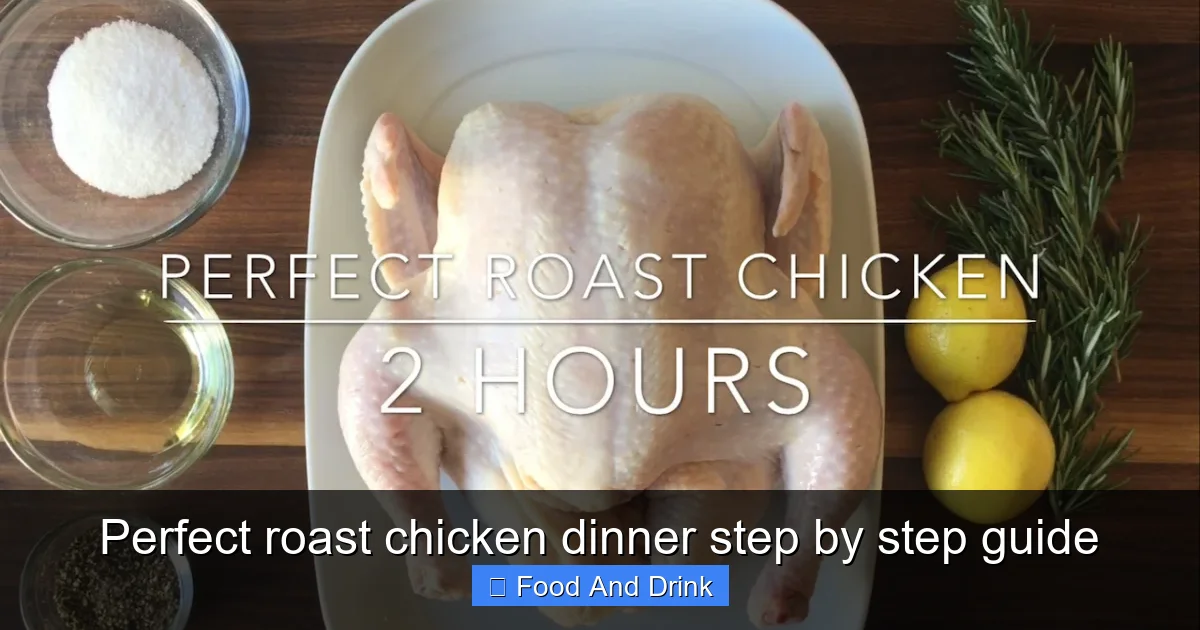
Preparing the Chicken: Brining and Seasoning
Visual guide about Perfect roast chicken dinner step by step guide
Image source: miacooking.files.wordpress.com
Once you’ve got your chicken, it’s time to prepare it for roasting. This step is where the magic begins—transforming a plain bird into a flavorful, juicy centerpiece for your roast chicken dinner.
Why Brining Makes All the Difference
Brining is one of the best-kept secrets for moist, flavorful chicken. It involves soaking the chicken in a saltwater solution (wet brine) or rubbing it with salt and letting it sit (dry brine). The salt helps the meat retain moisture during cooking, preventing dryness—especially in the lean breast meat.
For a wet brine, dissolve 1/2 cup of kosher salt and 1/4 cup of sugar in 4 cups of warm water. Add 4 more cups of cold water and any aromatics you like—garlic, herbs, citrus slices, or peppercorns. Submerge the chicken completely and refrigerate for 4 to 12 hours. Don’t go over 12 hours, or the meat can become too salty.
Dry brining is simpler and just as effective. Generously salt the chicken inside and out, then place it on a wire rack over a baking sheet and refrigerate uncovered for 8 to 24 hours. This method also helps dry out the skin, which leads to crispier results.
Seasoning Like a Pro
After brining (or if you skip it), it’s time to season. Pat the chicken dry with paper towels—this is crucial for crispy skin. Rub the skin with a little oil or softened butter to help it brown.
Season generously with salt and pepper. Don’t be shy—chicken needs flavor! Then, get creative with herbs and spices. A classic blend includes garlic powder, onion powder, paprika, thyme, rosemary, and black pepper. You can also use fresh herbs like rosemary sprigs or thyme sprigs tucked under the skin or inside the cavity.
For extra flavor, stuff the cavity with aromatics: halved lemons, garlic cloves, onion wedges, and fresh herb sprigs. These won’t be eaten, but they’ll infuse the meat with incredible aroma and taste as the chicken roasts.
Trussing: Should You Do It?
Trussing—tying the legs together with kitchen twine—is optional but helpful. It helps the chicken cook more evenly and gives it a neat, restaurant-style appearance. If you don’t have twine, you can tuck the wing tips under the body to prevent burning.
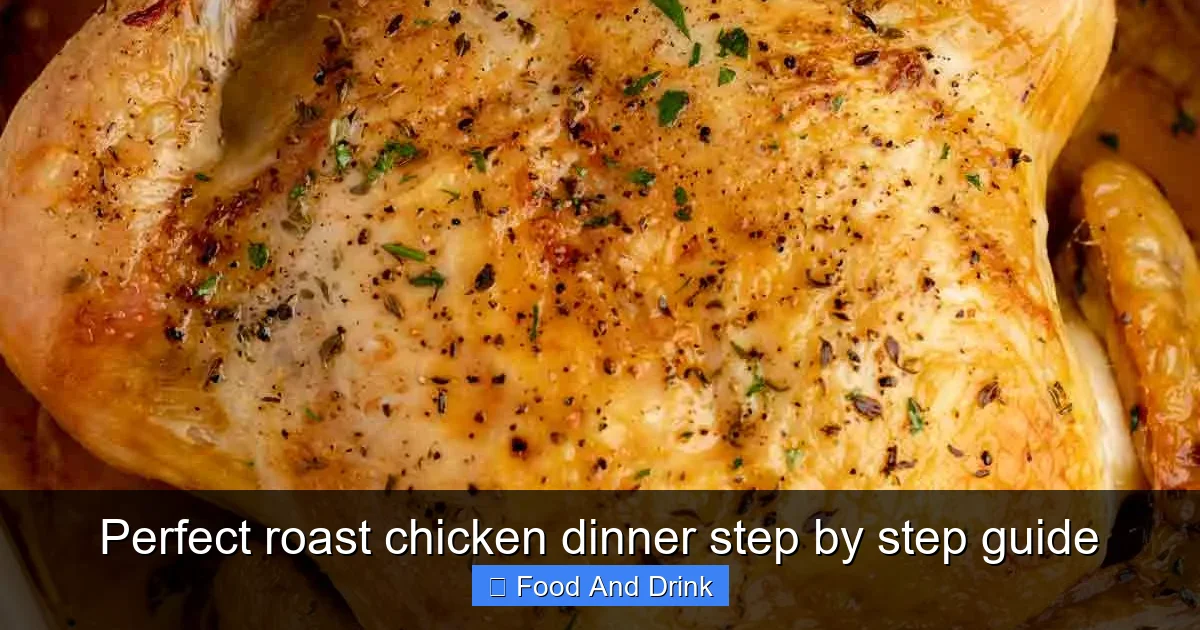
Roasting the Chicken: Step by Step
Visual guide about Perfect roast chicken dinner step by step guide
Image source: dinnerthendessert.com
Now comes the main event: roasting your chicken to golden, juicy perfection. Follow these steps for a foolproof roast chicken dinner.
Preheat Your Oven
Start by preheating your oven to 425°F (220°C). A hot oven is key to getting that crispy skin and locking in juices. While the oven heats, let the chicken sit at room temperature for 20–30 minutes. This helps it cook more evenly.
Prepare the Roasting Pan
Place the chicken breast-side up on a roasting rack inside a roasting pan. The rack elevates the chicken, allowing hot air to circulate underneath and preventing the bottom from steaming. If you don’t have a rack, you can use chopped vegetables (like carrots, onions, and celery) as a bed—they’ll absorb drippings and make a delicious base for gravy later.
Roast at High Heat, Then Reduce
Roast the chicken at 425°F (220°C) for the first 20 minutes. This high-heat blast jumpstarts browning and crisps the skin. Then, reduce the oven temperature to 375°F (190°C) and continue roasting.
Cooking time depends on the size of your chicken. As a general rule, allow 15–20 minutes per pound. So a 4-pound chicken will take about 60–80 minutes total. But don’t rely solely on time—use a meat thermometer to check doneness.
Check the Temperature
Insert a meat thermometer into the thickest part of the thigh, avoiding the bone. The chicken is done when it reaches 165°F (74°C). The breast should read around 160°F (71°C) at this point—it will continue cooking slightly as it rests.
If the skin is browning too quickly, loosely tent the chicken with aluminum foil. This prevents burning while allowing the inside to cook through.
Baste for Extra Flavor (Optional)
Some cooks like to baste the chicken with pan juices or melted butter every 20–30 minutes. This adds flavor and helps keep the skin moist. However, opening the oven door too often can cause temperature fluctuations, so baste sparingly.
Resting and Carving the Chicken
Once your chicken reaches the right temperature, it’s not quite time to eat—yet. The resting period is just as important as the roasting.
Let It Rest
Remove the chicken from the oven and transfer it to a cutting board. Tent it loosely with foil and let it rest for 15–20 minutes. During this time, the juices redistribute throughout the meat, ensuring every bite is moist and tender. Skipping this step can lead to dry, stringy chicken.
Carving Like a Pro
Now for the fun part: carving. Start by removing the legs. Hold one leg and gently pull it away from the body, then cut through the joint where it connects. Repeat on the other side. Next, slice the breast meat by cutting along the breastbone and slicing downward into even pieces. Remove the wings by cutting through the joint where they meet the body.
Serve the pieces on a platter, or arrange them family-style on a large board. Save the carcass for making homemade chicken stock—it’s a great way to reduce waste and boost flavor in soups and sauces.
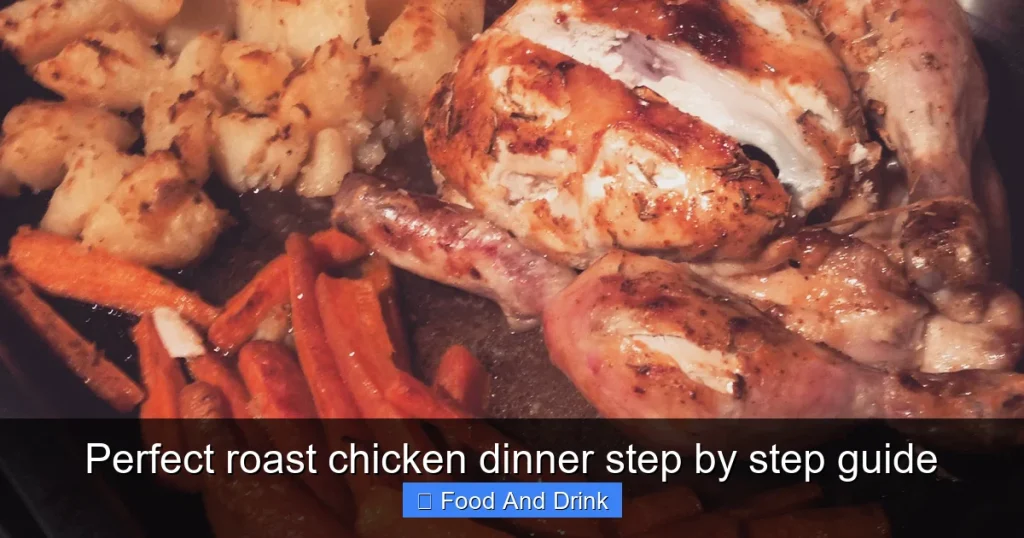
Building the Perfect Roast Chicken Dinner
A roast chicken is delicious on its own, but pairing it with the right sides turns it into a complete, satisfying meal. Here’s how to build a balanced and delicious roast chicken dinner.
Classic Side Dishes
Roasted vegetables are a natural match. Toss carrots, potatoes, Brussels sprouts, or sweet potatoes with olive oil, salt, pepper, and herbs, then roast them alongside the chicken in the last 40–50 minutes of cooking. They’ll absorb the chicken drippings and develop deep, caramelized flavor.
Mashed potatoes are another crowd-pleaser. Creamy, buttery mashed potatoes soak up gravy beautifully. For a lighter option, try garlic mashed cauliflower or a warm potato salad.
Fresh Salads and Greens
Balance the richness of the chicken with a crisp green salad. A simple mix of arugula, spinach, or romaine with a lemon vinaigrette adds brightness and freshness. You can also serve roasted chicken over a bed of quinoa or farro with roasted vegetables for a hearty grain bowl.
Gravy from Pan Drippings
Don’t let those golden drippings go to waste! Make a quick pan gravy by deglazing the roasting pan with chicken broth or wine, then thickening it with a roux (equal parts butter and flour). Season with salt, pepper, and a splash of fresh herbs. Serve warm in a gravy boat alongside the chicken.
Bread and Dessert
A warm dinner roll or crusty bread is perfect for mopping up gravy. For dessert, keep it simple with seasonal fruit, a slice of pie, or a light sorbet.
Tips for Success and Common Mistakes to Avoid
Even with a great recipe, things can go wrong. Here are some pro tips to ensure your roast chicken dinner is always a success.
Use a Meat Thermometer
This is the #1 tool for perfect chicken. Visual cues like “golden brown” or “juices running clear” aren’t reliable. A thermometer takes the guesswork out and ensures food safety.
Don’t Overcook
Overcooked chicken is dry and tough. Remember, the temperature will rise 5°F (about 3°C) during resting, so pull the chicken when the thigh hits 160°F (71°C).
Season Under the Skin
For maximum flavor, gently loosen the skin over the breast and thighs and rub seasoning directly onto the meat. This ensures the seasoning penetrates deeply.
Let the Chicken Come to Room Temperature
Cold chicken going into a hot oven cooks unevenly. Letting it sit for 20–30 minutes before roasting helps it cook more uniformly.
Don’t Skip the Rest
Rushing to carve the chicken right out of the oven is a common mistake. Resting is non-negotiable for juicy results.
Conclusion: Your Perfect Roast Chicken Dinner Awaits
Roasting a chicken doesn’t have to be complicated. With the right preparation, a few key techniques, and a little patience, you can create a roast chicken dinner that’s juicy, flavorful, and utterly satisfying. From brining to carving, every step in this guide is designed to help you succeed—even if you’ve never roasted a chicken before.
Remember, the secret to a perfect roast chicken dinner isn’t fancy equipment or exotic ingredients. It’s attention to detail: choosing a good bird, seasoning well, cooking to the right temperature, and letting it rest. Add some simple sides, and you’ve got a meal that feels special without the stress.
So next time you’re planning dinner, consider roasting a chicken. It’s a timeless dish that brings people together, fills your home with wonderful aromas, and leaves everyone asking for seconds. With this step by step guide, you’re ready to roast with confidence—and enjoy every delicious bite.
Frequently Asked Questions
Can I roast a chicken from frozen?
It’s not recommended to roast a chicken directly from frozen, as it can lead to uneven cooking and food safety risks. Always thaw the chicken completely in the refrigerator before roasting.
Should I rinse the chicken before cooking?
No, rinsing raw chicken can spread bacteria around your sink and kitchen. Simply pat it dry with paper towels before seasoning.
Can I use a different seasoning blend?
Absolutely! Feel free to customize your seasoning. Try lemon pepper, Cajun spice, or a blend of smoked paprika and garlic for a different flavor profile.
How do I keep the breast meat from drying out?
Brining, not overcooking, and using a meat thermometer are the best ways to keep breast meat juicy. You can also cover the breast with foil if it’s browning too quickly.
Can I roast vegetables with the chicken?
Yes! Add hardy vegetables like potatoes, carrots, and onions to the pan during the last 40–50 minutes of roasting. They’ll absorb the drippings and become deliciously caramelized.
What’s the best way to store leftover roast chicken?
Store leftover chicken in an airtight container in the refrigerator for up to 4 days. For longer storage, freeze it for up to 3 months. Reheat gently to preserve moisture.


