The Hamilton Beach Breakfast Sandwich Maker simplifies your morning routine by cooking a hot, layered sandwich in under five minutes. With easy-to-use nonstick surfaces and customizable layers, it’s perfect for eggs, cheese, meats, and more—no flipping required.
Key Takeaways
- Fast and efficient: Cooks a complete breakfast sandwich in just 5 minutes or less, ideal for busy mornings.
- Nonstick and easy to clean: Removable plates make cleanup a breeze—just wipe or pop them in the dishwasher.
- Customizable layers: Add eggs, cheese, bacon, sausage, or veggies to create your perfect sandwich every time.
- Compact and countertop-friendly: Fits easily in small kitchens and stores upright to save space.
- No flipping needed: The dual-sided heating cooks both sides simultaneously, ensuring even results.
- Perfect for meal prep: Use it to make ahead breakfast sandwiches that can be frozen and reheated later.
- Safe and user-friendly: Features cool-touch handles and automatic shutoff for peace of mind.
Quick Answers to Common Questions
How long does it take to cook a sandwich?
Most sandwiches are ready in 3–5 minutes, depending on the ingredients and your preferred level of doneness.
Can I cook raw sausage or bacon in it?
No, the sandwich maker is not designed to cook raw meat. Always pre-cook meats like sausage or bacon before adding them.
Are the cooking plates dishwasher safe?
Yes, the removable nonstick plates are dishwasher safe for easy cleaning.
Can I make sweet sandwiches?
Absolutely! Try sweet combinations like scrambled eggs with cinnamon, banana, and maple syrup on brioche.
Does it come with a warranty?
Yes, Hamilton Beach typically offers a 1-year limited warranty on their sandwich makers.
📑 Table of Contents
- Introduction: A Better Way to Start Your Day
- What’s in the Box? Unboxing Your Sandwich Maker
- Step-by-Step Guide: How to Use the Hamilton Beach Breakfast Sandwich Maker
- Cleaning and Maintenance: Keeping Your Sandwich Maker in Top Shape
- Creative Recipe Ideas: Beyond the Basic Sandwich
- Safety Tips and Troubleshooting
- Conclusion: Why the Hamilton Beach Breakfast Sandwich Maker Belongs in Your Kitchen
Introduction: A Better Way to Start Your Day
Mornings can be chaotic. Between getting dressed, packing lunches, and rushing out the door, who has time to cook a full breakfast? That’s where the Hamilton Beach Breakfast Sandwich Maker comes in—a compact, clever appliance designed to turn your morning routine from stressful to seamless.
Imagine waking up to the smell of sizzling bacon and freshly cooked eggs, all layered between warm English muffins or bagels—without the mess of multiple pans or the hassle of flipping. This little machine does it all in under five minutes. Whether you’re feeding a family of four or just yourself, the Hamilton Beach Breakfast Sandwich Maker delivers hot, delicious, restaurant-quality sandwiches with minimal effort.
But it’s not just about speed. This appliance is built for convenience, consistency, and customization. With its nonstick surfaces, dual heating elements, and simple one-button operation, it takes the guesswork out of breakfast. No more undercooked eggs or burnt toast. Just press a button, wait a few minutes, and enjoy a perfectly assembled sandwich that’s ready to eat.
What’s in the Box? Unboxing Your Sandwich Maker
Visual guide about How to Use the Hamilton Beach Breakfast Sandwich Maker for Perfect Mornings
Image source: i.ytimg.com
Before you start cooking, it’s helpful to know exactly what you’re working with. When you unbox your Hamilton Beach Breakfast Sandwich Maker, you’ll find:
– The main sandwich maker unit with two nonstick cooking plates
– A recipe guide with ideas and tips
– A quick-start instruction manual
The unit itself is lightweight and compact, measuring about 9 x 7 inches—perfect for small countertops or apartment kitchens. The exterior has a sleek, modern design with a cool-touch handle and a power indicator light. The two cooking plates are removable, which makes cleaning much easier than older, fixed-plate models.
One thing to note: the sandwich maker doesn’t come with a timer or digital display. Instead, it uses a simple on/off switch and relies on heat conduction to cook your ingredients evenly. This simplicity is part of its charm—no complicated settings to memorize.
Understanding the Design
The Hamilton Beach Breakfast Sandwich Maker features two nonstick cooking surfaces that heat up simultaneously. The bottom plate is slightly larger and holds the base of your sandwich (like an English muffin or bagel half), while the top plate presses down gently to cook the top layer. In between, you can add your fillings—eggs, cheese, meat, or veggies.
The plates are designed with shallow wells that help shape your ingredients. For example, the egg well ensures your scrambled or fried egg stays contained and cooks evenly. The meat and cheese areas are slightly deeper, giving you room to layer without spillover.
This smart design means you don’t need to flip anything. The heat from both sides cooks everything at once, so your sandwich comes out hot, melty, and perfectly assembled.
Step-by-Step Guide: How to Use the Hamilton Beach Breakfast Sandwich Maker
Visual guide about How to Use the Hamilton Beach Breakfast Sandwich Maker for Perfect Mornings
Image source: i.ytimg.com
Using the Hamilton Beach Breakfast Sandwich Maker is incredibly straightforward. Even if you’ve never cooked breakfast before, you’ll be making pro-level sandwiches in no time. Here’s a simple step-by-step guide to get you started.
Step 1: Prep Your Ingredients
Before you turn on the machine, gather and prep everything you’ll need. This includes:
– English muffins, bagels, or bread slices (split in half)
– Eggs (scrambled, fried, or beaten)
– Cheese slices (American, cheddar, pepper jack, etc.)
– Cooked meat (bacon, sausage patties, ham, or turkey)
– Optional add-ons: spinach, tomatoes, onions, avocado
Pro tip: Pre-cook your meats if they’re not already done. The sandwich maker isn’t designed to cook raw meat from scratch—only to reheat or warm it. So if you’re using raw sausage or bacon, cook it in a pan or microwave first.
Step 2: Preheat the Sandwich Maker
Plug in your sandwich maker and turn it on. The power light will illuminate, indicating it’s heating up. Let it preheat for about 2–3 minutes. You’ll know it’s ready when the light stays on steadily (some models have a ready light, but most rely on the power light).
Don’t skip this step! Preheating ensures even cooking and helps prevent sticking.
Step 3: Assemble Your Sandwich
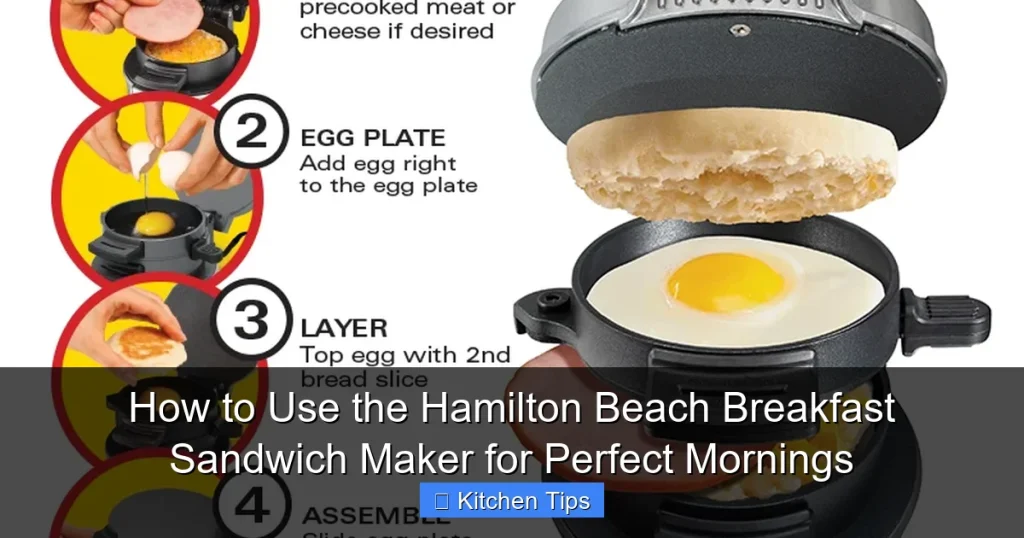
Now it’s time to build your sandwich. Here’s the layering order that works best:
1. Place the bottom half of your bread (English muffin, bagel, etc.) on the lower plate.
2. Add your cooked meat (bacon, sausage, ham).
3. Crack an egg into the egg well—scramble it first if you prefer.
4. Add a slice of cheese on top of the egg.
5. Place the top half of your bread on the upper plate.
Make sure everything fits within the designated areas. Overfilling can cause spillage, which leads to messy cleanup.
Step 4: Close and Cook
Gently close the lid. The top plate will press down slightly, helping to seal the sandwich and cook the ingredients evenly. The cooking time is typically 3–5 minutes, depending on your ingredients and how hot you like your sandwich.
You’ll hear a slight sizzle as the egg cooks and the cheese begins to melt. The bread will toast lightly from the heat of the plates.
Step 5: Remove and Enjoy
Once the sandwich is done, use a silicone spatula or tongs to carefully lift it out. The nonstick surface should release easily, but be gentle to avoid tearing the bread.
Let it cool for 30 seconds—it’ll be very hot! Then take a bite and enjoy your perfectly crafted breakfast sandwich.
Cleaning and Maintenance: Keeping Your Sandwich Maker in Top Shape

Visual guide about How to Use the Hamilton Beach Breakfast Sandwich Maker for Perfect Mornings
Image source: i.ytimg.com
One of the best things about the Hamilton Beach Breakfast Sandwich Maker is how easy it is to clean. Unlike traditional stovetop cooking, there’s no greasy pan to scrub or burnt-on residue to scrape off.
After Each Use
Once the unit has cooled completely (never clean it while hot), remove the cooking plates. Most models have plates that pop out with a simple press of a button or tab. Wash them with warm, soapy water using a soft sponge or cloth. For stubborn grease, let them soak for a few minutes.
Alternatively, the plates are dishwasher-safe—just place them on the top rack. This is a huge time-saver, especially on busy mornings.
Wipe down the exterior with a damp cloth. Never submerge the main unit in water—only the removable plates are waterproof.
Deep Cleaning Tips
Over time, grease and food particles can build up in the crevices around the plates. To prevent this:
– Use a toothbrush or small brush to clean tight spots.
– Wipe down the heating elements gently with a dry cloth.
– Avoid using abrasive cleaners or steel wool, which can damage the nonstick coating.
Storage
When not in use, store your sandwich maker upright to save counter space. It fits easily in a cabinet or pantry. If you’re short on space, some models come with a cord wrap feature to keep things tidy.
Creative Recipe Ideas: Beyond the Basic Sandwich
While the classic egg, cheese, and bacon combo is a winner, the Hamilton Beach Breakfast Sandwich Maker is versatile enough to handle all kinds of creative combinations. Here are a few ideas to inspire your next breakfast:
Veggie-Packed Power Sandwich
– Whole grain English muffin
– Scrambled egg with spinach and diced tomatoes
– Sliced avocado
– Pepper jack cheese
This version is loaded with nutrients and flavor—perfect for a healthy start.
Southwest Breakfast Wrap
– Tortilla or flatbread (cut to fit)
– Scrambled eggs with black beans and corn
– Cooked turkey sausage
– Cheddar cheese and a dash of hot sauce
A little spice goes a long way in the morning!
Sweet Morning Surprise
Yes, you can make sweet sandwiches too! Try:
– Brioche or cinnamon raisin bread
– Scrambled egg with a pinch of cinnamon and sugar
– Sliced banana
– A drizzle of maple syrup
It’s like French toast in sandwich form—great for a weekend treat.
Meal Prep Friendly Options
The sandwich maker is also great for meal prepping. Make a batch of sandwiches on Sunday, let them cool, wrap them in foil, and freeze. When you’re ready to eat, reheat in the toaster oven or microwave for a quick, homemade breakfast.
Just remember: avoid freezing sandwiches with watery ingredients like tomatoes or cucumbers—they can get soggy when thawed.
Safety Tips and Troubleshooting
While the Hamilton Beach Breakfast Sandwich Maker is designed to be safe and user-friendly, it’s important to follow a few guidelines to avoid accidents and keep your appliance working well.
Safety First
– Always unplug the unit when not in use.
– Use oven mitts or silicone grips when handling hot plates.
– Keep the cord away from the heating surfaces.
– Never use metal utensils on the nonstick plates—opt for silicone or plastic instead.
Common Issues and Fixes
– Egg sticking to the plate? Make sure the plate is fully preheated and lightly greased with cooking spray or butter.
– Sandwich not cooking evenly? Check that ingredients are evenly distributed and not overfilled.
– Unit not heating? Ensure it’s plugged in securely and the outlet is working. If the problem persists, contact Hamilton Beach customer service.
Energy Efficiency
The sandwich maker uses about 700–800 watts of power—less than a standard toaster oven. It heats up quickly and shuts off automatically when unplugged, making it an energy-efficient choice for daily use.
Conclusion: Why the Hamilton Beach Breakfast Sandwich Maker Belongs in Your Kitchen
The Hamilton Beach Breakfast Sandwich Maker isn’t just another kitchen gadget—it’s a game-changer for anyone who values quick, delicious, and hassle-free mornings. Whether you’re a busy parent, a student, or someone who just wants to enjoy a hot breakfast without the cleanup, this appliance delivers.
It’s fast, easy to use, and incredibly versatile. From classic breakfast combos to creative sweet and savory twists, it opens up a world of possibilities. And with its nonstick, dishwasher-safe plates, cleanup is a breeze.
Investing in this sandwich maker means investing in more peaceful mornings, better nutrition, and less stress. So go ahead—press that button, layer up your favorite ingredients, and savor the joy of a perfectly made breakfast sandwich, every single day.
Frequently Asked Questions
Can I use frozen bread in the sandwich maker?
Yes, you can use frozen English muffins or bagels. Just add an extra minute or two to the cooking time to ensure they toast properly.
Is the sandwich maker suitable for gluten-free bread?
Yes, as long as the bread fits in the cooking wells, you can use gluten-free English muffins or bread slices.
How do I prevent eggs from sticking?
Lightly spray the egg well with nonstick cooking spray or brush it with a little butter before adding the egg.
Can I make more than one sandwich at a time?
No, the Hamilton Beach Breakfast Sandwich Maker is designed for one sandwich at a time. However, it reheats quickly, so you can make multiple sandwiches in succession.
What’s the best way to reheat a pre-made sandwich?
For best results, reheat frozen sandwiches in a toaster oven or conventional oven. Microwaving may make the bread soggy.
Does it have an automatic shutoff feature?
The sandwich maker doesn’t have a timer-based shutoff, but it’s safe to unplug once cooking is complete. Always unplug after use.