Knowing when roast chicken is done doesn’t have to be guesswork. By using a meat thermometer, checking juices, and understanding visual cues, you can serve perfectly cooked, juicy chicken every single time—safe to eat and full of flavor.
There’s something deeply satisfying about pulling a golden, fragrant roast chicken out of the oven. The aroma fills the kitchen, the skin is crisp and glistening, and everyone at the table leans in with anticipation. But here’s the catch—how do you know it’s actually done? Not undercooked, not overdone, but *perfectly* cooked? That’s the million-dollar question every home cook asks, especially when serving a centerpiece dish like roast chicken.
The truth is, guessing just doesn’t cut it. Relying on time alone—like “cook for 20 minutes per pound”—can lead to disappointment. Ovens vary, chickens differ in size, and even the type of roasting pan can affect cooking. One chicken might be dry and stringy, another still pink near the bone. That’s why learning how to know when roast chicken is done isn’t just helpful—it’s essential. With the right tools and techniques, you can achieve juicy, flavorful, and safely cooked chicken every single time.
In this guide, we’ll walk you through every method, from the foolproof (hello, meat thermometer!) to the visual and tactile cues even seasoned chefs rely on. Whether you’re roasting a whole bird, bone-in thighs, or a spatchcocked chicken, these tips will give you confidence in the kitchen. No more cutting into the meat to check—just perfectly cooked chicken that’s safe, tender, and delicious.
Key Takeaways
- Use a meat thermometer: The most reliable way to check doneness is by inserting a thermometer into the thickest part of the thigh without touching bone—165°F (74°C) is the safe internal temperature.
- Check the juices: Pierce the chicken near the thigh; if the juices run clear (not pink), it’s likely done.
- Look for visual signs: Golden-brown skin, shrunken meat away from bones, and easy leg movement are good indicators.
- Rest the chicken: Let it rest for 10–15 minutes after roasting to allow juices to redistribute, ensuring moist meat.
- Account for carryover cooking: The internal temperature rises 5–10°F after removal from the oven, so pull it out at 160°F (71°C) if using a thermometer.
- Choose the right cut: Whole chickens, bone-in thighs, or boneless breasts require different cooking times and temperature checks.
- Practice makes perfect: Keep a roasting journal to track oven temps, times, and results for consistent success.
Quick Answers to Common Questions
What temperature should roast chicken reach?
The internal temperature should reach 165°F (74°C) in the thickest part of the thigh, without touching bone, to ensure it’s safe to eat.
Can you eat roast chicken if it’s a little pink?
Not necessarily. Some chicken can appear pink even when fully cooked, especially if brined. Always check the temperature with a thermometer to be sure.
How long should you rest roast chicken?
Let it rest for 10–15 minutes, tented loosely with foil, to allow juices to redistribute and ensure moist meat.
Is it safe to cook chicken at 160°F?
Yes, if you account for carryover cooking. Remove the chicken at 160°F (71°C), and it will reach 165°F during resting.
Should I cover roast chicken while cooking?
Only if the skin is browning too quickly. Cover the breast with foil to slow browning, but leave the rest exposed for crispy skin.
📑 Table of Contents
The Science of Safe and Juicy Roast Chicken
Understanding what happens inside a roasting chicken helps explain why certain methods work better than others. When chicken cooks, proteins denature and contract, squeezing out moisture. If it’s cooked too long, too much moisture is lost, and the meat becomes dry and tough. On the flip side, undercooked chicken poses a food safety risk due to harmful bacteria like Salmonella and Campylobacter.
The USDA recommends cooking all poultry to an internal temperature of 165°F (74°C) to ensure safety. But here’s a little secret: chicken doesn’t instantly become dry at 165°F. In fact, many chefs pull their chicken at 160°F (71°C) because of something called “carryover cooking.” As the chicken rests, the internal temperature continues to rise by 5–10°F. So, if you remove it at 160°F, it will reach 165°F during resting—perfectly safe and still juicy.
Another key factor is the difference between white and dark meat. The breast (white meat) cooks faster and dries out more easily, while the thighs and legs (dark meat) are more forgiving and stay moist longer. That’s why whole chickens can be tricky—the breast may be done before the thighs, or vice versa. This is where strategic temperature checking and even butterflying (spatchcocking) can help even out cooking times.
Why Temperature Matters More Than Time
We’ve all seen recipes that say “roast for 1 hour and 15 minutes” or “cook at 375°F until golden.” While these guidelines are helpful starting points, they’re not foolproof. A chicken from a local farm might be smaller or denser than a store-bought one. Your oven might run hot or cold. Even the time of day and altitude can affect cooking.
That’s why relying solely on time is like driving by looking only at the speedometer—you might be going the right speed, but you could still miss your exit. Temperature, on the other hand, tells you exactly where the chicken is in its cooking journey. It’s the most accurate way to know when roast chicken is done.
For example, a 4-pound chicken might take 75 minutes in one oven and 90 in another. But if you check the temperature, you’ll know it’s ready when it hits the right mark—regardless of the clock. This precision is especially important for food safety. Undercooked chicken isn’t just unappetizing; it can make you seriously ill.
The Role of Resting in Juiciness
Once your chicken reaches the target temperature, the cooking isn’t quite over. Resting is a crucial step that many home cooks skip—but it’s what separates a good roast chicken from a great one. When meat cooks, the juices are pushed toward the center. If you carve it immediately, those juices spill out onto the cutting board, leaving the meat dry.
By letting the chicken rest for 10–15 minutes (tented loosely with foil), the juices have time to redistribute throughout the meat. This ensures every bite is moist and flavorful. Think of it like letting a steak rest—same principle, same result.
During this time, the internal temperature will continue to rise slightly due to carryover cooking. So, if you pulled the chicken at 160°F, it might reach 165°F while resting. This is why many chefs recommend removing the chicken from the oven a few degrees below the target temperature.
Using a Meat Thermometer: The Gold Standard

Visual guide about How to Know When Roast Chicken Is Done Perfectly Every Time
Image source: i.pinimg.com
If there’s one tool that will revolutionize your roast chicken game, it’s a reliable meat thermometer. This small device takes the guesswork out of cooking and gives you precise, real-time data. No more cutting into the meat, no more hoping for the best—just confidence that your chicken is done perfectly.
There are two main types of thermometers: instant-read and probe (or leave-in). Instant-read thermometers are quick and accurate—you insert the probe, wait a few seconds, and get a reading. They’re great for spot-checking. Leave-in thermometers have a probe that stays in the chicken while it roasts, with a cord that connects to a base outside the oven. This lets you monitor the temperature without opening the oven door.
For most home cooks, an instant-read thermometer is sufficient and more affordable. Look for one that’s easy to read, responsive, and calibrated correctly. You can test calibration by inserting it into ice water (should read 32°F/0°C) or boiling water (212°F/100°C at sea level).
Where to Insert the Thermometer
Knowing where to place the thermometer is just as important as having one. The goal is to measure the internal temperature of the thickest part of the meat—without touching bone, fat, or gristle, which can give false readings.
For a whole roast chicken, the best spot is the thigh, near where it meets the body. Insert the probe into the thickest part, angling it so it doesn’t touch the bone. The thigh is ideal because it’s the last part to cook and is less likely to dry out than the breast.
If you’re cooking a chicken breast, insert the thermometer into the center, from the side, avoiding the bone. For bone-in thighs or legs, check the thickest part of the meat, again steering clear of the bone.
Avoid checking the breast on a whole chicken unless you’re concerned about overcooking. The breast usually reaches 165°F before the thighs, so if the thighs are done, the breast is likely overdone. That’s why some cooks use a dual-probe thermometer—one in the breast, one in the thigh—to monitor both zones.
Understanding Temperature Zones
Different parts of the chicken have different ideal temperatures. While 165°F is the safe minimum, some cuts can handle a slightly higher temperature without drying out.
– **Breast meat:** Best at 160–165°F. Over 165°F, it can become dry.
– **Thigh and leg meat:** Can go up to 170–175°F. Dark meat stays juicy at higher temps due to more fat and connective tissue.
– **Wings and drumsticks:** These can handle even higher temps—up to 180°F—for extra tenderness.
This is why a whole chicken is a balancing act. You want the thighs to reach 165°F, but the breast to stay under 165°F. One solution is to cover the breast with foil partway through cooking to slow down its cooking. Another is to spatchcock the chicken (butterfly it), which evens out the cooking time.
Visual and Tactile Cues: What to Look and Feel For

Visual guide about How to Know When Roast Chicken Is Done Perfectly Every Time
Image source: goodfoodgourmet.com
While a thermometer is the most accurate tool, visual and tactile cues can also help you know when roast chicken is done—especially if you don’t have a thermometer handy. These methods have been used by cooks for generations and are still valuable today.
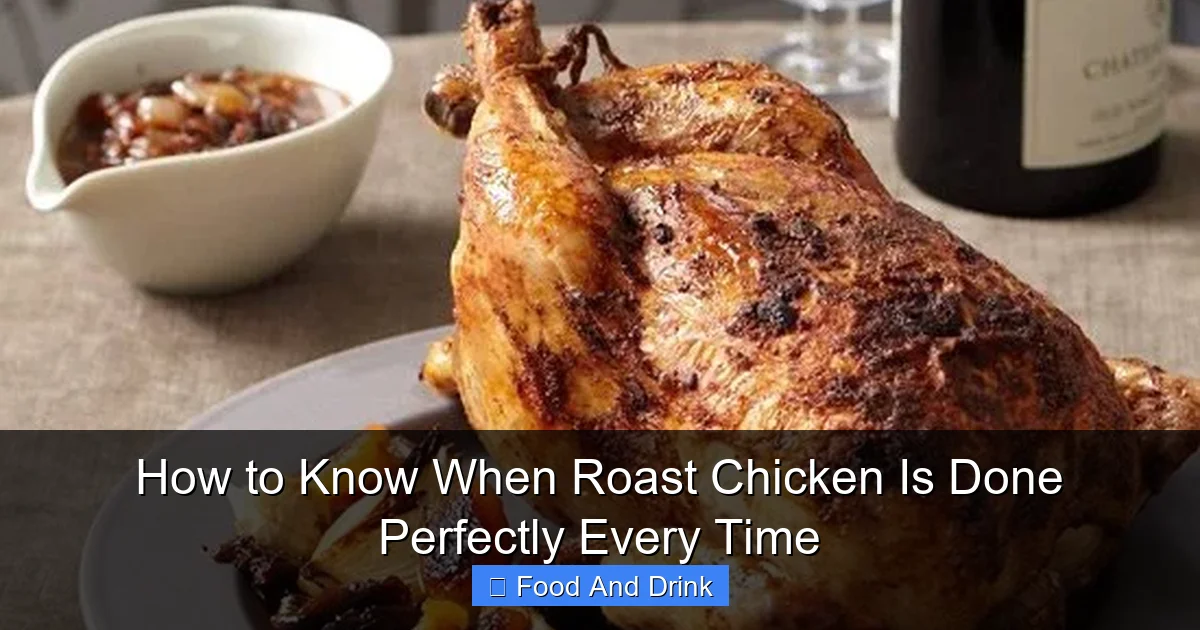
Golden-Brown Skin
One of the first signs that your chicken is close to done is the color of the skin. As it roasts, the skin turns from pale to golden, then to a rich, deep brown. This browning is due to the Maillard reaction—a chemical process that creates complex flavors and a crispy texture.
A well-browned chicken isn’t just pretty; it’s a sign that the surface has cooked thoroughly. However, color alone isn’t a reliable indicator of doneness. A chicken can look golden but still be undercooked inside, especially if it’s roasted at a lower temperature.
That said, if the skin is deeply browned and crispy, it’s a good sign that the chicken has been in the oven long enough to cook through. Just don’t rely on it as your only cue.
Juices Run Clear
This classic method involves piercing the chicken with a knife or fork near the thigh and checking the color of the juices. If they run clear—not pink or red—the chicken is likely done.
To test, insert a knife into the thickest part of the thigh, near the joint. Pull it out and observe the juices. Clear juices indicate that the proteins have coagulated and the meat is cooked. Pink or red juices suggest undercooking.
While this method is better than nothing, it’s not foolproof. Some chicken can appear pink even when fully cooked, especially if it’s been brined or cooked at high heat. Conversely, overcooked chicken can still have clear juices. So, use this as a secondary check, not your primary method.
Leg Wiggles Easily
Another tactile cue is the movement of the legs. When a chicken is fully cooked, the leg should move freely in its socket. You can test this by gently wiggling the drumstick. If it moves easily and the joint feels loose, the chicken is likely done.
If the leg is stiff and doesn’t move, it needs more time. This method works best with whole chickens and is especially useful if you’re roasting a bird with the legs tied together.
Meat Pulls Away from the Bone
As chicken cooks, the meat shrinks and pulls away from the bones. You can see this around the thighs and wings. If the meat looks visibly separated from the bone, especially near the joints, it’s a strong sign that the chicken is cooked through.
This is particularly noticeable in the drumsticks and wings, where the skin tightens and the meat recedes. While this isn’t a precise measurement, it’s a helpful visual confirmation when combined with other cues.
Different Cuts, Different Rules
Visual guide about How to Know When Roast Chicken Is Done Perfectly Every Time
Image source: media.zenfs.com
Not all roast chicken is created equal. A whole bird, bone-in thighs, boneless breasts, and spatchcocked chickens all require different approaches to ensure they’re done perfectly.
Whole Roast Chicken
A whole chicken is the classic Sunday roast—crispy skin, juicy meat, and a centerpiece-worthy presentation. But it’s also the most challenging to cook evenly. The breast cooks faster than the thighs, so you risk drying out the white meat while waiting for the dark meat to reach temperature.
To solve this, many chefs recommend starting the chicken at a high temperature (425–450°F) for 20–30 minutes to crisp the skin, then reducing the heat to 350–375°F for the remainder of the cook time. This helps the thighs catch up without overcooking the breast.
Another trick is to truss the chicken—tying the legs together with kitchen twine. This helps the bird cook more evenly and keeps the legs from drying out.
Always check the temperature in the thigh, not the breast. The breast may hit 165°F first, but the thigh is the last to cook and the best indicator of doneness.
Bone-In Chicken Thighs
Thighs are more forgiving than breasts because of their higher fat and collagen content. They can handle longer cooking times and higher temperatures without drying out.
For bone-in, skin-on thighs, roast at 400–425°F until the skin is crispy and the internal temperature reaches 165–170°F. The meat should be tender and pull easily from the bone.
Because thighs are smaller and more uniform in size, they’re less likely to have hot or cold spots. Still, it’s a good idea to check the temperature in the thickest part of one thigh to be sure.
Boneless Chicken Breasts
Boneless breasts are tricky because they have no bone to conduct heat and less fat to keep them moist. They can go from perfectly cooked to dry in just a few minutes.
To roast boneless breasts, use a lower temperature (350–375°F) and check the temperature early. They’re usually done at 160–165°F. You can also pound them to an even thickness to promote even cooking.
For extra insurance, consider brining the breasts before roasting. A simple saltwater brine (1/4 cup salt per quart of water) helps the meat retain moisture and stay juicy.
Spatchcocked (Butterflied) Chicken
Spatchcocking—removing the backbone and flattening the chicken—is a game-changer for even cooking. It exposes more surface area to heat, so the breast and thighs cook at the same rate.
To spatchcock, place the chicken breast-side down and use kitchen shears to cut along both sides of the backbone. Remove it, then flip the chicken over and press down firmly to flatten it.
Roast at 425–450°F for 40–50 minutes, depending on size. The skin gets extra crispy, and the meat stays juicy. Check the temperature in the thigh—165°F is your target.
Common Mistakes and How to Avoid Them
Even experienced cooks make mistakes when roasting chicken. Here are some common pitfalls and how to avoid them.
Not Using a Thermometer
This is the biggest mistake. Relying on time, color, or guesswork leads to inconsistent results. Invest in a good instant-read thermometer—it’s one of the best tools you can own.
Opening the Oven Too Often
Every time you open the oven door, heat escapes, and cooking slows down. This can lead to undercooked chicken or uneven browning. Use the oven light and window to check progress, and only open the door when necessary.
Skipping the Rest
Cutting into the chicken immediately after roasting lets all the juices escape. Always let it rest for 10–15 minutes before carving. This simple step makes a huge difference in moisture and flavor.
Overcrowding the Pan
If you’re roasting chicken parts, make sure they’re not touching. Overcrowding traps steam, which prevents browning and can lead to uneven cooking. Use a roasting pan with a rack to allow air circulation.
Not Trussing the Chicken
Trussing helps the chicken cook evenly and keeps the legs from drying out. It’s especially important for whole birds. Use kitchen twine to tie the legs together and tuck the wings under the body.
Tips for Perfect Roast Chicken Every Time
Now that you know how to know when roast chicken is done, here are some bonus tips to take your roasting to the next level.
Brining for Moisture
Brining—soaking the chicken in saltwater—helps it retain moisture during cooking. A basic brine is 1/4 cup salt and 1/4 cup sugar per quart of water. Soak the chicken for 4–12 hours in the fridge, then rinse and pat dry before roasting.
Seasoning Under the Skin
For extra flavor, gently loosen the skin over the breast and thighs and rub seasoned butter or herbs underneath. This keeps the meat moist and infuses it with flavor.
Using a Roasting Rack
A rack elevates the chicken, allowing hot air to circulate underneath. This promotes even browning and prevents the bottom from steaming.
Basting for Flavor and Color
Basting with pan juices or melted butter every 20–30 minutes adds flavor and helps the skin brown. Use a spoon or bulb baster to avoid losing heat.
Carving Like a Pro
Once the chicken has rested, carve it properly to preserve juiciness. Start by removing the legs, then the wings, and finally slice the breast meat against the grain.
Conclusion
Roasting a perfect chicken doesn’t have to be intimidating. With the right knowledge and tools, you can serve a juicy, flavorful, and safely cooked bird every time. The key is to stop guessing and start measuring—use a thermometer, check the juices, and pay attention to visual and tactile cues.
Remember, 165°F is the magic number for food safety, but pulling the chicken at 160°F and letting it rest ensures juiciness. Different cuts require different approaches, so adjust your method based on what you’re cooking. And don’t forget the little things—resting, trussing, and brining can make a big difference.
Now that you know how to know when roast chicken is done, you’re ready to impress your family and friends with a restaurant-quality roast. So preheat that oven, season that bird, and get ready for the best roast chicken of your life.
🎥 Related Video: How to roast a chicken!
📺 Jose.elcook
Roasting a chicken can make or break your reputation at the homies gathering, so show let me show you how to Bust it down!
Frequently Asked Questions
How do I know if my roast chicken is undercooked?
If the internal temperature is below 165°F (74°C), the juices run pink, or the meat feels rubbery and resists cutting, it’s undercooked. Return it to the oven and check again.
Can I use a digital thermometer for roast chicken?
Yes, digital instant-read or leave-in thermometers are ideal for checking doneness accurately and quickly.
Why is my roast chicken dry?
Overcooking is the most common cause. Use a thermometer, rest the chicken, and consider brining to retain moisture.
Should I rinse my chicken before roasting?
No, rinsing can spread bacteria in the kitchen. Pat it dry with paper towels instead to promote browning.
Can I roast a frozen chicken?
It’s not recommended. Frozen chicken cooks unevenly and can lead to food safety issues. Always thaw it in the fridge first.
How do I get crispy skin on roast chicken?
Dry the skin thoroughly before roasting, season well, and roast at a high temperature (425–450°F) to crisp the skin.