

Grilling chicken with a pan is a simple, effective way to achieve juicy, flavorful meat without needing an outdoor grill. With the right tools, techniques, and seasoning, you can sear and cook chicken to perfection using just a stovetop and a heavy skillet.
Key Takeaways
- Use a heavy-bottomed pan: Cast iron or stainless steel skillets retain heat evenly, creating a perfect sear.
- Pat chicken dry before cooking: Removing moisture ensures a crispy exterior and prevents steaming.
- Season generously and let it rest: Salt and spices should be applied at least 15–30 minutes before cooking for deeper flavor.
- Don’t overcrowd the pan: Cook in batches if needed to maintain high heat and avoid uneven cooking.
- Use a meat thermometer: Cook chicken to an internal temperature of 165°F (74°C) for safety and juiciness.
- Let it rest after cooking: Resting allows juices to redistribute, keeping the meat moist.
- Add flavor with butter and aromatics: Basting with garlic, herbs, and butter in the final minutes enhances taste and richness.
Quick Answers to Common Questions
Can I use a nonstick pan to grill chicken?
It’s not recommended. Nonstick pans can’t handle the high heat needed for a proper sear and may release harmful fumes. Use cast iron or stainless steel instead.
How long should I let chicken rest before cooking?
Let chicken rest at room temperature for 20–30 minutes before cooking. This ensures even cooking and a better sear.
What’s the best oil for pan-grilling chicken?
Use oils with high smoke points like avocado, grapeseed, or refined canola oil. Avoid extra virgin olive oil, which can burn.
How do I know when the chicken is done?
Use a meat thermometer. Cook chicken to an internal temperature of 165°F (74°C) in the thickest part.
Can I make a sauce after pan-grilling?
Yes! Deglaze the pan with broth or wine, scrape up the browned bits, and simmer with butter and herbs for a quick, flavorful sauce.
📑 Table of Contents
- Why Pan-Grilling Chicken Beats the Outdoor Grill (Sometimes)
- Choosing the Right Pan for Pan-Grilling Chicken
- Preparing the Chicken: The Foundation of Flavor
- Mastering the Pan-Grilling Technique
- Common Mistakes to Avoid
- Serving and Storing Pan-Grilled Chicken
- Conclusion: Perfect Pan-Grilled Chicken Is Within Reach
Why Pan-Grilling Chicken Beats the Outdoor Grill (Sometimes)
When you think of grilled chicken, you probably picture a smoky backyard barbecue with flames licking the grates. But here’s a secret: you can get just as juicy, flavorful, and beautifully seared chicken using nothing more than a pan on your stovetop. In fact, pan-grilling—sometimes called “stovetop grilling”—offers several advantages over traditional grilling, especially when the weather’s bad, you’re short on time, or you simply don’t have access to a grill.
Pan-grilling gives you more control. You can monitor the heat precisely, adjust it on the fly, and avoid flare-ups that can char your chicken. Plus, it’s perfect for smaller portions—like chicken breasts, thighs, or cutlets—without needing to fire up a full grill. And let’s be honest: not everyone has a backyard or balcony. Whether you’re cooking in a tiny apartment or just craving a quick weeknight dinner, learning how to grill chicken with a pan is a game-changer.
But don’t let the simplicity fool you. Pan-grilled chicken, when done right, can rival—or even surpass—its outdoor counterpart. The key is understanding how to mimic the high-heat, direct-flame environment of a grill using your stovetop. With the right pan, proper technique, and a few insider tips, you’ll be serving up restaurant-quality chicken in under 30 minutes.
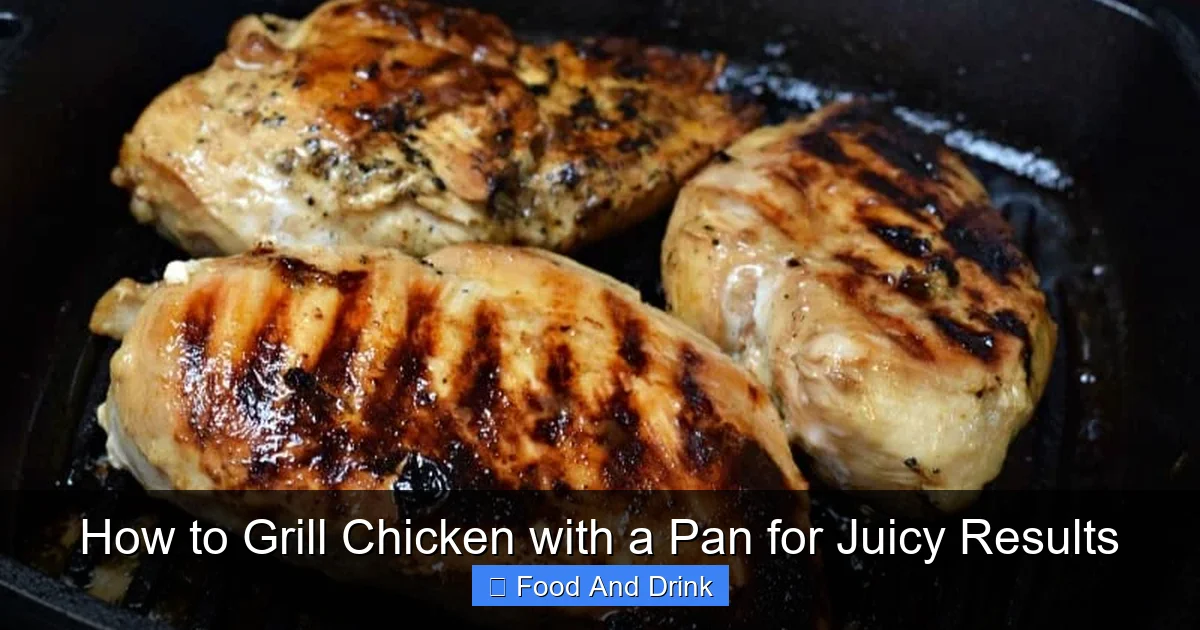
Choosing the Right Pan for Pan-Grilling Chicken
Not all pans are created equal when it comes to grilling chicken. The ideal pan for pan-grilling needs to conduct and retain heat evenly, develop a good sear, and withstand high temperatures. Let’s break down the best options.

Visual guide about How to Grill Chicken with a Pan for Juicy Results
Image source: cdn.foodfanatic.com
Cast Iron Skillet: The Gold Standard
If you only buy one pan for cooking chicken, make it a cast iron skillet. Cast iron is legendary for its heat retention and even distribution. Once it’s hot, it stays hot—perfect for creating that golden-brown crust that locks in juices. A well-seasoned cast iron pan also adds a subtle, smoky flavor that mimics outdoor grilling.
Cast iron skillets come in various sizes, but an 8- to 10-inch skillet is ideal for most chicken cuts. They’re heavy, which might be a downside for some, but that weight is what helps maintain consistent heat. Just remember: cast iron takes a bit longer to heat up, so preheat it properly before adding your chicken.
Stainless Steel Skillet: A Close Second
If you don’t have cast iron, a high-quality stainless steel skillet is your next best bet. Look for one with a thick, tri-ply or multi-clad base (layers of aluminum sandwiched between stainless steel) for even heating. Stainless steel sears beautifully and is easier to clean than cast iron, though it doesn’t retain heat quite as well.
One advantage of stainless steel? It’s non-reactive, so you can deglaze the pan with wine or broth to make a quick pan sauce—something that’s harder to do with cast iron unless it’s well-seasoned. Just avoid nonstick pans for grilling; they can’t handle the high heat needed for a proper sear and may release harmful fumes.
Avoid Nonstick and Thin Pans
Nonstick pans are great for eggs and delicate fish, but they’re not built for high-heat searing. Most nonstick coatings start to degrade around 500°F (260°C), and you need temperatures closer to 400–450°F (204–232°C) to get a good crust on chicken. Thin pans, like cheap aluminum or non-clad stainless steel, heat unevenly and can warp under high heat, leading to hot spots and uneven cooking.
So, stick with cast iron or heavy stainless steel. If you’re investing in a new pan, consider a Lodge cast iron skillet or an All-Clad stainless steel fry pan—both are reliable, durable, and perfect for pan-grilling chicken.
Preparing the Chicken: The Foundation of Flavor
Great pan-grilled chicken starts long before you turn on the stove. How you prepare the chicken—trimming, seasoning, and resting—makes a huge difference in the final result. Let’s walk through the steps to get your chicken ready for the pan.

Visual guide about How to Grill Chicken with a Pan for Juicy Results
Image source: img.wonderhowto.com
Choose the Right Cut
Not all chicken cuts are created equal for pan-grilling. Here’s a quick guide:
- Chicken breasts: Lean and quick-cooking, but prone to drying out. Best for thin cutlets or pounded to even thickness.
- Chicken thighs: Dark meat with more fat, so they stay juicy and flavorful. Bone-in, skin-on thighs are especially forgiving.
- Chicken cutlets: Thin slices of breast or thigh, ideal for fast cooking and even browning.
- Boneless, skinless thighs: A great middle ground—tender, juicy, and easy to handle.
For beginners, we recommend starting with boneless, skinless thighs or thin cutlets. They’re more forgiving and less likely to dry out. If you’re using chicken breasts, consider pounding them to an even thickness (about ½ inch) so they cook evenly.
Trim and Pat Dry
Excess fat and moisture are the enemies of a good sear. Trim any large pieces of fat or connective tissue, especially on thighs. Then, pat the chicken dry with paper towels—this step is crucial. Moisture on the surface creates steam, which prevents browning and leads to soggy, boiled-like chicken.
Don’t skip this! Even if the chicken looks dry, there’s still surface moisture that can interfere with searing. Take the extra 30 seconds to blot each piece thoroughly.
Season Generously—and Early
Seasoning isn’t just about adding salt and pepper at the last minute. For maximum flavor, season your chicken at least 15–30 minutes before cooking. This gives the salt time to penetrate the meat, enhancing both taste and texture.
Use a simple blend: kosher salt, freshly ground black pepper, garlic powder, onion powder, and a pinch of paprika for color and mild smokiness. For extra depth, add dried herbs like thyme, oregano, or rosemary. If you’re feeling adventurous, try a dry rub with brown sugar, chili powder, and cumin for a Southwestern twist.
Pro tip: Season both sides evenly, and don’t be shy with the salt. Chicken needs it to taste its best. If you’re short on time, you can season right before cooking, but you’ll miss out on some flavor development.
Let It Rest at Room Temperature
Take your seasoned chicken out of the fridge 20–30 minutes before cooking. Cold chicken straight from the fridge will lower the pan’s temperature when added, leading to uneven cooking and a weaker sear. Room-temperature chicken cooks more evenly and develops a better crust.
This small step makes a big difference, especially for thicker cuts like chicken breasts or bone-in thighs. Just make sure to keep the chicken covered and away from direct sunlight while it rests.
Mastering the Pan-Grilling Technique
Now that your chicken is prepped and your pan is ready, it’s time to cook. Pan-grilling is all about high heat, timing, and technique. Follow these steps for juicy, perfectly seared chicken every time.
Visual guide about How to Grill Chicken with a Pan for Juicy Results
Image source: southernplate.com
Preheat the Pan Properly
Heat your pan over medium-high to high heat for 3–5 minutes before adding oil. You want the pan to be hot—really hot—before the chicken goes in. A properly preheated pan ensures immediate searing, which locks in juices and creates that desirable crust.
To test if the pan is ready, flick a few drops of water into it. If they sizzle and evaporate instantly, it’s hot enough. If they just sit there, give it another minute.
Use the Right Oil
Not all oils can handle high heat. Choose an oil with a high smoke point, like avocado oil, grapeseed oil, or refined canola oil. These oils won’t burn at the temperatures needed for searing.
Avoid extra virgin olive oil—it has a low smoke point and can burn, creating a bitter taste. A light coating of oil (about 1–2 teaspoons) is enough. Swirl it around the pan to coat the bottom evenly.
Sear Without Moving
Place the chicken in the pan and let it sear without touching it for 2–3 minutes. Resist the urge to peek or move it around. Moving the chicken too soon prevents the crust from forming.
You’ll know it’s ready to flip when the chicken releases easily from the pan. If it sticks, give it another 30 seconds. Once flipped, sear the other side for another 2–3 minutes.
Cook to the Right Temperature
After searing, reduce the heat to medium and continue cooking until the chicken reaches an internal temperature of 165°F (74°C). Use a meat thermometer inserted into the thickest part of the meat, avoiding bone or fat.
For boneless chicken breasts or cutlets, this usually takes 6–8 minutes total. Thighs may take 8–10 minutes. If the chicken is browning too quickly, lower the heat slightly or finish cooking in a 375°F (190°C) oven for 5–7 minutes.
Baste for Extra Flavor
In the last 1–2 minutes of cooking, add a tablespoon of butter, a crushed garlic clove, and a few sprigs of fresh herbs (like thyme or rosemary) to the pan. Tilt the pan slightly and use a spoon to baste the chicken with the melted butter and aromatics.
This technique, called “basting,” adds rich, savory flavor and helps keep the chicken moist. Just be careful not to let the butter burn—keep the heat moderate during this step.
Common Mistakes to Avoid
Even experienced cooks make mistakes when pan-grilling chicken. Here are the most common pitfalls and how to avoid them.
Overcrowding the Pan
Cooking too much chicken at once lowers the pan’s temperature and causes steaming instead of searing. This leads to pale, soggy chicken instead of a crispy crust.
Solution: Cook in batches if needed. Give each piece enough space so it doesn’t touch the others. It’s better to cook in two rounds than to overcrowd and ruin the sear.
Flipping Too Early or Too Often
Patience is key. Flipping the chicken too soon prevents the crust from forming. Flipping it too often disrupts the cooking process and can dry out the meat.
Solution: Let it sear undisturbed for 2–3 minutes per side. Only flip once, unless you’re using a meat thermometer and need to check doneness.
Using Cold Chicken
As mentioned earlier, cold chicken from the fridge lowers the pan’s temperature and leads to uneven cooking.
Solution: Always let chicken rest at room temperature for 20–30 minutes before cooking.
Skipping the Thermometer
Guessing doneness by time or color is unreliable. Chicken can look done on the outside but still be undercooked inside—or overcooked and dry.
Solution: Invest in a good instant-read meat thermometer. It’s one of the best tools you can have in the kitchen.
Not Letting It Rest
Cutting into chicken immediately after cooking causes the juices to spill out, leaving the meat dry.
Solution: Let the chicken rest for 5–10 minutes on a cutting board or plate, loosely covered with foil. This allows the juices to redistribute, keeping the meat moist and tender.
Serving and Storing Pan-Grilled Chicken
Your chicken is cooked, rested, and ready to eat—now what? Here’s how to serve it for maximum enjoyment and how to store leftovers safely.
Serving Suggestions
Pan-grilled chicken is incredibly versatile. Serve it with:
- A fresh green salad and a tangy vinaigrette
- Roasted vegetables like broccoli, carrots, or Brussels sprouts
- Garlic mashed potatoes or creamy polenta
- A side of rice or quinoa
- A squeeze of lemon or a drizzle of chimichurri sauce
For a complete meal, pair it with a glass of crisp white wine or a light beer. The smoky, savory flavors of pan-grilled chicken go well with almost any accompaniment.
Making a Quick Pan Sauce
Don’t let those delicious browned bits (called “fond”) go to waste. After removing the chicken, deglaze the pan with a splash of chicken broth, white wine, or lemon juice. Scrape up the fond with a wooden spoon, then simmer for 2–3 minutes. Stir in a tablespoon of butter and fresh herbs for a rich, flavorful sauce to drizzle over the chicken.
Storing and Reheating
Store leftover chicken in an airtight container in the refrigerator for up to 3 days. To reheat, place it in a skillet over low heat with a splash of broth or water to prevent drying out. You can also reheat it in the oven at 325°F (163°C) for 10–15 minutes.
Avoid microwaving if possible—it can make the chicken rubbery. If you must use a microwave, cover it with a damp paper towel and heat in 30-second intervals.
Conclusion: Perfect Pan-Grilled Chicken Is Within Reach
Learning how to grill chicken with a pan is one of the most useful skills you can have in the kitchen. It’s fast, convenient, and delivers juicy, flavorful results that rival any outdoor grill. With the right pan, proper preparation, and a few key techniques, you can turn a simple chicken dinner into something truly special.
Remember: start with a hot pan, use room-temperature chicken, season well, and don’t rush the sear. Use a thermometer to ensure perfect doneness, and always let the chicken rest before slicing. Whether you’re cooking for one or feeding a family, pan-grilled chicken is a reliable, delicious option that works every time.
So next time you’re craving grilled chicken but don’t have a grill—or just don’t feel like firing one up—reach for your skillet. You might just discover that pan-grilling is your new favorite way to cook chicken.
Frequently Asked Questions
What’s the difference between pan-grilling and pan-frying?
Pan-grilling uses high heat to sear the chicken and mimic outdoor grilling, while pan-frying often involves more oil and lower heat. Pan-grilling aims for a crispy exterior and juicy interior with minimal added fat.
Can I use frozen chicken for pan-grilling?
It’s not recommended. Frozen chicken releases too much moisture, preventing a good sear. Always thaw chicken completely in the refrigerator before cooking.
Do I need to marinate the chicken?
Marinating adds flavor and can help tenderize, but it’s not required. A good dry rub or simple seasoning works well for pan-grilled chicken.
Can I cook bone-in chicken in a pan?
Yes, bone-in thighs or drumsticks work great. They may take longer to cook—usually 10–12 minutes—and benefit from finishing in the oven if needed.
Why is my chicken sticking to the pan?
This usually happens when the pan isn’t hot enough or the chicken is moved too soon. Make sure the pan is properly preheated and let the chicken sear undisturbed until it releases easily.
How can I add smoky flavor without a grill?
Use smoked paprika in your seasoning, or add a small amount of liquid smoke to your marinade or sauce. Basting with butter and herbs also enhances depth of flavor.


