
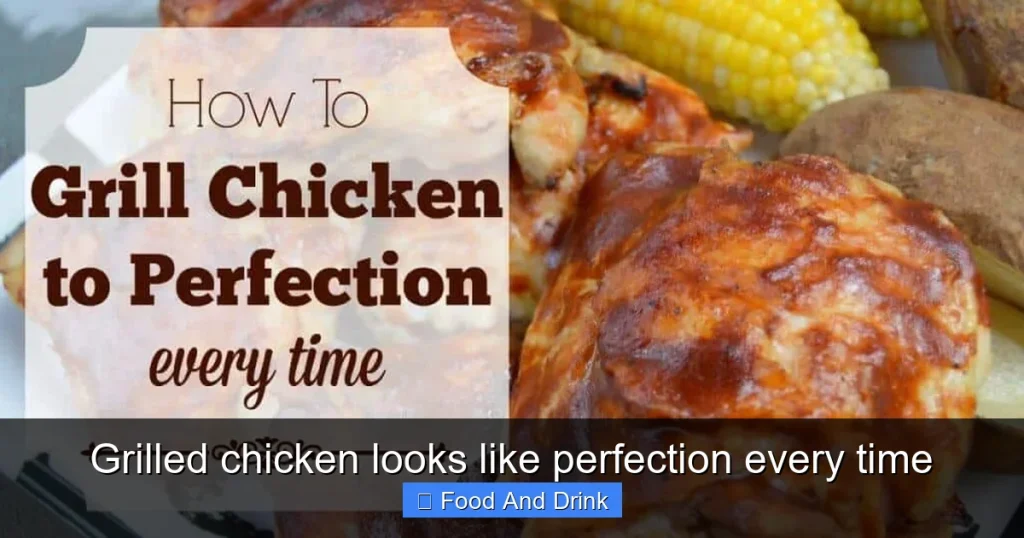
Grilled chicken looks like perfection every time when it’s golden-brown, juicy, and beautifully charred with grill marks. It’s not just about taste—its appearance signals doneness, flavor, and care in preparation. Whether you’re a home cook or a grill master, nailing that picture-perfect look is easier than you think.
Key Takeaways
- Golden-brown color: A rich, even sear indicates proper Maillard reaction and flavor development.
- Distinct grill marks: Those dark, caramelized lines aren’t just for show—they add smoky depth and visual appeal.
- Juicy interior: Perfect grilled chicken should look moist, not dry or rubbery, even after cooking.
- Uniform cooking: Even browning across the surface means balanced heat and timing.
- Safe internal temperature: Chicken that looks done should also read 165°F (74°C) on a meat thermometer.
- Resting matters: Letting it rest keeps juices locked in, preserving that appetizing sheen.
- Marinade enhances appearance: Acids and oils in marinades help create a glossy, caramelized crust.
Quick Answers to Common Questions
What should perfectly grilled chicken look like?
Perfectly grilled chicken should be golden-brown with distinct grill marks, a slightly crisp exterior, and a moist, opaque interior. It should look juicy, not dry or gray.
Why is my grilled chicken pale and unappetizing?
Pale chicken usually means the grill wasn’t hot enough or the surface was too moist. Pat the chicken dry and preheat the grill to at least 400°F (200°C) for better browning.
Are grill marks necessary for great-tasting chicken?
Grill marks aren’t necessary for taste, but they add smoky flavor and visual appeal. They’re a sign of proper searing and high heat.
How can I make my grilled chicken look glossy?
A glossy finish comes from resting the chicken and using marinades with oil. Letting it rest allows juices to redistribute, creating a natural sheen.
Can overcooked grilled chicken still look good?
Overcooked chicken often looks dry, cracked, or chalky. While it might still be safe to eat, it won’t look or taste as good as properly cooked chicken.
📑 Table of Contents
- Why Grilled Chicken Looks Like Perfection Every Time
- The Visual Language of Perfect Grilled Chicken
- The Science Behind the Sear: Why Appearance Matters
- Tips for Achieving That Perfect Look at Home
- Common Mistakes That Ruin the Look of Grilled Chicken
- Conclusion: When Grilled Chicken Looks Like Perfection, It Tastes Like It Too
Why Grilled Chicken Looks Like Perfection Every Time
There’s something undeniably satisfying about a perfectly grilled chicken breast. It’s golden-brown, slightly charred at the edges, with those signature dark grill marks running diagonally across the surface. The skin—if left on—is crisp and glistening, while the meat beneath looks tender and juicy, not dry or pale. When grilled chicken looks like perfection, it’s more than just a meal—it’s a visual promise of flavor, texture, and satisfaction.
But what makes grilled chicken look so good? Is it luck? Skill? Or is there a science behind that flawless finish? The truth is, achieving that ideal appearance comes down to technique, timing, and understanding how heat transforms raw chicken into a culinary masterpiece. From the sizzle when it hits the grates to the final resting stage, every step contributes to how grilled chicken looks—and tastes.
In this guide, we’ll explore the visual cues that signal a perfectly grilled chicken, break down the science behind the sear, and share practical tips to help you replicate that restaurant-quality look at home. Whether you’re cooking boneless breasts, thighs, drumsticks, or a whole spatchcocked bird, knowing what to look for will elevate your grilling game. Because when grilled chicken looks like perfection, it doesn’t just satisfy your hunger—it delights your senses.
The Visual Language of Perfect Grilled Chicken

Visual guide about Grilled chicken looks like perfection every time
Image source: creatingmyhappiness.com
Grilled chicken speaks a visual language. Its color, texture, and surface patterns tell you everything you need to know about its doneness, flavor, and quality. When grilled chicken looks like perfection, it’s communicating that it’s been cooked with care, at the right temperature, and for the right amount of time.
One of the first things you’ll notice is the color. A well-grilled chicken breast should have a rich, golden-brown hue, not pale or gray. This color comes from the Maillard reaction—a chemical process that occurs when proteins and sugars in the meat react under high heat. It’s responsible for that deep, savory flavor and appetizing crust. If your chicken looks pale or blotchy, it likely didn’t get hot enough or was moved too soon.
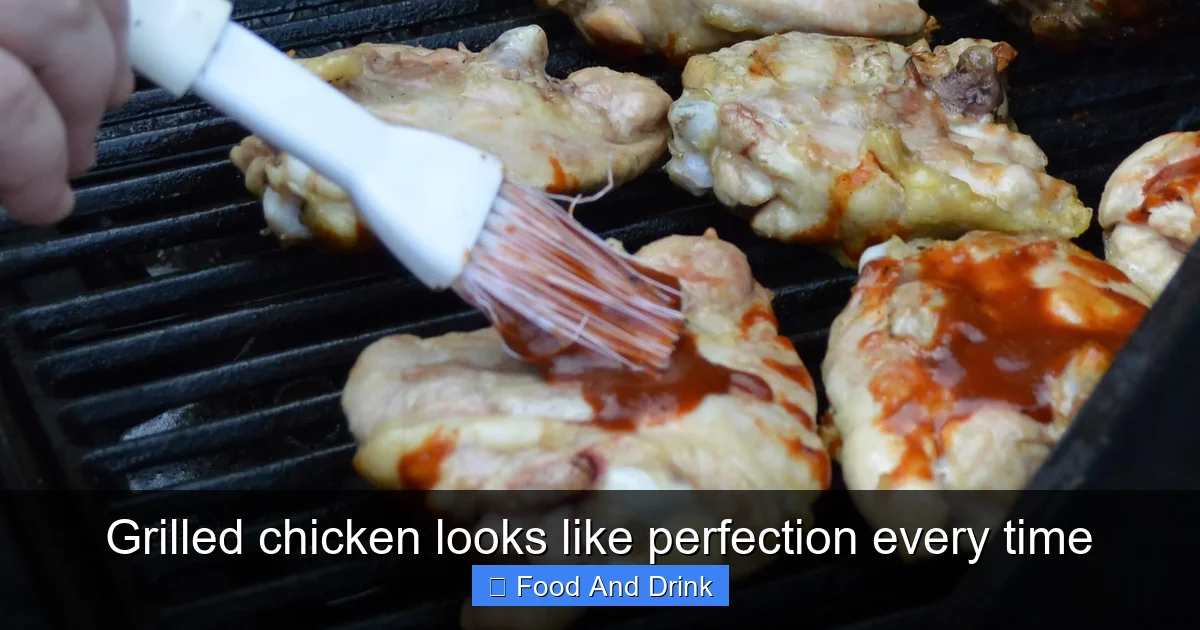
Then there are the grill marks. Those dark, caramelized lines aren’t just decorative—they’re a sign of proper contact with the grates and high heat. They add a smoky, slightly charred flavor that enhances the overall taste. But be careful: too much char can mean burnt spots, which can taste bitter. The goal is clean, even marks that frame the chicken without overwhelming it.
Texture also plays a big role in how grilled chicken looks. The surface should be slightly crisp, especially if the skin is on. Underneath, the meat should look moist and opaque, not translucent or rubbery. If you see juices pooling on the plate after slicing, that’s a good sign—it means the chicken retained its moisture during cooking.
Even cooking is another hallmark of perfection. When grilled chicken looks uniform in color and texture across its surface, it tells you the heat was consistent and the chicken wasn’t overcrowded on the grill. Overcrowding leads to steaming instead of searing, which results in a soggy, unappealing exterior.
Finally, the way the chicken holds its shape matters. A perfectly grilled piece should stand firm, not fall apart or look mushy. This indicates proper handling and cooking time—neither underdone nor overdone.
Color: The First Clue to Doneness
Color is the most immediate visual cue when assessing grilled chicken. A golden-brown exterior is the gold standard. This color develops when the surface of the chicken reaches temperatures high enough to trigger the Maillard reaction—typically between 280°F and 330°F (140°C to 165°C). This reaction not only creates flavor but also gives the chicken that appetizing, roasted appearance.
If your chicken looks pale or grayish, it likely didn’t get hot enough or was cooked too slowly. This can happen if the grill isn’t preheated properly or if the chicken is too thick and the heat can’t penetrate quickly. On the other hand, if the chicken is blackened or charred in patches, it’s been exposed to too much direct heat or left too long.
The ideal color is even and consistent. You want a rich, amber tone that covers the entire surface, with darker edges where the chicken touched the grates. This contrast adds visual interest and signals that the chicken has developed a flavorful crust.
For bone-in pieces like thighs or drumsticks, the skin should be golden and slightly crispy. If the skin is soggy or rubbery, it wasn’t grilled long enough or the fat didn’t render properly. A quick fix? Finish skin-on pieces skin-side down over direct heat for the last few minutes to crisp it up.
Grill Marks: More Than Just Aesthetic
Grill marks are one of the most recognizable features of grilled chicken. They’re those dark, crosshatched lines that give the meat a professional, restaurant-style look. But they’re not just for show—they’re a sign of proper grilling technique.
To get great grill marks, you need high heat and clean grates. Preheat your grill to medium-high (around 400°F to 450°F or 200°C to 230°C) and make sure the grates are clean and lightly oiled. Place the chicken on the grates at a 45-degree angle to the bars. After 2–3 minutes, rotate the chicken 90 degrees to create the crosshatch pattern. Flip and repeat on the other side.
The key is not to move the chicken too soon. Let it sear and develop that crust before flipping. If you lift it too early, the meat will stick and tear, ruining the pattern. Once the marks form, they’ll stay—adding both flavor and visual appeal.
Some people worry that grill marks mean the chicken is burnt. But as long as the marks are dark brown—not black—they’re perfectly fine. In fact, they add a subtle smokiness that enhances the overall taste. Just avoid letting the chicken sit too long over direct flames, which can cause flare-ups and excessive charring.
Texture and Juiciness: What to Look For
Texture is just as important as color when it comes to how grilled chicken looks. A perfectly grilled piece should look firm but tender, with a slight sheen that suggests moisture. If the chicken looks dry, cracked, or chalky, it’s likely overcooked.
Juiciness is a big part of the visual appeal. When you slice into a well-grilled chicken breast, you should see a hint of pink near the bone (if bone-in) and clear juices running out—not blood, but moisture. This indicates that the chicken was cooked to the right temperature and allowed to rest, which helps redistribute the juices.
One trick to maintaining juiciness is brining. Soaking chicken in a saltwater solution (or a flavored brine) before grilling helps it retain moisture during cooking. Even a quick 30-minute brine can make a noticeable difference in texture and appearance.
Another tip? Don’t press down on the chicken with your spatula while it’s cooking. This squeezes out the juices and leads to a drier, less appealing result. Let it cook undisturbed, and trust the process.
The Science Behind the Sear: Why Appearance Matters
Visual guide about Grilled chicken looks like perfection every time
Image source: creatingmyhappiness.com
When grilled chicken looks like perfection, it’s not just about aesthetics—it’s a sign that the science of cooking is working in your favor. The sear, the color, the texture—all of these are the result of chemical and physical changes happening at the molecular level.
At the heart of it is the Maillard reaction. Named after French chemist Louis-Camille Maillard, this reaction occurs when amino acids (from proteins) and reducing sugars in the chicken react under high heat. It produces hundreds of new flavor compounds and that characteristic brown color. Without the Maillard reaction, grilled chicken would taste bland and look unappetizing.
But the Maillard reaction isn’t the only player. Caramelization also contributes, especially if your chicken has been marinated with ingredients like honey, brown sugar, or soy sauce. These sugars break down and brown, adding sweetness and depth to the flavor profile.
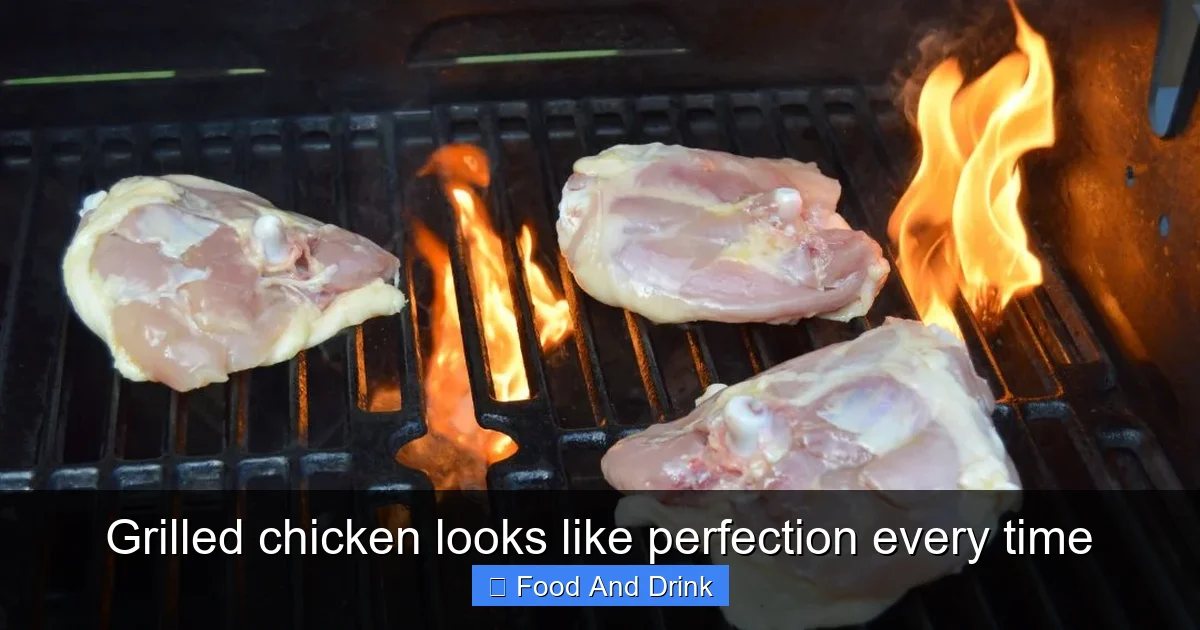
Heat transfer is another key factor. When chicken hits the hot grill grates, the surface quickly reaches temperatures that trigger these reactions. The interior, however, cooks more slowly. That’s why timing and temperature control are crucial. Too hot, and the outside burns before the inside is done. Too cool, and you get steamed chicken with no sear.
The way heat moves through the meat also affects how grilled chicken looks. Thicker cuts need lower, indirect heat to cook through without charring the outside. Thinner cuts can handle direct heat for a quick sear.
Understanding these principles helps you control the outcome. By managing heat, timing, and moisture, you can ensure that grilled chicken looks—and tastes—like perfection every time.
Maillard Reaction: The Flavor Factory
The Maillard reaction is the unsung hero of grilled chicken. It’s what turns a pale, raw piece of meat into a golden, flavorful masterpiece. This reaction begins around 280°F (140°C) and accelerates as temperatures rise. It’s responsible for the browning, the aroma, and the complex flavors that make grilled chicken so irresistible.
But it’s not just about heat. The surface of the chicken must be dry for the Maillard reaction to occur. That’s why patting chicken dry before grilling is so important. Moisture on the surface creates steam, which lowers the temperature and prevents browning.
Marinades can also influence the Maillard reaction. Ingredients like soy sauce, Worcestershire, and even citrus contain sugars and amino acids that enhance browning. Just be cautious with sugary marinades—they can burn if the grill is too hot. A good rule of thumb? Apply sugary glazes in the last 5–10 minutes of cooking.
The result is a crust that’s crispy, flavorful, and visually stunning. When grilled chicken looks like it’s been kissed by fire, that’s the Maillard reaction at work.
Heat Zones and Cooking Methods
Grill masters know that not all heat is created equal. To get grilled chicken that looks perfect, you need to understand direct and indirect heat.
Direct heat is used for searing. It’s high, intense, and perfect for creating those beautiful grill marks and a caramelized crust. Use direct heat for the first few minutes on each side of boneless breasts or thin cuts.
Indirect heat is lower and more gentle. It’s used for thicker cuts like bone-in thighs or whole chickens. By placing the chicken away from the flames, you allow it to cook through without burning the outside. This method ensures even cooking and a juicy interior.
Many grills have multiple heat zones. Use them to your advantage. Start with direct heat to sear, then move the chicken to indirect heat to finish cooking. This two-zone method gives you the best of both worlds: a crispy exterior and a tender interior.
For gas grills, turn off some burners to create an indirect zone. For charcoal grills, push the coals to one side. This simple technique can make a huge difference in how grilled chicken looks and tastes.
Tips for Achieving That Perfect Look at Home
Visual guide about Grilled chicken looks like perfection every time
Image source: creatingmyhappiness.com
You don’t need a professional kitchen or expensive equipment to make grilled chicken that looks like perfection. With a few simple techniques, you can achieve restaurant-quality results in your own backyard.
Start with quality ingredients. Fresh, well-trimmed chicken makes a big difference. Avoid pre-packaged, water-injected chicken, which can steam instead of sear due to excess moisture.
Pat the chicken dry before seasoning. Use paper towels to remove any surface moisture. This ensures a better sear and more even browning.
Season generously. Salt not only adds flavor but also helps draw out moisture, which then reabsorbs into the meat, enhancing juiciness. Let the chicken sit with salt for 15–30 minutes before grilling for best results.
Use a meat thermometer. Visual cues are helpful, but the only way to know for sure that chicken is safe to eat is to check the internal temperature. Insert the probe into the thickest part, avoiding bone. It should read 165°F (74°C).
Let it rest. After grilling, transfer the chicken to a plate and let it rest for 5–10 minutes. This allows the juices to redistribute, keeping the meat moist and giving it that glossy, appetizing sheen.
Marinades and Rubs: Boosting Flavor and Appearance
Marinades and rubs do more than add flavor—they can enhance how grilled chicken looks. Acids like lemon juice, vinegar, or yogurt help tenderize the meat and promote browning. Oils in marinades create a barrier that prevents sticking and helps develop a glossy crust.
Dry rubs with sugar, paprika, or chili powder can caramelize on the grill, adding color and depth. Just be mindful of sugar content—too much can lead to burning.
For a quick marinade, try olive oil, garlic, lemon juice, and herbs. Let the chicken soak for at least 30 minutes, or up to 4 hours in the fridge. The result? Chicken that’s flavorful, juicy, and beautifully browned.
Grill Maintenance: The Foundation of Great Grilling
A clean grill is essential for great-looking chicken. Grease and food residue can cause flare-ups, uneven cooking, and sticking. Clean your grates before each use with a wire brush. For stubborn buildup, use a grill cleaner or a mixture of baking soda and water.
Oil the grates lightly before cooking to prevent sticking. Use tongs and a folded paper towel dipped in oil to wipe the surface.
Preheat the grill for at least 10–15 minutes. This ensures even heat distribution and helps create those perfect grill marks.
Common Mistakes That Ruin the Look of Grilled Chicken
Even experienced cooks make mistakes that affect how grilled chicken looks. Avoid these common pitfalls to keep your chicken looking flawless.
One of the biggest mistakes is flipping too often. Let the chicken sear for a few minutes before flipping. Constant flipping prevents browning and leads to a pale, unappealing surface.
Another error is grilling over too high heat. While high heat is good for searing, it can burn the outside before the inside is done. Use a two-zone setup to control the cooking process.
Don’t skip the rest. Cutting into chicken immediately after grilling lets the juices escape, leaving it dry and less visually appealing.
Finally, avoid overcrowding the grill. Give each piece space so heat can circulate. Overcrowding leads to steaming, not searing.
Conclusion: When Grilled Chicken Looks Like Perfection, It Tastes Like It Too
Grilled chicken looks like perfection every time when it’s cooked with attention to detail, proper technique, and a little bit of science. From the golden-brown crust to the juicy interior, every visual cue tells a story of flavor, care, and skill.
By understanding the role of heat, timing, and moisture, you can consistently produce chicken that’s not only safe and delicious but also a feast for the eyes. Whether you’re grilling for a family dinner or a summer barbecue, aiming for that perfect look will elevate your meal and impress your guests.
So fire up the grill, pat that chicken dry, and watch it transform into a golden, sizzling masterpiece. Because when grilled chicken looks like perfection, it’s more than just food—it’s an experience.
Frequently Asked Questions
How do I know when grilled chicken is done by looking at it?
While color and texture are helpful, the only sure way is to use a meat thermometer. Chicken is done at 165°F (74°C). Visually, it should be opaque, not translucent, with clear juices.
Should I grill chicken with the skin on or off?
Skin-on chicken tends to look better and stay juicier. The skin crisps up and adds flavor. If you prefer skinless, brine the chicken to retain moisture.
Why does my grilled chicken stick to the grates?
Sticking usually happens when the grill isn’t hot enough or the grates aren’t clean or oiled. Preheat well, clean the grates, and oil them before cooking.
Can I get grill marks on a gas grill?
Yes! Gas grills can produce great grill marks if preheated properly. Use high heat and avoid moving the chicken too soon.
Is it safe to eat slightly pink grilled chicken?
Chicken is safe at 165°F (74°C), even if it looks slightly pink near the bone. Use a thermometer to confirm doneness, not color alone.
How long should I let grilled chicken rest?
Let grilled chicken rest for 5–10 minutes after cooking. This helps retain juices and improves both texture and appearance.


