
Yes, you absolutely can roast chicken in a Dutch oven—and it’s one of the best ways to do it. The heavy, oven-safe pot locks in moisture, promotes even browning, and creates a crispy skin while keeping the meat tender and flavorful. Whether you’re a beginner or a seasoned cook, this method delivers restaurant-quality results at home with minimal effort.
Key Takeaways
- Yes, Dutch ovens are ideal for roasting chicken: Their thick walls and tight-fitting lids create a moist, even cooking environment that mimics professional ovens.
- Even heat distribution prevents hot spots: Unlike thin pans, Dutch ovens heat evenly, ensuring every part of the chicken cooks uniformly.
- Crispy skin and juicy meat are achievable: Starting with a hot oven and finishing uncovered delivers golden skin without drying out the meat.
- One-pot convenience saves time and cleanup: Roast your chicken and vegetables together in the same pot for a complete meal with fewer dishes.
- Seasoning and prep matter most: Dry brining, proper seasoning, and letting the chicken come to room temperature before roasting make a big difference.
- Use a meat thermometer for perfect doneness: Insert it into the thickest part of the thigh—165°F (74°C) is the safe internal temperature.
- Rest the chicken after roasting: Letting it rest for 10–15 minutes allows juices to redistribute, resulting in more flavorful, moist meat.
Quick Answers to Common Questions
Can I roast a whole chicken in a Dutch oven?
Yes, absolutely! A Dutch oven is one of the best tools for roasting a whole chicken, thanks to its even heat distribution and moisture-retaining lid.
What temperature should I roast chicken in a Dutch oven?
Preheat your Dutch oven to 425°F (220°C). Roast covered for 30–40 minutes, then uncovered until the internal temperature reaches 165°F (74°C).
Do I need to add liquid when roasting chicken in a Dutch oven?
Adding ½ to 1 cup of liquid (like broth or wine) helps create steam and keeps the meat moist, but it’s not strictly necessary.
How long does it take to roast a chicken in a Dutch oven?
A 4-pound chicken typically takes 60–75 minutes total: 30–40 minutes covered, then 20–30 minutes uncovered.
Can I roast vegetables with the chicken in a Dutch oven?
Yes! Place chopped vegetables like carrots, potatoes, and onions around the chicken. They’ll absorb the flavorful juices and make a delicious side dish.
📑 Table of Contents
Why Roasting Chicken in a Dutch Oven Works So Well
Roasting a whole chicken might seem like a simple task—just throw it in the oven and wait. But if you’ve ever ended up with dry breast meat or undercooked thighs, you know it’s trickier than it looks. That’s where the Dutch oven comes in. This versatile, heavy-duty pot isn’t just for stews and soups—it’s a secret weapon for roasting poultry.
The magic lies in the design. Dutch ovens are typically made from cast iron or enameled cast iron, materials known for their excellent heat retention and even distribution. Unlike thin baking sheets or roasting pans that can create hot spots, a Dutch oven surrounds the chicken in consistent, gentle heat. This means the bird cooks evenly from all sides, reducing the risk of overcooked or undercooked sections.
But there’s more. The tight-fitting lid traps steam, creating a mini convection oven effect. This keeps the meat incredibly moist, especially during the first part of cooking. Then, when you remove the lid for the final stretch, the skin crisps up beautifully. It’s the best of both worlds: tender, juicy meat and golden, crackling skin.
And let’s not forget convenience. Roasting a chicken in a Dutch oven often means you can cook your vegetables right alongside it—carrots, potatoes, onions, and herbs all nestle around the bird, absorbing its rich juices. That’s one pan, one cleanup, and a full meal ready to serve.
Whether you’re cooking for a weeknight dinner or a holiday feast, the Dutch oven method delivers reliable, impressive results. It’s no wonder professional chefs and home cooks alike swear by it.
Choosing the Right Dutch Oven for Roasting Chicken
Visual guide about Can You Roast Chicken in a Dutch Oven for Perfect Results
Image source: 1898mama.com
Not all Dutch ovens are created equal, and choosing the right one can make a big difference in your roasting success. The good news? Most standard Dutch ovens are perfectly suited for roasting a whole chicken, but a few key features will help you get the best results.
First, consider the material. Cast iron Dutch ovens are the gold standard. They retain heat exceptionally well and can handle high oven temperatures—up to 500°F (260°C) or more. Enameled cast iron is a close second. It offers the same heat retention as bare cast iron but with a non-reactive, easy-to-clean surface that won’t rust or react with acidic ingredients. Both are excellent choices for roasting chicken.
Size matters too. For a standard 3.5- to 5-pound (1.6–2.3 kg) chicken, a 5- to 7-quart Dutch oven is ideal. This gives the bird enough room to roast without touching the sides, allowing heat to circulate freely. If the pot is too small, the chicken may steam instead of roast, leading to soggy skin. Too large, and the drippings may burn or evaporate too quickly.
Look for a model with a heavy, tight-fitting lid. A well-sealed lid is crucial for trapping moisture during the first phase of cooking. Some Dutch ovens come with self-basting lids—those with spikes or ridges on the underside that drip condensation back onto the food. These can enhance juiciness, though they’re not essential.
Brands like Le Creuset, Staub, Lodge, and Crock-Pot are popular and reliable. While enameled versions tend to be pricier, they’re worth the investment if you plan to use your Dutch oven frequently. Lodge offers a more budget-friendly cast iron option that performs just as well for roasting.
Finally, make sure your Dutch oven is oven-safe. Most are, but always check the manufacturer’s guidelines. Avoid using non-stick or lightweight Dutch ovens at high temperatures, as they may warp or degrade.
Enameled vs. Bare Cast Iron: Which Is Better?
When it comes to roasting chicken, both enameled and bare cast iron Dutch ovens deliver excellent results. But each has its pros and cons.
Enameled cast iron is non-reactive, meaning it won’t interact with acidic ingredients like wine, tomatoes, or vinegar. This makes it ideal if you’re deglazing the pot after roasting to make a pan sauce. It’s also easier to clean and maintain—no seasoning required. However, it can chip if dropped or exposed to sudden temperature changes.
Bare cast iron, on the other hand, requires seasoning to maintain its non-stick surface, but it’s incredibly durable and can handle extreme heat. It’s also more affordable. Some cooks prefer it for high-heat roasting because it develops a beautiful crust on the chicken.
For most home cooks, enameled cast iron is the safer, more convenient choice. But if you’re comfortable maintaining a seasoned pan, bare cast iron is a fantastic option.
Size Guide: Matching Your Chicken to Your Pot
Here’s a quick guide to help you match your chicken size to your Dutch oven:
- 3–4 lb (1.4–1.8 kg) chicken: 5-quart Dutch oven
- 4–5 lb (1.8–2.3 kg) chicken: 6- to 7-quart Dutch oven
- 5–6 lb (2.3–2.7 kg) chicken: 7-quart or larger Dutch oven
If you’re roasting a smaller bird or just chicken parts (like thighs and drumsticks), a 4- to 5-quart pot may suffice. Always leave at least an inch of space around the chicken for proper air circulation.
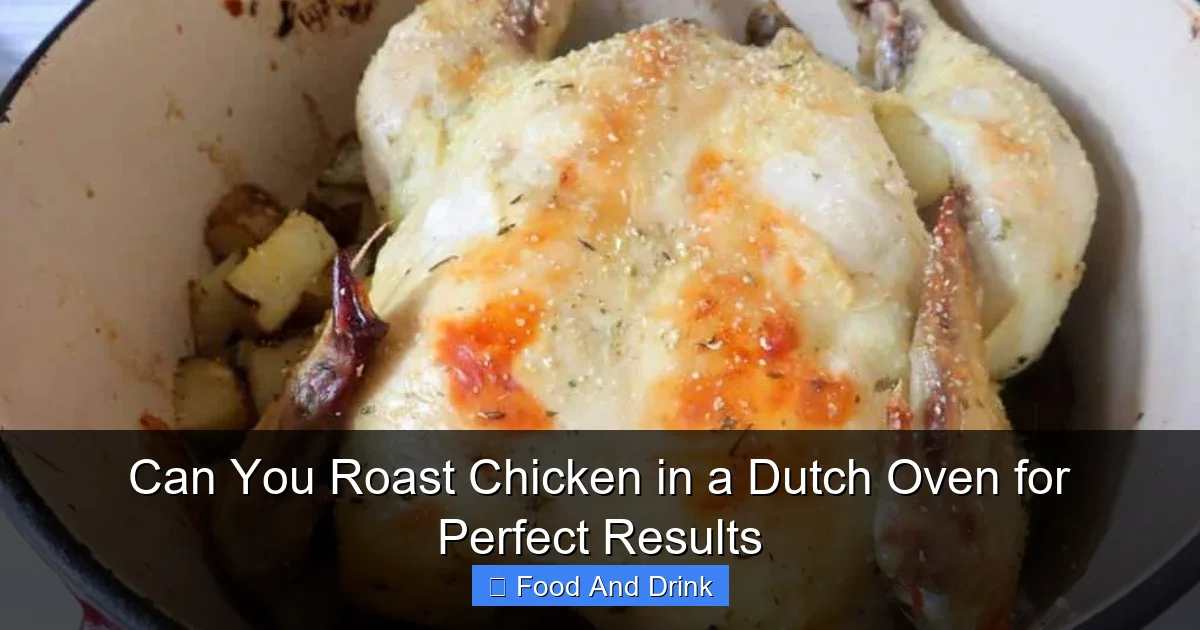
Step-by-Step Guide to Roasting Chicken in a Dutch Oven

Visual guide about Can You Roast Chicken in a Dutch Oven for Perfect Results
Image source: wearychef.com
Now that you’ve got the right pot, it’s time to roast that chicken. Follow this simple, foolproof method for juicy, flavorful results every time.
Step 1: Prep the Chicken
Start with a whole, fresh or thawed chicken. Pat it completely dry with paper towels—this is crucial for crispy skin. Moisture is the enemy of browning, so don’t skip this step.
Season generously inside and out with salt and pepper. For extra flavor, use a dry brine: rub salt all over the chicken, place it on a rack in the fridge, and let it sit uncovered for 12–24 hours. This not only seasons the meat deeply but also dries out the skin, ensuring maximum crispiness.
Let the chicken come to room temperature for 30–60 minutes before roasting. Cold meat straight from the fridge won’t brown evenly and may cook unevenly.
Step 2: Preheat the Dutch Oven
Place your Dutch oven (with the lid on) in the oven and preheat to 425°F (220°C). This step is important—starting with a hot pot helps sear the chicken and jumpstarts the browning process. Never add cold food to a hot Dutch oven, as it can cause cracking in enameled models.
Step 3: Add Aromatics and Vegetables (Optional)
Once the oven and pot are hot, carefully remove the Dutch oven (use oven mitts—it’s extremely hot!). Place the chicken breast-side up in the center.
Surround it with chopped vegetables like onions, carrots, celery, and garlic. Add fresh herbs such as thyme, rosemary, or sage. These will infuse the chicken with flavor and make a delicious side dish.
For extra moisture and flavor, pour in ½ to 1 cup of liquid—chicken broth, water, or white wine. This creates steam during the covered phase, keeping the meat juicy.
Step 4: Roast Covered, Then Uncovered
Place the lid back on and return the Dutch oven to the oven. Roast covered for 30–40 minutes, depending on the size of your chicken. This traps steam and gently cooks the meat.
Then, remove the lid and continue roasting for another 20–30 minutes, or until the skin is golden brown and crispy. The uncovered phase is where the magic happens—the skin crisps up while the meat stays moist.
Step 5: Check for Doneness
Use a meat thermometer to check the internal temperature. Insert it into the thickest part of the thigh, avoiding the bone. The chicken is done when it reaches 165°F (74°C). If the breast is browning too quickly, loosely tent it with foil.
Step 6: Rest the Chicken
Once done, remove the Dutch oven from the oven and let the chicken rest, uncovered, for 10–15 minutes. This allows the juices to redistribute, ensuring every bite is moist and flavorful.
Step 7: Carve and Serve
Transfer the chicken to a cutting board and carve. Serve with the roasted vegetables and a drizzle of the pan juices for extra flavor.
Tips for Perfectly Juicy and Crispy Roasted Chicken

Visual guide about Can You Roast Chicken in a Dutch Oven for Perfect Results
Image source: somuchfoodblog.com
Even with the right method, a few extra tips can take your roasted chicken from good to extraordinary.
Dry Brining Is a Game-Changer
Dry brining—salting the chicken and letting it sit in the fridge—is one of the easiest ways to improve flavor and texture. Salt penetrates the meat, breaking down proteins and helping it retain moisture during cooking. It also dries the skin, which is essential for crispiness.
For best results, salt the chicken 12–24 hours in advance. Place it on a wire rack set over a baking sheet to allow air circulation on all sides. Cover loosely with paper towels and refrigerate.
Use a Meat Thermometer
Guessing when chicken is done is a recipe for dry meat. A meat thermometer takes the guesswork out of roasting. Insert it into the thickest part of the thigh, making sure it doesn’t touch the bone. 165°F (74°C) is the safe internal temperature.
Don’t Overcrowd the Pot
While it’s tempting to pack in lots of vegetables, overcrowding can lower the temperature inside the Dutch oven and lead to steaming instead of roasting. Stick to a single layer around the chicken, and choose vegetables that roast well—potatoes, carrots, onions, and fennel are great options.
Baste for Extra Flavor (Optional)
If you want even more flavor, baste the chicken with its own juices or melted butter during the last 10 minutes of roasting. Use a spoon or basting brush to coat the skin. This adds richness and helps the skin crisp up.
Make a Pan Sauce
Don’t waste those delicious drippings! After removing the chicken, place the Dutch oven on the stovetop over medium heat. Add a splash of wine or broth to deglaze, scraping up the browned bits. Simmer until reduced, then whisk in a tablespoon of butter for a rich, velvety sauce.
Experiment with Seasonings
While salt and pepper are classic, don’t be afraid to get creative. Try a spice rub with paprika, garlic powder, onion powder, and dried herbs. Or stuff the cavity with lemon halves, garlic cloves, and fresh herbs for aromatic flavor.
Common Mistakes to Avoid
Even experienced cooks can make mistakes when roasting chicken. Here are the most common pitfalls and how to avoid them.
Starting with a Cold Dutch Oven
Adding a cold chicken to a hot Dutch oven can cause thermal shock, especially in enameled models. Always preheat the pot with the lid on before adding the chicken.
Not Drying the Skin
Wet skin won’t crisp up. Always pat the chicken dry with paper towels before seasoning. For even better results, dry brine it overnight.
Overcooking the Breast
The breast cooks faster than the thighs. To prevent dryness, avoid overcooking. Use a thermometer and remove the chicken as soon as the thigh reaches 165°F (74°C). The breast will be safe to eat at a slightly lower temperature (around 160°F/71°C) and will continue to cook as it rests.
Skipping the Resting Period
Cutting into the chicken immediately after roasting lets all the juices escape, leaving dry meat. Always let it rest for 10–15 minutes before carving.
Using Too Much Liquid
While a small amount of liquid helps create steam, too much can lead to boiled chicken. Stick to ½ to 1 cup, and avoid submerging the chicken.
Not Using a Rack (Optional but Helpful)
Placing the chicken on a small roasting rack or bed of vegetables elevates it slightly, allowing heat to circulate underneath. This helps the skin crisp up evenly.
Serving Suggestions and Leftover Ideas
A perfectly roasted chicken is delicious on its own, but it’s also a versatile base for countless meals.
Serve With:
- Roasted vegetables from the pot
- Crusty bread to soak up the juices
- A simple green salad with vinaigrette
- Mashed potatoes or rice pilaf
- A glass of crisp white wine or sparkling water with lemon
Leftover Ideas:
- Chicken salad: Shred the meat and mix with mayo, celery, grapes, and herbs.
- Chicken soup: Simmer the bones with vegetables and herbs to make broth, then add shredded meat.
- Tacos or wraps: Use leftover chicken in tacos with salsa, avocado, and lime.
- Grain bowls: Add chicken to quinoa or farro with roasted veggies and a tahini dressing.
- Sandwiches: Slice the breast and serve on sourdough with arugula and mustard.
Conclusion
Roasting chicken in a Dutch oven isn’t just possible—it’s one of the best methods for achieving juicy, flavorful, and perfectly cooked poultry. The pot’s superior heat retention, even cooking, and moisture-trapping lid create ideal conditions for a golden, crispy skin and tender meat. With a little prep and attention to detail, you can turn a simple whole chicken into a show-stopping centerpiece for any meal.
Whether you’re cooking for a family dinner or a special occasion, the Dutch oven method delivers consistent, impressive results. From dry brining to using a meat thermometer, small steps make a big difference. And with the added bonus of one-pot cooking and easy cleanup, it’s a technique worth mastering.
So the next time you’re planning a roast chicken dinner, reach for your Dutch oven. You’ll be amazed at how effortless and delicious it can be.
🎥 Related Video: Roasted Chicken In Dutch Oven
📺 This Is What We Do
Welcome to This Is What We Do. Today, we are making roasted chicken in dutch oven. We hope you like the video and consider …
Frequently Asked Questions
Can I use a non-enameled cast iron Dutch oven for roasting chicken?
Yes, a well-seasoned bare cast iron Dutch oven works great for roasting chicken. Just make sure it’s properly seasoned to prevent sticking and handle it carefully to avoid rust.
Should I cover the chicken the entire time?
No. Start covered to trap steam and keep the meat moist, then remove the lid for the last 20–30 minutes to crisp the skin.
What if my chicken skin isn’t crispy?
This usually happens if the skin wasn’t dried thoroughly before roasting or if the pot wasn’t hot enough. Pat the chicken dry and preheat the Dutch oven properly.
Can I roast chicken parts instead of a whole bird?
Absolutely! Chicken thighs, drumsticks, or breasts roast beautifully in a Dutch oven. Adjust cooking time—parts usually take 35–45 minutes at 425°F (220°C).
Is it safe to use a Dutch oven at high temperatures?
Most Dutch ovens are oven-safe up to 500°F (260°C) or higher. Always check the manufacturer’s guidelines, especially for enameled models.
How do I clean my Dutch oven after roasting chicken?
Let it cool, then wash with warm, soapy water. For stuck-on bits, soak briefly or use a non-abrasive scrubber. Avoid harsh detergents on enameled surfaces.